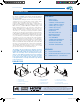
C3X Lumis HOST manuale d’uso ed installazione user and installation manual bedienungs und wartungsanleit manuel d’utilisation et d’installation manual de uso e instalación manual de utilização 使用及安装手册 ВИДЕОПРОЕКТОР COPERTINA.
C3X Lumis HOST 1 INTRODUCTION CONTENTS The appliance has been subjected to exhaustive operating tests by SIM2 to guarantee the highest quality, The projector bulb life should thus initially be around 30-60 hours. In addition to the customary checks, the Quality Control department also runs additional statistical tests before shipment.
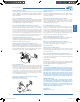
LUMIS HOST EN.pdf 12-01-2009 17:59:56 C3X Lumis HOST 2 SAFETY WARNINGS CAUTION To reduce the risk of electrocution, disconnect the power supply cable on the rear panel before removing the top cover of the projector. For technical service refer to trained personnel authorised by the manufacturer. LAMP WARNING If the lamp suddenly ‘fails’ with a loud ‘pop’ Switch off the Projector & HOST and air the room thoroughly.
C3X Lumis HOST Disconnect the unit from the mains power during electrical storms and when not in use. To prevent damage from lightning strikes in the vicinity, disconnect the unit during storms or when the system is going to be left unused for a long time. Do not touch internal parts of the units. Inside the housing there are electrical parts carrying dangerously high voltages and parts operating at high temperature. Never open the housing.
C3X Lumis HOST 3 CONTENTS OF THE PACKAGING Inside the packaging you will find: - Projector - HOST System - Remote control 2 - Four 1.5V AAA type batteries for the remote control - 3 mains cables for the projector (EU, UK, USA) - 3 mains cables for the Host system (EU, UK, USA) - 1 cable with 3 optical fibres 2 - LiveColors Calibrations CD 1 - 2 brackets to attach the Host system to the rack - Instruction booklet.
C3X Lumis HOST 4.2 CONTROL (PROJECTOR KEYPAD) ▲-▼-◀-▶ Browse through the On Screen Display menus and set parameters Opens the On Screen Display permits browsing though the various pages Sets the unit to stand-by ENGLISH MENU ESC INPUT Disables the On Screen Display Opens the Input selection menu 4.
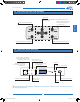
C3X Lumis HOST 5 CONNECTION PANEL CONTROL 18 13 15 17 11 12 LAN USB RS-232 HD-SDI AUDIO-OUT R/Pb B/Pb H/HV DVI-D B/Pb H/HV V 5 R/Pr G/Y B/Pb H/HV S-VIDEO 7 R/Pb V 10 8 6 3 VIDEO G/Y V 4 1 12V OUT G/Y 16 HDMI R/Pb 2 14 G/Y B/Pb H/HV 9 V COMPONENT / RGBS GRAPHICS RGB USB - RS232 INTERFACES (Control) LAN - RJ45 (Control) Projector and HOST system functions can be controlled remotely from a PC or other dedicated devices connected to the RS232 or USB connectors on t
C3X Lumis HOST 6 INSTALLATION • POSITIONING THE 2 UNITS The C3X Lumis HOST system is made up of two separate units (HOST and C3X Lumis projector), each of which have a power cable and are connected to each other by a 20 m long optical fibre cable. Ideally, the HOST system should be placed on the top of a cabinet. Make sure that the surface it stands on is stable and that there is sufficient space around it to permit good ventillation (at least 3 cm).
C3X Lumis HOST (7, 87 inc cm cm 20 20 (7, 87 inc he s) CONTROLLING THE 2 UNITS The remote control supplied (IR, infrared operation), permits full control of the system. It controls both the HOST™ system and the projector since both are equipped with an IR sensor on the front while the projector also has an IR receiver on the back. The two units are connected by a cable containing three optical fibres, each ending with an LC connector.
C3X Lumis HOST Configuring network functions by OSD (network setup): The “Network configuration” option in the “Setup” menu is displayed only when no signal is being displayed. 7 SWITCHING ON AND OFF The C3X Lumis HOST system consists of two units (HOST system and Projector) of which the former is also the system control centre.
C3X Lumis HOST IP Address Mode Static IP Dinamic IP (DHCP) IP Address: 172.031.127.055 Subnet Mask: 255.255.000.000 Gateway: DHCP Host Name DESCRIPTION OF THE NOTIFICATION MAIL SENT BY THE PROJECTOR If the email notification service is enabled, the projector will automatically send an email to the specified address when the following circumstances occur: 172.031.045.115 : sim2prj 1. Cooling fan error (Error Code 1) 2. Temperature too high (Error Code 2) 3. Lamp error (Error Code 3) 4.
C3X Lumis HOST 9 VIDEO CONNECTIONS ATTENTION: When switching between inputs the image is deliberately ‘frozen’ to allow time for the system to stabilize, during this time you may see color changes & noise on screen - this is perfectly normal and not a malfunction of the projector S-VIDEO (3-4) Fit a mini-DIN connector with an S-Video signal to this input. The corresponding output on the external device is normally identified by the labels S-VIDEO or Y/C.
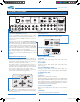
C3X Lumis HOST 10 ON SCREEN MENU All system functions can be operated from the keypad or remote control, with the aid of a complete, user-friendly on screen menu. INPUTS The input selection menu is opened by pressing 0 on the remote control or with the SOURCE key on the projector or HOST system keypads. To select an input, scroll through the list with the ▲ and ▼ keys until the required input is highlighted, then press ▶.
C3X Lumis HOST CONTRAST Use this control to adjust the images white level without affecting its dark areas. For correct adjustment it may prove useful to display a grey scale with at least twenty bands. Now try to increase the brightness of the white band as much as possible while ensuring that it can still be distinguished from the adjacent band with brightness slightly less than white.
C3X Lumis HOST IMAGE This menu features adjustments relating to picture position, aspect ratio, magnification etc. Menu With progressive HDMI signals, for all resolutions, “User” adjustment can be used only in decreasing mode: the increment mode is intentionally set to value “0”. Image Aspect Color Temperature Gamma Correction Dynamic Black Overscan Position Y/C Delay User 1, 2, 3: Use this option if none of the default aspects are satisfactory.
C3X Lumis HOST Gamma Correction Determines the systems response to the grey scale, emphasising or attenuating the different grades of brightness (blacks, dark, medium, light greys, whites) in the projected image. The projector has a range of gamma functions which enable you to display any image to the best effect for the type of video source, the ambient lighting and your subjective preferences. There are 3 sets of gamma curves: Standard (ST), Enhanced SIM2 (EN) and Graphics (GR).
C3X Lumis HOST imperfections can be moved outside the displayed area. Setting the parameter to 2.2, typically yields pleasant, wellcontrasted images. For most common video sources, the overscanning setting may be from 0 (no overscan) to 32 (highest setting). The resulting image always maintains the selected aspect SETUP Y/C DELAY ORIENTATION Reverses the image vertically and horizontally to best fit the installation: i.e. desktop front, ceiling front, desktop rear and ceiling rear.
C3X Lumis HOST In STANDBY mode the projector remains in STANDBY mode and awaits the power-up command from the remote control or keypad. VARIABLE IRIS The C3X Lumis HOST features a variable iris which allows users to choose between High Contrast or Optimum Picture modes. The Iris control is accessed via the OSD. Press Menu +/- on the remote control repeatedly, until the ‘Setup’ page is displayed. ENGLISH Open: Use this setting to get optimum performance from the projector.
C3X Lumis HOST The main page displays all the source inputs physically connected to the projector. You can delete any inputs which are not in use. To do this, select the input in the pull down menu which appears when you press ◀, and choose whether to enable or disable the input. Enabling or disabling of sources will automatically cause the renumbering of the remaining active inputs. Active video signal sources (shown in the input selection menu) are ticked.
C3X Lumis HOST OSD DISPLAY TIMEOUT Determines the On Screen Display timeout after the last event (adjustment using remote control or keypad). The adjustment is made using the ◀ (decrease) and ▶ (increase) keys within a 6-200 second timeframe. Memorie 0 1 2 3 4 5 6 7 OSD POSITION Positions the On Screen Display in a particular area of the projected image. The OSD can be positioned using the arrow keys for fine adjustments or keys 1...9 on the remote control to select one of 9 preset positions.
C3X Lumis HOST mote control (or, when the On Screen Display is not enabled, the ▶ key on the keypad). 12 TROUBLESHOOTING GUIDE QUICK MENUS The quick menus provide access to the main adjustments that affect image quality without opening the main menu. BRIGHTNESS, CONTRAST, COLOUR, TINT, SHARPNESS, FILTER and NOISE REDUCTION adjustments appear at the bottom of the screen one after the other when the ▼ and ▲ keys are pressed.
ENGLISH C3X Lumis HOST_ EN.
C3X Lumis HOST_ EN.
C3X Lumis HOST 14 TECHNICAL SPECIFICATIONS GENERAL: PROJECTOR Input signals: • 2 COMPOSITEVIDEO (CVBS) gilded RCA type connectors 1.0 Vpp / 75 Ω, negative synchronisation • 2 S-VIDEO (Y/C) 4 pin mini-DIN connectors Y: 1.0 Vpp / 75 Ω, negative synchronisation C: 0.286 Vpp / 75 Ω, [NTSC burst rated level] 0.3 Vpp / 75 Ω [PAL, SECAM burst rated level] • 1 SETS OF 5 BNC CONNECTORS (YPRPB/RGB) • 3 SETS OF 5 RCA CONNECTORS (YPRPB/RGB) - Component signal Y: 1.
APPENDIX PROJECTION DISTANCES INSTALLATION INSTRUCTIONS C3X Lumis DIMENSIONS - HOST DIMENSIONS C3X Lumis HOST - Appendice.
C3X Lumis HOST APP.1 PROJECTION DISTANCES 16:9 Metric Measure PROJECTION DISTANCE SCREEN T1 Screen Size (Diagonal) Height offset* (Ho) T3 T2 Screen Width Screen Height Min Projection Max Projection Min Projection Max Projection Min Projection Max Projection Distance Distance Distance Distance Distance Distance Min. Offset Max.
C3X Lumis HOST APP.1 PROJECTION DISTANCES 2.35.1 Metric Measure PROJECTION DISTANCE SCREEN T1 Screen Size (Diagonal) Screen Width Height offset* (Ho) T3 T2 Screen Height Min Projection Max Projection Min Projection Max Projection Min Projection Max Projection Distance Distance Distance Distance Distance Distance Min. Offset Max.
C3X Lumis HOST APP.2 INSTALLATION INSTRUCTION (VERTICAL SHIFT) To install the C3X Lumis HOST system correctly place the projector so that the projected image completely fills the screen. Ideally, to avoid image distortion, the projector should be positioned perfectly perpendicular to the projection screen, as shown in the figure below. The centre of the projection lens should be lined up with the centre of the projection screen.
C3X Lumis HOST VERTICAL SHIFT (ASSUMING +50% OFFSET) If it is not possible to position the projector perpendicular to the projection screen (with the centre of the lens in line with the centre of the screen) you can use the mechanical shift to move the projected image either above or below the centre of the projection lens.
C3X Lumis HOST APP.3 HOST DIMENSIONS (unit of measure: mm + inches) 350 (11,48) 90 (2,95) 80 (2,62) 40 (1,31) 40 (1,31) 350 (11,48) 438 (14,37) 10 (0,39) 49,9 (1,92) 165 (6,5) 289 (11,37) 301 (11,85) APP.3 PROJECTOR DIMENSIONS (unit of measure: mm + inches) 313 (10,26) 255 (8,36) 122 (4,01) 210 mm 458,6 (15,02) 210 (6,88) 128 (4,19) 455 (14,92) 6 6 C3X Lumis HOST - Appendice.
SIM2 Multimedia S.p.a. Viale Lino Zanussi, 11 33170 Pordenone - ITALY Phone +39,434,383,253-256 Fax +39.434.383260-261 www.sim2.com e-mail: info@sim2.it SIM2 USA Inc. 10108 USA Today Way 33025 Miramar FL - USA Phone +1.954.4422999 Fax +1.954.4422998 www.sim2usa.com e-mail: sales@sim2usa.com SIM2 Deutschland GmbH Arndtstrasse 34-36 - D-60325 Frankfurt Am Main Phone 0800.800.7462 (Germany only) Int. Phone: +49-163-500 7462 Fax 0800.900.7462 www.sim2.de - e-mail: info@sim2.