C3X Lumis manuale d’uso ed installazione user and installation manual bedienungs und wartungsanleit manuel d’utilisation et d’installation manual de uso e instalación manual de utilização 使用及安装手册 ВИДЕОПРОЕКТОР COPERTINA.
HT5000E - EN.
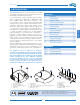
C3X Lumis 1 INTRODUCTION The C3X Lumis projector uses the maximum in signal processing technology as well as the innovative DLP™ 3 chip 1080p and a refined optical system. It comes with inputs (1 Video Composite input, 1 S-Video input, 1 Component or RGB input, 1 RGB graphic input and 2 HDMI™ inputs) which allow connection to the most disparate sources, both analogue and digital: DVD readers, video recorders, satellite and terrestrial receivers, computers, videogame consoles, video cameras etc.
C3X Lumis 2 SAFETY WARNINGS CAUTION To reduce the risk of electrocution, disconnect the power supply cable on the rear panel before removing the top cover of the projector. For technical service refer to trained personnel authorised by the manufacturer. LAMP WARNING If the lamp suddenly explodes with a loud bang, turn off the projector immediately and air the room thoroughly before using it. Do not attempt to replace the bulb: contact your local service centre.
C3X Lumis Place the unit on a stable surface. Place the projector on a stable surface or use the ceiling mounting bracket provided. Never place the projector on its side or rear, on the lens or top panel. lation operations. Pull the plug, not the cable, to disconnect the unit from the mains. Use only the specified power supply. Connect the units to a mains electrical supply with rated voltage of between 100-240 VAC, 50/60 Hz and equipped with a protective earth connection.
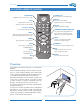
C3X Lumis 3 PACKAGE CONTENTS 3 The packing box contains the following: - Projector 4 - Remote control - Four 1.5V AAA type batteries for the remote control 2 - Three network cables for the projector (EU, UK, USA) - CD LiveColors Calibration - Instruction booklet - Three jacks for the 12V connections. !! CAUTION: 1 If any of the accessories are missing, please contact your dealer as soon as possible. Handle the packaging with care. 4.
C3X Lumis 4.2 CONTROL (REMOTE CONTROL) STANDBY / ON Places the projector in standby mode. Backlighting Backlights the keys on the remote control. INPUT Displays input selection menu. Switches the panel on from Standby KEYS 0-9 Selects the sources directly. Switches the panel on from Standby. LIGHT ESCAPE Disables the On-Screen Display. Test Pattern - ENTER Access the input selection menu MENU Opens the On-Screen Display menus and permits browsing though the various pages.
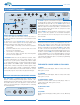
C3X Lumis 5 CONNECTION PANEL 6 HDMI 1 5 R/Pr HDMI 2 G/Y 3 B/Pb 12v TRIG 1 Max 100mA S-VIDEO Max 100mA SOURCE/ Connect the cables from the video sources, any serial cable from an external control device to the rear panel of the C3X Lumis. To get the most out of the C3X Lumis system, make connections to the various signal sources using quality cables made specifically for video applications.
C3X Lumis 6 INSTALLATION Use the motorised focus, by pressing the FOCUS key on the remote control, to obtain the highest definition of the projected image; correct focussing should allow each individual pixel composing the projected image to be distinguishable on approaching the screen.
C3X Lumis 1 2 2 3 It is possible to install an anamorphic lens in the frontal part of the projector. The lens control commands of the anamorphic lens can be found at the TRIG3 output located at the back of the projector. It is possible to use a hideaway motorized screen. The activation switch can be provided using output TRIG1 (+12V) located on the back of the projector. This output is activated (voltage +12 V DC) when you turn the projector on.
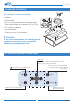
C3X Lumis The air intake and outlet are positioned on the sides of the projector, and it is essential that these air vents are not obstructed. SIM2 recommends that you leave 20cm free space on each side. If the projector must be installed inside a box or a confined space, it must be fed cool air in order maintain good ventilation. Insufficient ventilation causes the projector to overheat, and this can lead to the projector switching off randomly and may damage the lamp, significantly reducing its life.
C3X Lumis If you use the RGB inputs you can select YPrPb video mode. The RGB signals may have composite synchronisation on the green signal (RGsB), composite synchronisation on the HV signal. Connect the R, G, B outputs of the source to the respective R, G, B inputs of the C3X Lumis system (taking care not to invert the positions) and any synchronisation signals to the HV.
C3X Lumis PICTURE IMAGE SETUP 2. Access to the functions in the submenU MENU Brightness 50 Contrast 60 Colour 50 Tint 12 (available submenus) Video Sharpness Access the palette of the desired menu by using keys MENU, MENU + or MENU-. Place yourself on the parameter of which you wish to explore the sub-menu using keys ▲▼. Press the INPUT/ key of the projector or the remote control to access the sub-menu.
C3X Lumis ensuring that it can still be distinguished from the adjacent band with brightness slightly higher than black. Alternatively use a scene composed of black objects alongside other dark coloured objects and try to ensure that all the objects can be separately identified. CONTRAST Use this control to adjust the image's white level without affecting its dark areas. For correct adjustment it may prove useful to display a grey scale with at least twenty bands.
C3X Lumis select a different aspect for each source: the selected aspect ratio will be automatically applied the next time the relative source is displayed. You can also select the required aspect ratio from the remote control by repeatedly pressing the key or by pressing the key and one of the number keys (1...9).
C3X Lumis Each of these has 9 available preset settings of the white balance. To access the white balance adjustment menu it is necessary to press key 2 on the remote control. The default settings are: STANDARD applies a certain white balance depending on the standard selected in column “1 RGB”: HIGH - MEDIUM - LOW (default white balance levels); NATIVE (the machine's native white balance); D75 - D65 - D50 - C standard CIE illuminants; subjective preferences.
C3X Lumis Dynamic Black The C3X LUMIS allows the image contrast characteristics to be customised both by working a Variable Iris, which is set according to the brightness of the room during projection, and by enabling the Dynamic Black function which activates the operation of another Iris, this moves dynamically based on the informative content of the image being projected, considerably increasing the level of black and the depth and detail of the images, most of all in the parts with low and medium bright
C3X Lumis INITIAL SETTINGS Resets the projector to its initial factory settings (except Position, Orientation, Y/C Delay, Zoom and Focus). Before performing this operation, confirmation is requested. Confirm? Variable Iris The C3X Lumis Lumis system is equipped with a "Variable Iris" which allows the user to choose between the best video settings and very high contrast settings. The Iris is controlled from the OSD. Press +/- on the remote control until the ‘Setup’ page appears.
C3X Lumis MENU PICTURE IMAGE SETUP in the pull-down menu and rename the source currently in use. This makes it easier to remember which source is connected to a given input; you can use up to 12 alphanumeric characters for the name (for further details, see Entering text).
C3X Lumis PICTURE IMAGE SETUP SOURCE INFORMATION When enabled (YES), each time the source is changed information regarding the signal type is displayed. If disabled (NO), no information on the source is displayed.
C3X Lumis REMOTE CONTROL - SPECIAL KEYS will be applied to the projected image, while a message will confirm that Memory has been applied. The memory will be associated with the particular source and signal type and will be automatically applied whenever that particular combination of source and signal type is selected. MEMORIES The main image parameters can be saved in separate sets of values (called MEMORIES) so that they can be subsequently applied as a group using a single command.
C3X Lumis INFO Displays the current operating status of the projector and information concerning the projected video/graphic signal. This function is displayed by pressing the key on the remote control (or, when the On Screen Display is not enabled, the ▶ key on the keypad). 11 TROUBLESHOOTING GUIDE NO POWER (LEDS ALWAYS OFF) • Check that the projector’s power switches are in position. • Check that the power cables are correctly connected to the projector’s power sockets.
C3X Lumis • • Check the state of the connection by interpreting the code displayed by the projector LEDs. Make sure the cooling air vents on the units are not blocked and that the room temperature is below 35°C. Incomplete image at edges • Check compatibility of the video or graphic signals with the technical specifications of the projector, and in particular, with the specifications of the selected input.
C3X Lumis 13 TECHNICAL SPECIFICATIONS ELECTRONICS GENERAL INFORMATION: PROJECTOR Input signals: • 1 COMPOSITE VIDEO (CVBS) gilded RCA type connectors 1.0 Vpp / 75 Ω, negative synchronisation • 1 S-VIDEO (Y/C) 4 pin mini-DIN connectors Y: 1.0 Vpp / 75 Ω, negative synchronisation C: 0.286 Vpp / 75 Ω, [NTSC burst rated level] 0.3 Vpp / 75 Ω [PAL, SECAM burst rated level] • 1 set of 4 RCA connectors (YPrPb/RGB H/V) - Component signal Y: 1.
APPENDIX PROJECTION DISTANCES INSTALLATION INSTRUCTIONS C3X Lumis DIMENSIONS C3X Lumis HOST - Appendice.
C3X Lumis APP.1 PROJECTION DISTANCES 16:9 Metric Measure PROJECTION DISTANCE SCREEN T1 Screen Size (Diagonal) Height offset* (Ho) T3 T2 Screen Width Screen Height Min Projection Max Projection Min Projection Max Projection Min Projection Max Projection Distance Distance Distance Distance Distance Distance Min. Offset Max.
C3X Lumis APP.1 PROJECTION DISTANCES 2.35.
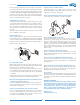
C3X Lumis APP.2 INSTALLATION INSTRUCTION (VERTICAL SHIFT) To install the C3X Lumis system correctly place the projector so that the projected image completely fills the screen. Ideally, to avoid image distortion, the projector should be positioned perfectly perpendicular to the projection screen, as shown in the figure below. The centre of the projection lens should be lined up with the centre of the projection screen.
C3X Lumis VERTICAL SHIFT (ASSUMING +50% OFFSET) If it is not possible to position the projector perpendicular to the projection screen (with the centre of the lens in line with the centre of the screen) you can use the mechanical shift to move the projected image either above or below the centre of the projection lens.
C3X Lumis APP.3 C3X Lumis DIMENSIONS (unit of measure: mm + inches) 255 (8,36) 313 (12,32) 128 (5,03) 122 (4,80) 210 (8,26) 458,6 (18,03) 210 (8,26) 455 (17,91) 66 C3X Lumis HOST - Appendice.
SIM2 Multimedia S.p.a. Viale Lino Zanussi, 11 33170 Pordenone - ITALY Phone +39,434,383,253-256 Fax +39.434.383260-261 www.sim2.com e-mail: info@sim2.it SIM2 USA Inc. 10108 USA Today Way 33025 Miramar FL - USA Phone +1.954.4422999 Fax +1.954.4422998 www.sim2usa.com e-mail: sales@sim2usa.com SIM2 Deutschland GmbH Arndtstrasse 34-36 - D-60325 Frankfurt Am Main Phone 0800.800.7462 (Germany only) Int. Phone: +49-163-500 7462 Fax 0800.900.7462 www.sim2.de - e-mail: info@sim2.de Phone +44.0182 5.