
User Manual


740P Dual-Mono Preamplifier
____________________________________________________________________________________
17
Remote Control Operation
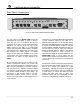
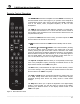
The MOON 740P Dual-Mono Preamplifier uses the ‘FRM-3’ full function, all
aluminum backlit remote control (figure 3). It operates on the Philips RC-5
communication protocol and is can be used with other MOON components
such as CD Players, DAC’s, Integrated Amplifiers, as well as other
Preamplifiers.
The ‘FRM-3’ remote uses three AAA batteries (included). To install them,
use a Phillips head screwdriver #1 to remove the three screws located on
the rear plate; insert the batteries in the correct direction and then screw the
rear plate back into place.
To operate the 740P with this remote control, you must first press the AMP
button located on the second row from the top.
The
power button switches the 740P between ‘Standby’ and ‘On’ mode.
The Balance W and Balance X buttons control channel balance; Pressing
the left arrow button causes a decrease in the volume level of the right
channel; pressing the right arrow button causes a decrease in the volume
level of the left channel. The balance adjustment operates in 1% increments.
When the balance is equal for both channels, “Å 00 Æ” will briefly appear in
the front panel display. The range for the balance control varies from “Å
100” for left channel only to “100 Æ” for right channel only.
The Input S and Input T buttons allow you to sequentially scroll through
each of the preamplifier’s inputs, performing the identical function as the
‘Input’ buttons located on the 740P’s front panel
The Mute button, located between the input and volume buttons, reduces
your volume setting to zero, performing the identical function as the ‘Mute’
button located on the 740P’s front panel.
The VolS and VolT buttons increase and decrease the volume level. From
30 to 80dB, holding either button down results in 1.0dB volume changes;
repeatedly pressing either button very briefly results in 0.1dB volume
changes.
The Disp button allows you to adjust the brightness of the digital display
window. It also provides you with the option of turning off the display,
performing the identical function as the ‘Display’ button located on the
740P’s front panel.
Figure 3: FRM-3 Remote Control