
Owner`s manual


MOON P-5 Dual-Mono Preamplifier
Connecting the PS-5 Power Supply
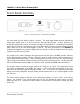
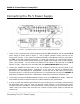
Figure 3: Connecting the Moon P-5 (top) to the PS-5 Power Supply (bottom)
1. There are two connections that must be made between the P-5 preamplifier and its separate PS-5
power supply as shown above in Figure 3; One for digital controller circuitry and one for the
analog audio circuitry. These cables are hard-wired directly to the P-5 and must be connected to
the PS-5 via the XLR terminated connectors. To avoid any confusion, the “Analog Power Supply”
uses a 3-pin connector (black colored shield) and the “Digital Power Supply” uses a 4-pin connector
(silver colored shield). You will notice two additional XLR sockets on the left side of the PS-5
labeled “TO PSP”; These are to be used ONLY with the optional MOON PSP Phono Section.
2. Connect the supplied AC power cable to the IEC receptacle, located on the rear panel of the
preamplifier’s power supply chassis. Alternatively, if you wish, you may use a dedicated high-
performance AC cable designed for preamplifiers. Ensure that the AC wall outlet you use has a
functioning ground. For the best sonic performance, it is preferable that you plug your MOON P-5
Dual-Mono preamplifier directly into a dedicated AC outlet and avoid using an extension cord.
3. You should never place the P-5 preamplifier directly on top of the PS-5 power supply. These two
units should be placed on separate surfaces to obtain maximum sonic performance.
4. In order to obtain the maximum performance from your audio system, we strongly recommend that
the detachable power cord not come into physical contact with any of the interconnect cables
running to and from your P-5. In the event that this can’t be avoided, you should ensure that any
cables coming into contact with each other are crossed at ninety degree angles to minimize the
contact area.
____________________________________________________________________________________
Connecting The PS-5 Power Supply 10