Owner’s Manual Series 380D 32-bit Digital-to-Analog Converter
80 D Digital to Analog Converter Important Safety Instructions 1. Read these instructions. 2. Keep these instructions. 3. Heed all warnings. 4. Follow all instructions. 5. Do not use this apparatus near water. 6. Clean only with a dry cloth. 7. Do not block ventilation openings. Install in accordance with the manufacturer’s instructions. 8. Do not install near any heat sources such as radiators, heat registers, stoves or another apparatus that produces heat. 9.
380 D Digital to Analog Converter Important Safety Instructions (cont’d) The lightning flash with the arrowhead symbol, within an equilateral triangle, is intended to alert the user to the presence of uninsulated “dangerous voltage” within the product’s enclosure that may be of sufficient magnitude to constitute a risk of electric shock to persons.
380 D Digital to Analog Converter Table of Contents Introduction .................................................... 6 Unpacking........................................................ 7 Installation & Placement ................................... 7 Front Panel Controls ......................................... 8 Rear Panel Connections ..................................... 9 SimLink™ .......................................................10 Operating the 380D .........................................
380 D Digital to Analog Converter Introduction Thank you for selecting the MOON Nēo 380D Digital-to-Analog Converter (DAC) as a part of your music/cinema system. This component has been designed to offer state-of-the-art high-end performance in an elegant package, while retaining all the sonic hallmarks on which Simaudio has made its reputation. We have spared no effort to ensure that it is amongst the finest DAC’s available in its class.
380 D Digital to Analog Converter Unpacking The Nēo 380D Digital-to-Analog Converter should be removed from its box with care.
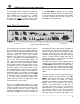
380 D Digital to Analog Converter Front Panel Controls Figure 1: Nēo 380D Front panel The front panel will look similar to Figure 1 (above). The large digital display window indicates the selected digital input (“D1” thru “D8”) its corresponding sampling frequency in kHz (“44.1” thru “192.0”) of the source material currently being played. The “Standby” button disengages all outputs from the rest of the Nēo 380D’s circuitry and turns off the digital display.
380 D Digital to Analog Converter A corresponding red LED, located to the right of the display window, will turn onbased on selected input type: “TOSLINK” (for “D6” and “D7”) , “S/PDIF” (“D3”, “D4” and “D5”), “AES/EBU” (“D1” and “D2”) or “USB” (“D8”). Note: you cannot connect a USB flash drive or external hard drive to the “D8” input.
380 D Digital to Analog Converter far right side is the main power switch (“0”=off, “1”=on), the IEC receptacle, labeled “AC Input” for the included AC power cord, and the “AC Fuse” socket cover. Connect the supplied AC power cable to the IEC receptacle. Ensure that the AC wall outlet you use has a functioning ground. For the best sonic performance, it is preferable that you plug your 380D directly into a dedicated AC outlet and avoid using an extension cord.
380 D Digital to Analog Converter Balanced Operation When using an unbalanced interconnect, the audio signal runs through both the center wire and the shield/ground wire. Any noise picked up by this interconnect (ie. nearby magnetic fields such as an AC power cord) will be reproduced by both the preamplifier and amplifier, then heard through the loudspeakers. Conversely, a balanced interconnect has three separate conductors; one for the ground and two for the actual signal.
380 D Digital to Analog Converter Remote Control Operation The Nēo 380D Digital-to-Analog Converter uses the ‘CRM-2’ full-function remote control (figure 6). It operates on the Philips RC-5 communication protocol and is can be used with other Simaudio MOON components. The ‘CRM-2’ remote uses two AA batteries (included). To install them, simply slide the back plate off in the direction of the arrow; insert the batteries in the correct direction and then replace the back plate.
380 D Digital to Analog Converter Remote operation with multiple MOON components Figure 4: Remote Operation with 12V Trigger In figure 4 we have a Nēo 380D, equipped with both the “MiND” and variable output options, connected to a 330A Amplifier via their respective 12V triggers (using a 1/8” mini-jack cable); The 12V trigger output on the 380D is connected to the 12V trigger input on the 330A.
380 D Digital to Analog Converter Specifications Configuration .................................................... Digital / Analog Power Supply Transformers ......... Power Supply Capacitance ................................. Digital Filter / Digital-to-Analog Converters ........... Frequency Response (full range) ......................... THD @1kHz, 0dBFS (A-weighted) ......................... Intermodulation Distortion ................................. Dynamic Range ....................................