User Guide COPYRIGHT© 2015 RIDDELL INC. ALL RIGHTS RESERVED. REPRODUCTION OF THIS MANUAL IN ANY MEDIUM WITHOUT THE EXPRESS PERMISSION OF RIDDELL IS PROHIBITED. LIMITED RIGHTS NOTICE TECHNICAL DATA/DOCUMENTATION P/N R64216 v3.
CONTENTS Introduction 4 Product Overview 5 MxEncoder ........................................................................................................................................................ 6 SRS Field Case .................................................................................................................................................. 7 SRS Computer............................................................................................................................
Viewing, Creating, and Editing Players .......................................................................................................... 26 RedZone .................................................................................................................................................. 26 HIT Analyzer............................................................................................................................................. 30 Warnings .......................................
INTRODUCTION For over 80 years, Riddell has been the recognized leader in helmet technology and innovation. Founded with the mission to make sports equipment safer, better, and easier to use, Riddell continues to address the evolving protective equipment needs of the athlete. Today, Riddell equipment is seen on football fields from coast-to-coast, protecting every level of player—from youth athletes to NFL professionals.
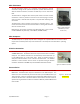
PRODUCT OVERVIEW The Sideline Response System is composed of the following components: 1. MxEncoder (Figure 1): Installed in players’ helmets to record head impact data and transmit to the Sideline. Figure 1: Revo Speed MxEncoder installed in Revo Speed helmet (Overliner removed for clarity). 2. SRS Field Case (Figure 2): Holds all required components of the SRS (excluding MxEncoders and Battery Charger). 3. SRS Computer: Pre-loaded with all required software to use the SRS. Figure 2: SRS Field Case 4.
8. Battery Charger (Figure 6): 40 position charging station for MxEncoder battery packs. Figure 6: Battery charger MxEncoder The MxEncoder, Figure 7, is the impact sensor and wireless radio worn by the athlete. Each MxEncoder is installed in a player’s helmet and contains six single-axis ±250g accelerometers that record head impacts as they occur and transmit that information in near real-time to the Sideline Controller.
SRS Field Case The SRS Field Case, Figure 9, is a protective carrier designed to provide convenient storage for all system components, protect electronics from adverse weather conditions, and make the SRS easy to use on and off the field. The Field Case is configured with internal power outlets and data transfer connections. Power is provided to the case via an external plug on the left side of the case. External 120v AC power is required while collecting data on the field.
Alert System The Alert System consists of two parts: Alert Pager: This is carried by sideline staff and displays the player number, impact magnitude, alert type and impact time for any impact that is above a player’s customizable alert threshold. Multiple Alert Pagers can be used with the same SRS. The Alert Pagers have a communication range of 1/8th of a mile. Alert Pager Transmitter: This is housed in the base of the Field Case and transmits valuable alert information to all available Alert Pagers.
SRS Software The SRS comes with two software applications, RedZone and HIT Analyzer. These software applications work together to allow you to create sessions, manage roster lists, collect impact data, monitor system performance, and analyze player and team impact data.
QUICKSTART GUIDE In order to ensure successful operation of the SRS, the following steps must be completed: Before Field Use 1. Install MxEncoders in each player’s helmet using supplied Velcro. NOTE: See the Equipment Guide for help on MxEncoder installation and the MxEncoder/Helmet compatibility chart. 2. Install charged battery pack into each MxEncoder. 3. Install the overliner if the helmet is supplied with one. 4.
EQUIPMENT GUIDE MxEncoder Installation To install Revolution IQ and Revolution Speed MxEncoders in a helmet: 1. Separate the Velcro strips attached to the back of the MxEncoder. 2. Remove the adhesive backings from the loop side. 3. Adhere to corresponding location on the inside of the helmet (Figure 15) Figure 15: Position of MxEncoder Velcro strips inside of helmet. 4. Position the MxEncoder in the helmet as shown in Figure 16. Figure 16: Initial position of the MxEncoder prior to inserting it fully.
6. Keeping the center of the U-shape MxEncoder lined up with the center of the helmet pads, gently work the front sections of the MxEncoder into each front area of the helmet firmly pressing the MxEncoder all the way down into the gap in the helmet (see Figure 17). Figure 17: Final position of the MxEncoder. 7. Install the HITs overliner (see Figure 18). Figure 18: Installation of the HITs overliner. P/N R64216 v3.
Use Each MxEncoder requires a Battery Pack to operate. Be sure the power cable is routed as shown in Figure 19 to prevent any damage to the wires. MxEncoders need to have routine battery changes in order to ensure proper function. It is recommended that the MxEncoder battery be replaced once a week during typical use. Follow the Best Practices Guide (Page 54) for help on performing battery changes. Changing a battery pack does not erase stored events on the MxEncoder’s on-board memory.
Field Case Sideline Controller (Only applicable to 900MHz only and Dual Mode Field Case models) The SRS Sideline Controller should be stored in the Field Case when not in use. The Sideline Controller is water resistant and can remain in use during inclement weather. To use the Sideline Controller follow the steps below: 1. Screw the bottom of Sideline Controller onto the Sideline Controller Mast. 2. Screw the Antenna onto the top of the Sideline Controller. 3.
SRS Data Synchronization is a process in which all impact data are automatically backed-up onto a remote SRS Data Server in the event there is damage to the SRS Computer hard drive. Daily data synchronization is strongly recommended. Synchronization only requires an active internet connection. To setup a wireless internet connection, follow the Windows Network Settings guide.
Figure 23: SRS Field Case cabling diagram Battery Charger Use The SRS Battery Charger is capable of charging 40 MxEncoder Battery Packs simultaneously. To use the Battery Charger, follow these steps: 1. Plug in the power cable to the side of the Charger and then into a 120V AC power outlet. 2. Confirm that all charger lights turn green momentarily then turn to red (this is a self-test). 3. Plug in MxEncoder Battery Packs into each of the charging ports. 4.
software on the SRS computer may cause the SRS Software to become non-functional and may void system warranty. Overview The SRS comes with two software applications: RedZone and HIT Analyzer. These complementary applications work together to allow you to create sessions, manage roster lists, collect impact data, monitor system performance, and analyze player and team impact data. The RedZone website can be accessed from your SRS laptop or from any other computer when an Internet connection is available.
1. Go to the website www.redzone.riddell.com, and you will be presented with the screen shown in Figure 24. Alternately you can use the RedZone shortcut on your SRS laptop. 2. Log onto RedZone by using your Riddell username and password. (This is the same username and password you provided when you ordered your SRS system). Figure 24: RedZone login screen. HIT Analyzer To start the HIT Analyzer application: 1. After you turn on your SRS computer the HIT Analyzer software will start automatically.
Figure 25: HIT Analyzer screen shown when you have more than one team using an SRS system. Figure 26: The HIT Analyzer in the process of synchronizing to the central database. Viewing, Creating, and Editing Sessions Both RedZone and HIT Analyzer allow you to create and edit Sessions. A Session is how you are able to associate events with a specific team activity (a practice, a game, etc.).
View Sessions Filter Sessions Session Display Mode Create New Session Refresh View Figure 27: RedZone Session Manager. The following information is given for each session: 1. ID#: This is an alphanumeric code automatically generated by HIT Analyzer or RedZone. Each ID# is unique and cannot be changed 2. Date: This is the date on which the session occurs 3. Team: This is the name of your team 4. Squad: All, Varsity or Jr. Varsity 5. Sub-Group: All, Defense, Offense or Special Teams 6.
Creating and Editing Sections To create a new session in RedZone, click on the “New Session” button shown in Figure 27. To edit an existing session, click on the ID# of the session you wish to edit (e.g. A-1-1173). Once you complete setting all desired parameters for the session, you may save your session by clicking the Save button on the top right of the screen, as shown in Figure 28. For creating or editing a session, there are four tabs: session, players, staff, and weather.
Figure 28: Session Tab in the RedZone Session Editor. These fields define the session parameters. PLAYERS TAB Under this tab, you are able to select which players will be participating in your session. A list of all players in your roster is provided in this tab, and all players are marked as participating in the session by default. If you wish to exclude any players from the session, deselect the checkbox next to their name.
HIT Analyzer Viewing Sessions Click on the “Session Manager” option on the toolbar to view your session as shown in Figure 30. View Sessions Create New Session Figure 30: HIT Analyzer Session Manager. To get to the Session Manager click on the “Session Manager” item on the toolbar. The session list can be sorted by clicking on any of the category headings. The HIT Analyzer session list cannot be filtered.
Creating and Editing Sessions To create a new session in HIT Analyzer, click on the “New Session” link on top of the session list as shown in Figure 30. To edit an existing session, click on the ID# of the session you wish to edit. Once you complete setting all desired parameters for the session, you may save your session by clicking the Save button on the bottom right of the screen, as shown in Figure 31. IMPORTANT: You cannot edit a session in the HIT Analyzer once it has started.
Figure 31: Session Tab in the Session Editor in HIT Analyzer. The fields shown define your Session’s parameters. Players Tab Under this tab, you are able to determine which players will be participating in your selected session. A list of all players on your roster is provided in this tab; all players are marked as participating in the session by default. If you wish to exclude any players from the session, deselect the checkbox next to their name.
Viewing, Creating, and Editing Players Both RedZone and HIT Analyzer allow you to view, create, and edit players. By creating a profile for each player you will be able to track impact data by position, alert type, etc. RedZone Viewing Players In RedZone click on the “Roster” option on the left hand side of the screen to view your roster as shown in Figure 33. The RedZone roster can include a complete history of all active and inactive players.
Creating and Editing Players To create a new player in RedZone, click on the “New Player” button shown in Figure 33. To edit an existing player, click on the player’s name. For creating or editing a player, there are four tabs for entering information: General, Team Membership, HIT System, and Emergency Info. Although only some fields are required, it is recommended that you fill in as much information as possible.
7. Website User, Username, Password, Confirm Password: If you want your player to have access to RedZone website, set the Website User option to “Yes” and enter a username and password for the player Team Membership Tab Under this tab you define a player’s team related information (jersey number, position, etc.). A description of all fields for this tab is provided below. 1. Team Membership Start Date: This is the date the player was added to your roster 2.
o Head Injury Criteria (HIC): Head impact severity metric that relates injury to head acceleration over time for a discrete time frame (15 ms). HIC is unit-less o HIT SeverityProfile (HITsp): A weighted combination of biomechanical inputs (peak linear acceleration, GSI, HIC, and impact location) used as a single impact metric to better quantify head impact severity. HITsp is unit-less o InSite Alert Protocol: InSite Alert Protocol has two types of impact Alerts, “Single Impact” and “Multiple Impact”.
HIT Analyzer Viewing Players To view your current roster, click on the “Roster Manager” option on in the menu bar. You will be presented with a screen like the one shown in Figure 35. By default the roster is sorted by the players’ last names. The roster list is capable of being sorted by any of the category headings as shown in Figure 35. The HIT Analyzer roster list cannot be filtered, and the list only displays currently active players (i.e. players who have not left the team).
NOTE: In HIT Analyzer you can create a new player during an active session and the player will be added to the currently running session ONLY. The player WILL NOT be added to other sessions you have created. The player must be added to these sessions manually. Figure 36: HIT Analyzer Roster Editor showing the fields available under the General tab. General Tab Under this tab you define a player’s basic personal information. A description of all fields under this tab is provided below. 1.
Team Membership Tab Under this tab you define a player’s team related information (jersey number, position, etc.). A description of all fields for this tab is provided below. 1. Team Membership Start Date: This is the date the player was added to your roster. This field is automatically populated in the HIT Analyzer. If you are creating a new player the field will be blank. NOTE: If you wish to create or edit a future player, you must use RedZone. 2.
o HIT SeverityProfile (HITsp): A weighted combination of biomechanical inputs (peak linear acceleration, GSI, HIC, and impact location) used as a single impact metric to better quantify head impact severity. HITsp is unit-less o InSite Alert Protocol: InSite Alert Protocol has two types of impact Alerts, “Single Impact” and “Multiple Impact”.
Do not use your helmet to butt, ram or spear an opposing player. This is in violation of the football rules, and such use can result in severe head or neck injuries, paralysis, or death to you and possible injury to your opponent. NO HELMET CAN PREVENT HEAD OR NECK INJURIES A PLAYER MIGHT RECEIVE WHILE PARTICIPATING IN FOOTBALL. Riddell SRS alerts the sideline to significant, single or multiple impacts that MAY result in a concussion or other head injury. Riddell SRS is NOT a medical device.
Monitoring Head Impact Exposure (HIT Analyzer Only) When you have a session defined and players assigned MxEncoders, you are ready to start collecting impact data. The following sections describe the process of collecting and viewing data and the viewing options available. Data Collection Overview Figure 37: HIT Analyzer data collection screen prior to downloading any impact data. The following steps outline the process of collecting impact data using HIT Analyzer. 1.
On the Player’s tab, two numbers are shown. The top number is the number of players who have communicated with the system and the bottom number is the total number of players that have been instrumented with MxEncoders. For example if the tab reads “Players 15/20” this means that there are 20 players assigned MxEncoders and the MxEncoders of 15 of these players have communicated with the system. The IDs of Players that have not communicated with the system are shown in bold text.
4. Help: This will open a copy of this manual B. Quit: Closes the HIT Analyzer program. If you choose to end the program before the end of the session you will be prompted with a choice to end the session. If you choose “Yes” the program will automatically overwrite your previously defined end time with a new end time. C. Back to Setup: Clicking on this button returns you to the Session Manager.
H. Graph Display Controls: These pull down menus control which impact data is displayed on the Impact Graph and how the data is presented. See Viewing Impacts, page 37-39 for further details. I. System Communication and Impact Processing Status Messages: This field informs you of the current status of the Sideline Controller and/or Access Point and once an impact has been downloaded, the status of processing this impact. J.
Figure 39: Type of screen displayed when you select an impact alert from the Alerts list. In this example the player was configured so that when the linear acceleration of an impact exceeded a threshold, an alert is issued. Viewing Impact History A player’s impact history for the current day can be viewed by clicking on the player’s ID or by switching the graph control from “Live” to “History”. When you make this switch you will see a screen similar to that shown in Figure 40.
Figure 40: Viewing a player’s impact history. In this example the player has had three impacts during the past 24 hours. The impacts are sorted by their HITsp severity and the second impact is selected. Note that the Impact Display shows the impact vectors for all three impacts but only one vector is highlighted. Session Summary (HIT Analyzer Only) The session summary screen, shown in Figure 41, gives you an overview of your current session.
The following are the fields shown under the Session Summary: 1. Session type: How the session was categorized when it was created (practice, competition, etc.) 2. Players Checked-In: The number of players who have been assigned MxEncoders and whose MxEncoders have communicated with the system. 3. Players with Impacts: The number of players who have had impacts downloaded by the system. 4. Total Impact Alerts: The total number of impacts that have resulted in alerts being sent to the pager 5.
Charting Page Plot Chart Figure 42: RedZone charting page showing the charting options available. Descriptions of the charting options are listed below: 1.
4. Plot Chart: o Chart: Creates charts within web browser o Player Report: Creates detailed player report within Adobe Reader (a) (b) Figure 43: Examples of the types of charts available through RedZone (a) column (b) bar. Player Report The player report function gives in-depth analysis of an individual player’s impact history over a userselectable period of time. It is advisable to synchronize your HIT Analyzer database BEFORE creating a player report.
Figure 44: Example page from a player report. Data displayed in each report includes: 1. Frequency distribution of impacts by peak linear acceleration 2. Individual impact history by peak linear acceleration 3. Top Ten recorded impacts by peak linear acceleration 4. Impact distribution by location 5. Cumulative impacts by date 6. Graphical summary of impact locations 7. List of all impacts exceeding alert threshold 8.
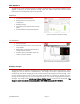
RedZone Command Menu and User Settings in the Administration menu located on the left side of the screen (Figure 45). Figure 45: User administration page. To select a current user, click on the desired last name (underlined and highlighted in blue) in the list of users. If multiple users are in the system, locating a specific person can be made easier by searching the user list for specific Username, Last Name, Website User Flag, and/or User Type.
3. First Name and Last Name (required) 4. Role (required): Identifier of the user (administrator, player, etc.) that is defined when a new user is created and cannot be changed after initial setup. Role is only an identifier and does not limit or allow access to the database 5.
Reconditioning Riddell offers SRS Reconditioning services at the end of a season. It is highly recommended that all SRS equipment be returned to the SRS Service Center for annual reconditioning. During this process the following occurs: 1. Thorough cleaning and inspection of all SRS components 2. Full system level functional testing and updates as necessary 3.
SYMPTOM Sideline Controller is slow to download data POSSIBLE SOLUTION •Make sure Sideline Controller Antenna is securely connected to the Sideline Controller.
SYMPTOM POSSIBLE SOLUTION MXENCODER MxEncoder will not fit into helmet •Verify MxEncoder model is compatible with helmet model •Replace stock helmet Overliner (if equipped) with MxEncoder Overliner Player complains about MxEncoder comfort •Verify MxEncoder model is compatible with helmet model •Verify helmet is properly fit with MxEncoder installed •Verify Battery is properly installed within pouch MxEncoder not showing up in Active Player List •Turn MxEncoder on by placing hand inside helmet near On
SYMPTOM POSSIBLE SOLUTION Unable to Synchronize •No internet connection •Network settings are blocking communication to Riddell Server – Ensure Port 2440 is OPEN for SRS •No need for Synchronization - system up to date Limited or no access to features (Roster/Session/Charting) •User not authorized for view/edit access Cannot create Player Report •Must be performed through RedZone.riddell.
Q: WHAT IF IT RAINS? CAN I STILL USE THE SRS? Yes, the Field Case can be closed while keeping the Sideline Controller and/or Access Point plugged in and attached to the Mast. The Field Case has an internal cooling system to keep the laptop operating without overheating if the lid is closed. Q: DO I HAVE TO SETUP THE SRS DURING EVERY PRACTICE/GAME? Yes, it is recommended that the SRS always be setup when using the MxEncoders to prevent potential discontinuity within recorded head impact data.
Q: HOW OFTEN DO I NEED TO CHARGE THE BATTERIES? The typical life of a battery pack is one week of normal in-season use. This can be reduced if the batteries are older (>2 years) or if the MxEncoders are being used during two-a-days during pre-season. It is recommended to schedule a routine battery change once a week. See the Best Practices Guide for more information. Hardware – MxEncoder Q: HOW MANY EVENTS CAN THE MXENCODER STORE IN MEMORY? The MxEncoder can store up to 100 events in on-board memory.
Software - RedZone Q: WHAT IS THE DIFFERENCE BETWEEN DEMO, PRACTICE AND COMPETITION SESSION TYPES? A Demo session can be used for routine battery changes, performing demonstrations and system testing. All events recorded by MxEncoders during Demo sessions are invalidated and are not displayed using the Charting feature. Practice sessions must have a start and end time defined. Competitions must have an end time assigned at the conclusion of the competition.
Q: WHAT IS THE TOP 10 LIST? The Top 10 List displays the highest impact magnitudes for all players for that day. Q: CAN I EXPORT ALL IMPACTS RECORDED DURING A SESSION? Yes. There is an additional software tool that can export out all head impacts for various ranges.
unrecoverable. Frequent synchronization will limit your potential for data loss since all information is backed up on the SRS Data Server. 2. System Performance Evaluation: Frequent synchronization allows for regular monitoring of incoming data. Algorithms designed to evaluate data quality and SRS performance, are executed daily for all data contained on the SRS Data Server.
o Correct Player Assignment: Is the correct MxEncoder assigned to the correct player? Occasionally when MxEncoders are removed from helmets and replaced, the serial number of the MxEncoder does not get assigned to the correct player. Verify in RedZone (within the Roster page) that the serial number of the MxEncoder within the helmet is accurately assigned to the player o Damaged MxEncoder: If damage to the MxEncoder (ex.
COMPLIANCE INFORMATION Federal Communications Commission (FCC) The following statements apply to the Sideline Receiver and MxEncoder, as required by the Federal Communications Commission (FCC): Compliance Statement (Part 15.19) This device complies with part 15 of the FCC Rules. Operation is subject to the following two conditions: 1) This device may not cause harmful interference, and 2) This device must accept any interference received, including interference that may cause undesired operation.
MxEncoder Section 14 of RSS-210 The installer of this radio equipment must ensure that the antenna is located or pointed such that it does not emit RF field in excess of Health Canada limits for the general population. Consult Safety Code 6, obtainable from Health Canada’s website: www.hc-sc.gc.ca/rpb. WARRANTY Riddell warrants SRS to be free from defects in materials and workmanship for a period of one (2) years from the date of purchase provided there has been normal use and proper maintenance.