OWNER’S MANUAL Portable Utility/Sprinkler Pump ® 293 Wright St., Delavan, WI 53115 Phone: 1-800-468-7867 1-800-546-7867 Fax: 1-800-390-5351 Model 2825ss Installation/Operation/Parts For further operating, installation, or maintenance assistance: Call 1-800-468-7867 ©2003 PRINTED IN U.S.A. SIM590 (Rev.
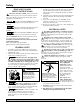
Safety 2 READ AND FOLLOW SAFETY INSTRUCTIONS! This is the safety alert symbol. When you see this symbol on your pump or in this manual, look for one of the following signal words and be alert to the potential for personal injury. warns about hazards that will cause serious personal injury, death or major property damage if ignored. warns about hazards that can cause serious personal injury, death or major property damage if ignored.
Table of Contents 3 Page General Safety .....................................................................................................2 Warranty ..............................................................................................................3 Installation (Well Pumps) .................................................................................4, 5 Connecting Discharge Piping...............................................................................
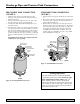
Installation 4 SPECIFICATIONS Power Supply Required. ...................................115 Volts Motor Duty ...................................................Continuous Circuit Requirement (minimum) .....................15.0 Amps Discharge Adapter .......................................................1” SHALLOW WELL JET PUMP INSTALLATIONS: • Have a vertical depth of 25’ or less. • Have one pipe from the well to the pump case. • Can be installed in a bored or drilled well, or in a driven well.
Installation 5 CASED WELL INSTALLATION, 2” OR LARGER CASING (FIGURE 2) INSTALLATION FOR SURFACE WATER (FIGURE 3) 1. Mount the pump as close to the well as possible. 2. Assemble the foot valve, strainer, and well pipe (see Figure 2). Make sure that the foot valve works freely. 3. Lower the pipe into the well until the strainer is five feet above the bottom of the well. It should also be at least 10 feet below the well’s water level while the pump is running in order to prevent the pump from sucking air.
Discharge Pipe and Pressure Tank Connections 6 PRE-CHARGE TANK CONNECTION (FIGURE 4) STANDARD TANK CONNECTION (FIGURE 5) 1. Install two tees in the pump discharge port (see Figure 4). The pipe size must be at least as large as the discharge port. 2. Run a pipe or reinforced hose from one arm of the first tee to the port on the pre-charged tank. 3. Connect the other end of the discharge tee to your plumbing system. 4. Check the pre-charge of air in the tank with an ordinary tire gauge.
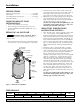
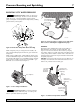
Pressure Boosting and Sprinkling 7 BOOSTING CITY WATER PRESSURE Hazardous pressure. Never run the pump against a closed discharge. To do so can boil the water inside the pump, causing hazardous pressure in the pump causing the risk of explosion and possibly scalding persons nearby. See Figure 6. Connect the Pump Inlet to the Water Faucet for use with Sprinklers. Water Faucet Hose Adapters 3942 0401 Figure 8 – Connect pump to a spigot for use with sprinklers.
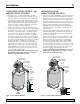
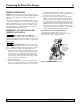
Preparing To Start The Pump PRIMING/OPERATION NOTICE: Do not run the pump dry. Running the pump without water can damage the impeller and may damage the seal, causing leaking or flooding, and will void warranty. All suction connections must be airtight. Make sure the suction lift is not more than 25 feet (7.6M). Fill the pump body through the priming port before starting the pump.
Troubleshooting SYMPTOM 9 POSSIBLE CAUSE(S) CORRECTIVE ACTION Motor will not run Fuse is blown or circuit breaker tripped DISCONNECT POWER;Replace fuse or reset circuit breaker. Motor runs hot and the overload kicks off or the does not run and only hums. Voltage is too low Check voltage being supplied to the pump. Motor runs but no water is delivered* Pump during new installation did not pick up prime through: 1. Improper priming 2.
Repair Parts 10 8 7 6 18 5 4 2 17 3 1 16 13 11 29 12 10 9 14 2 3 15 19 20 21 22 23 24 22 25 26 27 3985 0501 28 Key No.
For parts or assistance, call Simer Customer Service at 1-800-468-7867 / 1-800-546-7867
For parts or assistance, call Simer Customer Service at 1-800-468-7867 / 1-800-546-7867