The first name in electronic drums. SD ELECTRONIC DRUM KIT OWNER’S MANUAL www.simmonsdrums.net www.SimmonsDrums.
SD OWNER’S MANUAL safety instructions THE LIGHTNING FLASH WITH ARROWHEAD SYMBOL WITHIN AN EQUILATERAL TRIANGLE IS INTENDED TO ALERT THE USER TO THE PRESENCE OF UNINSULATED DANGEROUS VOLTAGE WITHIN THE PRODUCT S ENCLOSURE THAT MAY BE OF SUFFICIENT MAGNITUDE TO CONSTITUTE A RISK OF ELECTRIC SHOCK TO PERSONS.
www.simmonsdrums.net Congratulations! …on your purchase of Simmons’ SD500 Electronic Drum Kit. To get the most enjoyment from this kit, we recommend that you skim through this manual at least once, then refer back to it to learn more about specific functions. Caring for Your SD500 Electronic Drum Set Location • Keep the drum kit away from direct sunlight, high temperature sources, and excessive humidity to prevent deformation, discoloration, or more serious damage.
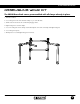
SD SD OWNER’S MANUAL ASSEMBLED KIT 4 The first name in electronic drums.
www.simmonsdrums.net Table of Contents SAFETY INSTRUCTIONS . . . . . . . . . . . . . . . . . . . . . . . . . . . . . . . . . . . . . . . . . . . . . . . . . 2 CONGRATULATIONS. . . . . . . . . . . . . . . . . . . . . . . . . . . . . . . . . . . . . . . . . . . . . . . . . . . . . 3 ASSEMBLED KIT . . . . . . . . . . . . . . . . . . . . . . . . . . . . . . . . . . . . . . . . . . . . . . . . . . . . . . . . . . . . 4 FEATURES . . . . . . . . . . . . . . . . . . . . . . . . . . . . . . . . . . . . . . . . . .
SD OWNER’S MANUAL features New Features of the SD500 Kit • Custom Sound Library. Completely new sample set based on the most popular classic and modern kits. • Variable Attack Response. Significantly improved playback with dynamic response according to hit velocity, combined with alternating sample playback by velocity zone. • S500 Series Pads with increased sensitivity and greater isolation for multi-zone snare pad.
www.simmonsdrums.net Connections Connecting the Sound Module and Pads CAUTION! To prevent electric shock and damage to the device, make sure the power is switched OFF on the sound module and all related devices before making any connection. The voice of the hi-hat pad is controlled by the hi-hat pedal. Plug into the Hi-Hat pedal the plug that is labelled “Hi-Hat Control”. Similar to a real drum kit, the hi-hat pad functions as an ‘open hi-hat’ when the pedal is released.
SD OWNER’S MANUAL Assembling your Kit Inside this package Before assembly, please make sure that all the items listed below are present.
www.simmonsdrums.net Assembling your Kit The SD500 Drum Rack comes preassembled with all clamps already in place. 1. Pull rack out of box. 2. Loosen wing nuts on side arms and snare clamps so you can rotate bars. 3. Pull the side arms and snare arm out into their playing positions. 4. Tighten wing nuts on side arm clamps. 5. Loosen L-rod wing nuts on tom clamps. Insert textured plastic of L-rod into tom clamps and tighten wing nuts. 6. Loosen wing nuts on pads. 7.
SD OWNER’S MANUAL Assembling your Kit Attaching the Cymbal Pads 1. Insert each cymbal arm into the rack clamp. 2. Insert short hi-hat arm on the left-side arm’s cymbal clamp. 3. Remove wing nut from cymbal tilter. Place cymbal pad on tilter assembly. 4. Re-attach washer and wing nut. Tighten wing nut. Attaching the drum module 1. Loosen wing screw on drum rack. 2. Place drum module into drum clamp. 3. Tighten wing screw to secure module 10 The first name in electronic drums.
www.simmonsdrums.net Assembling your Kit Bass drum, hi-hat pedal and pad connections 1. Place the hi-hat pedal on the floor and to the left, as illustrated below. 2. Connect the marked cables from the pads to their corresponding inputs on the drum module 3. Place the bass pedal on the floor in the center of the rack as illustrated. 11 The first name in electronic drums.
SD OWNER’S MANUAL Connections Connecting the Module and Pads Using the provided cables, connect the 1/4” jacks to the corresponding drum pads, cymbal pads and kick pad. The pin connection will attach to the serial port of the sound module. (See illustration.) NOTE: The voice of the hi-hat pad is controlled by the hi-hat pedal. Similar to a real drum kit, the hi-hat pad functions as an ‘open hi-hat’ when the pedal is released. When the pedal is pressed down, it functions as a ‘closed hi-hat’.
www.simmonsdrums.net Connections Connecting Audio Equipment Mixers and Amplifiers 1. When you want to listen to the voices send the drum to a mixer or amplifier. Connect using the Output L/MONO and R jacks on the rear panel (for monaural playback, use the L/MONO jack; for stereo playback, connect both L/MONO and R jacks.) 2. The volume from the module is adjusted with the VOLUME knob.
SD OWNER’S MANUAL Connections AUX Input This input allows you to mix the input from the external audio along with the SD500 module’s internal sounds. 1. Plug the audio output of MP3 player, or other audio source into the AUX IN jack on the back panel.
www.simmonsdrums.
SD OWNER’S MANUAL SD500 Drum Module Operation Bottom Panel 1 1 Serial Connection Jack for the pad trigger cables Back Panel 1 AC Adapter Input Connection for the 9V DC power adapter 2 USB Port Used for connecting the SD500 module to a computer. 3 AUX Input Stereo 1/8” jack to connect CD or MP3 players to the module. 1 2 3 4 4 Output Stereo audio outputs to connect to external audio sources Side Panel 1 Volume knob 2 1/8” TRS headphone jack 1 16 The first name in electronic drums.
UTIL SAVE www.simmonsdrums.net Quick start operations Turning the Power on the Module MUTE 1. Connect the AC Adapter to the drum module. 2. Press the power switch on the top panel to turn on the module. NOTE: There is an automatic power off functionPLAY that/ STOP turns off RECORD the module when the kit is not being used for a certain period of time. The default setting is off. If this gets changed you can reset this in the Utility mode.
SD OWNER’S MANUAL Quick start operations Listening to the Demo Songs The demo songs help to show you the capabilities and sounds of the SD500 module. There are two demos in the module. The first demo song is an extended drum solo that switches between various kits in the module. The second demo sound plays a long song that has several patterns combined to show the different genres of music that module can play. 1. Press KIT and SONG button simultaneously to enter Demo Mode.
www.simmonsdrums.net Kit Mode - Advanced Editing a Kit 1. Press the KIT button. 2. Press the PAGE button to see the screen for the current sound 3. Strike a drum pad to view the Voice currently assigned 4. Press the PAGE button to move to the first parameter to be changed on the current sound. Press the PAGE button repeatedly to step through all the available parameters that can be changed on the voice. 5. Press the -/+ buttons to change the parameter 6.
SD OWNER’S MANUAL Kit Mode - Advanced Renaming a Kit 1. Select a User Kit.( Preset Kits cannot not be renamed) 2. Press the -/+ buttons to choose the User kit for save. 3. Press the SAVE/ENTER button to rename the User Kit. 4. Press the PAGE button to move the cursor 5. Press [+/-] to change the character 6. Press the SAVE/ENTER confirmation Saving a Kit 1. Press the SAVE/ENTER button to save the assignment to a User Kit. 2. Press the -/+ buttons to choose the User kit for save. 3.
www.simmonsdrums.net Song mode Playing a Song 1. Press PLAY/STOP to play a song. 2. Press the PLAY/STOP button to stop playback of the song. NOTE: You can temporarily change the tempo of a song while playback is in progress. The song returns to its preset tempo when a different song is selected. Muting the Drum Part 1. While a Song is playing press the PLAY/STOP and CLICK Button at the same time. This will mute the drum sound. 2.
SD OWNER’S MANUAL Recording a Song Recording Settings There are several settings for the Record mode. To enter the setup mode press the RECORD and PAGE buttons. 1. The first page is the Track you wish to record to. The default is Drum. The other setting is Acc (accompaniment). To change between these Press the -/+ buttons. To record an accompaniment track you must use an external MIDI device such as MIDI keyboard that is connected to your computer to the USB input.
www.simmonsdrums.net RECORDING A Song To Record 1. Press the Song Button 2. Select a User Song 3. Press the Record button. KIT You will hear the Click metronome sound count in. Begin playing the song after the count off. 4. After you record your song you can also rename the song, Press SAVE/ENTER button to save and rename. SONG UTIL Click Settings The CLICK is the metronome sound that is played when you are listening to beat to play along with. Press CLICK button on/off metronome. 1.
SD OWNER’S MANUAL Utility Mode Utility Mode Settings The Utility mode is for the main functions of the module such as trigger setup for the pads, effects, MIDI setup and saving global settings. Trigger Settings You can set the parameters of each drum and cymbals pad in the Trigger menu. While editing the settings, you can select each trigger by hitting the corresponding trigger pad. 1. Press the UTILITY button. 2.
www.simmonsdrums.net Utility Mode Effects The SD500 module has built-in Reverb and Chorus which are adjustable in the Utility Effects setup. 1. Press the UTILITY button. The first parameter is for the trigger settings. 2. Press the PAGE button until you see the screen for Reverb type 3. Press the -/+ buttons to change the parameter setting. 4. Press the PAGE button again to go to the screen for the Chorus type 5. Press the -/+ buttons to change the parameter setting.
SD OWNER’S MANUAL Utility Mode Pad MIDI Note assignments The MIDI output notes from the SD500 are preset in the Module. The following list has the MIDI notes that are sent from the module when the drum pads and pedals are played.
www.simmonsdrums.net Utility mode Factory Reset There may be occasions where you want the module to return to the factory settings. This function will return the module back to factory setup. To Reset the Module to Factory Setup 1. Press the UTILITY button. 2. Press the PAGE button until you see the screen for “Util Reset”* 3. Press the SAVE button to reset the module. The module will go through the reset procedure and afterwards return to the Kit mode screen. * There are two types of resets.
SD OWNER’S MANUAL appendix Voice List Voice List # Type Voices # Type Voices 1 Bass Drum BD-Gated 32 Snare SD-ClssRkRS 2 Bass Drum BD-ClassRok 33 Snare SD-DepBrass 3 Bass Drum BD-EltroFnk 34 Snare SD-DpBrssCS 4 Bass Drum BD-Funk 1 35 Snare SD-DpBrssRS 5 Bass Drum BD-Funk 2 36 Snare SD-ElctFkRS 6 Bass Drum BD-GTRKick 37 Snare SD-ElctrFnk 7 Bass Drum BD-HvyMtl 38 Snare SD-Funk1 8 Bass Drum BD-Jazz 39 Snare SD-Funk1CS 9 Bass Drum BD-LAFunk 40 Snare
www.simmonsdrums.
SD OWNER’S MANUAL appendix Voice List Voice List # Type 125 Ride 126 Voices # Type Voices RD-Ping 156 Percussion PR-QuicaDwn Ride RD-Bell1 157 Percussion PR-QuicaHi 127 Ride RD-Bell2 158 Percussion PR-Shaker 128 Ride RD-Bow1 159 Percussion PR-Sleghbel 129 Ride RD-Bow2 160 Percussion PR-Surdo 130 Ride RD-RideEdg1 161 Percussion PR-TmbrnSlp 131 Ride RD-Bell3 162 Percussion PR-Tambourn 132 Ride RD-Bow3 163 Percussion PR-TimbleHi 133 Ride RD-RideEdg2
www.simmonsdrums.
SD OWNER’S MANUAL appendix Voice List Voice List # Type 249 Electronic Tom 250 Voices # Type Voices ET- Simmns1 280 Electronic Percussion EC-ClsdHat5 Electronic Tom ET- Simmns2 281 Electronic Percussion EC-ClsdHat6 251 Electronic Tom ET- Simmns3 282 Electronic Percussion EC-OpenHat1 252 Electronic Tom ET- Simmns4 283 Electronic Percussion EC-OpenHat2 253 Electronic Tom ET- Simmns5 284 Electronic Percussion EC-OpenHat3 254 Electronic Tom ET- Simmns6 285 Electronic
www.simmonsdrums.net appendix Voice List Kit List # Type 311 Electronic Percussion 312 Voices # No.
SD OWNER’S MANUAL appendix Key Map Key Map # PG# 1 0 2 Manual Name # PG# Acoustic Piano 32 80 Synth 1 4 Electric Piano 33 81 Synth 2 3 7 Clavinet 34 82 Synth 3 4 16 Drawbar Organ 35 83 Synth 4 5 17 Percussion Organ 36 84 Synth 5 6 24 Nylon Guitar 37 85 Synth 6 7 25 Steel Guitar 38 86 Synth 7 8 27 Tweed Guitar 39 87 Synth 8 9 28 Muted Guitar 40 88 Synth 9 10 29 Distorted Guitar 1 41 89 Synth 10 11 30 Distorted Guitar 2 42 90 Synth 11
www.simmonsdrums.
SD OWNER’S MANUAL appendix MIDI Implementation Chart Function Transmitted Recognized Basic Channel Default Changed 10 CH Only X 1-16 CH 1-16CH Mode Default Messages Altered Mode 3 X ********** Mode 3 X X True voice 0~127 ********** 0~127 0~127 Note ON Note OFF O 9nH,v=1-127 O 8nH,v=0 O 9nH,v=1-127 O 9nH,v=0 or 8nh Affter Key’s X X Pitch Bender X O X X X X X X X X X X X X X X O O O O O O O O O O O O O (*1) O Program Change : True O 0-127 0-127 O 0-127 0-127 System Exclusive X