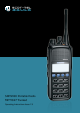
SRP9180 Portable Radio MPT1327 Trunked Operating Instructions Issue 1.
General Safety Page 4 Hints for Using the Radio Page 4 1. INTRODUCTION Page 4 1.1 Overview Page 4 1.2 Configuration Page 4 1.3 Convensions Page 4 2. FRONT PANEL CONTROLS Page 5 3. MENU SYSTEM Page 6 3.1 Menu navigation Page 6 4. MENU SYSTEM Page 7 4.1 Phonebook Screen Page 8 4.2 Stored Calls Screen Page 9 4.3 Recall Screen Page 11 4.4 Status Screen Page 11 4.5 Call Types Screen Page 12 4.6 Send Message Screen Page 12 4.7 Setup Screen Page 12 5.
7.1.4 Contrast Page 22 7.1.5 Alert Volume Page 22 7.1.
General Safety Do not operate your portable radio whilst driving a vehicle. Do not operate your radio in an explosive atmosphere. Obey the ‘Turn Off Two way Radios’ signs where these are posted, e.g. on a petrol station forecourt. Do not dispose of batteries in a fire. Only recharge batteries in an approved SRP9180 Charger. Hints for Using the Radio When speaking, hold the radio a few centimeters from your mouth and speak across it, rather than into it.
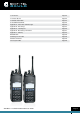
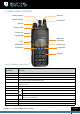
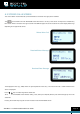
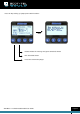
2. FRONT PANEL CONTROLS Rotary Selector Selector Switch Antenna Function #7 Volume Indicator LED Function #5 Function #6 PTT Accessory Connector Function #2 Function #3 Function #1 Function #4 Keypad Figure 1 SRP9180 Portable Layout Key/Control Function On/Off/Volume Rotate the switch clockwise to turn on the radio and then set the volume to the desired level Selector Switch Rotate to select Phone Book entries. ABC Switch May be programmed to change radio Modes.
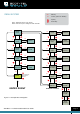
3. MENU SYSTEM The SRP9180 radio software uses a programmed menu structure to enable the operator to access the radio options. The structure of the menu can be configured to meet the customer’s specific needs using the FPP. Figure 2 (overleaf) illustrates the menu structure of the radio. Note that the order and presence of each menu is determined by the configuration of the radio programmed by the FPP. There are Setup submenus that provide access to radio setup parameters.
MENU SYSTEM OK OK Key ‘M’ ‘M’ Key (same as ‘BACK’) Up Key Down Key Note: Example Menus only shown.
4. MAIN MENU SCREENS 4.1 PHONEBOOK SCREEN The Phonebook allows calls to be made to entries from the Phonebook list. The RSSI Bars indicate the signal strength of the current Control or Traffic channel. Displayed Labels show the function of the F1 and F4 keys. Pressing the key below will set the function. Pressing the The Name Field shows the current selected entry from the Phonebook. The Icon Line displays various icons as described in the table below.
4.2 STORED CALLS SCREEN This screen allows missed Voice calls (and received Status and Data messages) to be reviewed. The icon will show in the main Phonebook Screen when there is an entry in this Screen. A “Bip” tone is emitted every few seconds when a new call or message is stored. Three different types of call can be stored. The screen display will change depending on the type of call stored. Missed Voice Call Received Status Message Received Data Message The displayed number (e.g.
Press OK key to bring up a popup menu with functions: More Delete: Delete the message and go to stored calls Screen Exit: Go to idle Screen Press M to remove the popup SRP9180 - Trunked Portable Radio User Guide Page 10
4.3 RECALL SCREEN Use this Screen to review any of the last eight recently placed calls • Press the keys to scroll through the Recall list • Press OK and select “Exit” by pressing the keys to return to the Phonebook Screen without making a call or press back twice. • Press OK and select “Delete” by pressing the keys to delete the viewed entry and return to the Recall Screen.
4.5 CALL TYPES SCREEN Use this Screen to make different types of calls. • Press the keys to scroll through the available call types. • Press the nominated Clear * key to return to the Phonebook Screen without making a call. • Press OK to go to the Phonebook Screen with the Call-Type modifier ready for editing (the keyboard is enabled for this step). * A function key (usually F6) can be programmed as a Clear key using the FPP. 4.
5. COMMON FUNCTIONS AND FACILITIES 5.1 SWITCH-ON/SWITCH-OFF • Turn the On/Off/Volume knob clockwise to switch the portable radio On. • The display will illuminate and show a Welcome Message and the Trunk Identity of the radio. • After a brief time the display will revert to the Phonebook Screen, at which time the radio is ready for use. • Turning the On/Off/Volume knob anti clockwise will switch the portable radio Off.
6. CALL TYPES A Trunking System allows the user to make a number of different call types. The SRP9180 supports the following call types: • Voice calls between Individuals or Groups • Status Calls • Priority and Emergency Calls • Diversion Calls Individual Voice Calls. Allow private conversations between two users. Other users can be included in the call using the Include Call function. Group Voice Calls. Allow a group of users to participate in a group conversation.
6.1 MAKING A VOICE CALL Voice Calls may be made in several different ways: Using the Phonebook: • From the Phonebook Screen, scroll through the entries using the keys until the desired name is shown; then press the OK key (F4 must be programmed as Call function). Using Direct-Call Function Key: • The F1, F2, …, F6 keys may be assigned as Direct-Call keys. Pressing such a key will place a call to the pre-programmed identity (e.g. Depot).
MAKING A STATUS CALL Status Calls allow a Status Number to be sent between users. This Status Number can have a meaning that t he user assigns to it. e.g. 1 may mean: “Ready for Despatch”. 2 may mean: “At Lunch”. 3 may mean: “Contact Home”, (etc). A Status Message can be sent in a number of ways similar to making Voice Calls. 6.1.1 Using the Phonebook To send a Status Call using the Phonebook: • Scroll through the Phonebook until the persons name is displayed (or enter the ID number using the keypad).
6.2 RECEIVING A CALL The SRP9180 will respond to incoming calls according to the type of call being received. There are three types of call: • Individual Voice Call. • Group Voice Call. • Status Message or Data Message. 6.2.1 Receiving an Individual Voice Call When a call is received both radios will be connected and will display the audio enabled icon. A conversation can now take place with each operator taking turns to press their PTT keys and speaking.
RECEIVING A GROUP CALL All radios that are members of the group automatically connect to the Group Voice Call. While in a Group Voice Call, all operators can press their PTT, in turn, and talk to each other. Only the originator of the Group Voice Call can clear the call. Notes: Operators who leave a Group Voice Call are returned to that Group Voice Call after a short period of time.
7. SETUP The Setup sub-menus allow the operator to edit/modify the operation of some of the general functions of the radio. The programmer can restructure or restrict access to any or all of these menu screens and may rearrange them according to specific requirements. 7.1 SETUP SUB MENUS The Setup sub-menu structure programmed at manufacture is shown in Figure 2. These sub-menu Screens provide access to the following operator functions. User Options Group Display Illumination & DTMF on/off selection.
7.1.3 Phone Book Edit This menu allows you to delete, add or edit a Phone Book entry. From the main Phone Book Edit Screen (at any Phonebook Entry), just press OK. Use the keys to select “Add” and press OK Enter the New Entry number using the keypad. Press OK. Next, enter New Entry text using the ABC keypad (see 7.1.3.4 below). Press OK again to exit back to the Idle Screen.
7.1.3.2 DELETE AN ENTRY Use the keys to select the required Phonebook Entry, then press OK. Use the keys to select “Delete”, then press OK to delete the Entry and exit back to the Idle Screen 7.1.3.3 EDIT AN EXISTING ENTRY Use the Use the keys to select the required Phonebook Entry, then Press OK. keys to select “Edit” and then press OK. Next, edit the number using the F6 key (destructive backspace) and keypad and press OK.
7.1.3.4 USING THE KEYPAD When using the keypad to enter text: • Press the appropriate keypad key a number of times until the desired character or number is selected. • The current character position is identified by a flashing block cursor. • Use # to select lower/upper case letters. • Use * for special characters. • Use the keys to move to the next or previous character space to be entered/modified. • Use the space key, “0” to erase characters. • Press OK to accept changes. 7.1.
7.1.6 Radio Information This Screen displays information that identifies the: • Programmer File description, • Software Version • Selcall ID; and, • Radio Serial Number and ESN. Press OK to return to the Idle Screen. Press Back to return to the Menu Select Screen.
8. TROUBLESHOOTING If, after reading this guide, you are unable to switch the radio on, check that the battery is charged and correctly attached. If these checks are OK, contact Scot-Tel-Gould for further advice.. Appendix A - Alert Tones and Messages 0.05 Key Press Call Setup in Progress 0.8 Call Queued 0.3 .1 1.2 Number Unobtainable 5 Seconds Transmit Confirmed 0.3 Call Clear 0.3 0.3 Item Duration Warning 1 Second 0.5 Go to Traffic Channel 0.1 0.
Appendix B - Dial Strings The following conventions and dial strings apply on the SRP9180 radio. Dial Strings DESCRIPTION CALL MODIFIER Abbreviated PSTN Codes **nn nn = 1 to 45 Call Set up Abandon/Call Complete *# or Red Handset Button Accept Incoming Call # or PTT or Green Handset Status Call *0n*...# , n = 1 to 30 Broadcast Call *11*...# (for groups only) Send Short Data Message 2*Data*….# ,Data=Up to 20 digits of 0 9 Non-prescribed data call *31*...# Divert all, voice, data calls *41*..
Appendix A - Call Progress These messages are displayed to give the user an indication of Call Progress. CALL PROGRESS DESCRIPTION Calling Indicates the radio is passing your request to the Trunk Network and the Network is attempting to locate the Called party. Queued System is busy : no channels available on your site or called parties site. Wait and System may allocate you next available channel. Engaged The Called party is on another call. Wait and you may be connected if they become free.
Appendix B - Numbering Conventions Numbering Conversions NUMBERING CONVENTIONS DESCRIPTION 0-19 Quick-Dialling (index must be in Phonebook) 20-89 Small fleet Unit number 90-99 Small fleet Group number 200-899 Large fleet Unit number 900-998 Large fleet Group number 999 Emergency operator 1000-8999 PABX extension 31000-38999 PABX extension on exchange 1 41000-48999 PABX extension on exchange 2 51000-58999 PABX extension on exchange 3 61000-68999 PABX extension on exchange 4 9nnnn Sh
Appendix C - Glossary A summary of common radio terms and some other terms used in this document, and their meanings, are given below. NUMBERING CONVENTIONS DESCRIPTION Alert tones The transceiver emits these tones to indicate an invalid operator or error. Indicator When displayed next to a Function, indicates that the Function is active. Chevron Same as Indicator Cradle The bracket that holds the microphone when it is not in use.
BEFORE USE Before operating the Radio: Ensure that a fully charged battery is fitted to the radio. Ensure that the antenna is firmly secured. To remove battery: Slide Latch (1) and lift out (2) To fit battery: Seat lower end (2) and push battery top in SWITCH ON THE RADIO Turn the rotary volume control until it clicks. A welcome message is displayed and the top LED illuminates green for 2 seconds - adjust the volume control to about mid position.
Tel: 01224 471335 www.scot-tel-gould.co.