GAS Pressure Washer Use and Care Guide 039-8563-8 Congratulations on the purchase of your new pressure washer. In order to ensure you have the best possible experience please read through the following instructions. If you require any help please contact the customer service department at: 1-866-4SIMONIZ (1-866-474-6664) Contact us for assistance, we’re here to help.
Table of Contents 1. Safety Advice..........................................................................................................3 1.1 Definitions..........................................................................................................3 1.2 Safety Warnings................................................................................................3 1.3 Intended Application..........................................................................................7 2.
Safety Advice 3 1. SAFETY ADVICE IMPORTANT, RETAIN FOR FUTURE REFERENCE AND READ CAREFULLY! Do not attempt to install or operate this product until you have read the safety instructions in this manual. Safety items throughout this manual are labelled Danger, Warning, or Caution depending on the risk type. Read and understand the operating manual and labels on the product. Familiarize yourself with the product application and limitations and the specific potential hazards.
Safety Advice 1.2 Safety Warnings AREA SAFETY AND DANGER–WORK EXHAUST FUMES • Keep work area clean and well lit. Cluttered and dark areas incite accidents. • Operate the product in a clean, dry and well-ventilated area. • Do not operate the product in explosive atmospheres, such as in the presence of flammable liquids, gases or dust. Power tools create sparks which may ignite the dust or fumes. • Never operate the product on a steep slope.
Safety Advice 5 1.2 Safety Warnings FLAMMABLE AND POISONOUS MATERIALS • Gasoline is highly flammable and its vapours can explode if ignited. Take precautions when using fuel to reduce the chance of serious personal injury. • When refilling or draining the fuel tank, use an approved fuel storage container while in a clean, well-ventilated outdoor area. • Do not smoke or allow sparks, open flames, or other sources of ignition near the area while adding fuel or operating the product.
Safety Advice 1.2 Safety Warnings CAUTION–SPECIFIC SAFETY ADVICE • Avoid dangerous conditions. Always operate this product on dry, solid and level ground. • Never operate this product on slippery, wet, muddy, or icy surfaces. The operating area should be free from any obstructions. There should be plenty of room for handling, and the operator should stay alert at all times. • Do not use this product in wet or damp areas or expose it to rain.
Safety Advice 7 1.2 Safety Warnings CAUTION–SERVICE • Before cleaning, repairing, inspecting, or adjusting, shut off the engine and make sure that all moving parts have stopped. • Have your product serviced by certified repair personnel using only identical replacement parts. This ensures the safety of the product is maintained. • Ensure proper maintenance. Check for misalignment or binding of moving parts, breakage of parts and any other condition that may affect the product’ s operation.
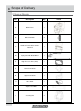
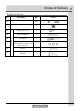
Scope of Delivery 2. SCOPE OF DELIVERY Ref. Description Qty.
Scope of Delivery 9 2. SCOPE OF DELIVERY Ref. Description Bolt,Nut K Water Inlet Filter L Qty.
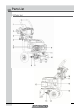
Parts List 3.
Parts List 11 3. PARTS LIST Ref. Description Ref. Description 1 Spray Nozzles (x5) 10 Detergent Tank 2 Trigger Safety Lock 11 Detergent Tank Caps 3 Spray Gun with Wand 12 Air Filter 4 Start Cord Handle 13 Water Outlet for Pressure Hose 5 Muffler 14 Pump Detergent Inlet 6 Oil Tank with Dipstick 15 Engine I/O Switch 7 Spark Plug 16 Fuel Tank 8 Pump Fresh Water Inlet 3/4” 17 Fuel Tank Cap 9 Pump Unit 18 Pressure Hose(25ft) Note: Engine oil is not included.
Assembly Instruction 4. ASSEMBLY INSTRUCTIONS Letters refer to Scope of Delivery diagrams on pages 8 and 9. 1 2 Lift the main frame (A) with one hand and attach one of the wheels (B) by pressing the wheel’s pin and inserting the wheel shaft into the main frame (A). Align the pin with the hole on the frame (A) until it snaps in. Repeat this procedure for the second wheel (B) on the opposite side.
Assembly Instruction 13 4. ASSEMBLY INSTRUCTIONS 4 6 Insert hose hook (H) to the groove of handle assembly(C) until the end as per instruction. 5 Insert the water inlet filter (L) into the pump fresh water inlet (8). Then attach a garden hose or other means of water supply (not provided) to the pump inlet (8). The water flow rate must not fall below 18 litres per minute LPM (4 gallons per minute GPM), or the pump might be damaged.
Assembly Instruction 4. ASSEMBLY INSTRUCTIONS 8 Attach one end of the pressure hose (18) to the spray gun (3) .Take down the air shield on pump water outlet (13), then attach to the other end of the pressure hose and fasten. Note: please make sure all the quick connectors are connected in the right direction. Now your pressure washer is fully assembled. CAUTION Do not operate the product before you read and fully understand next chapter→Engine operation.
Engine Operation 15 5. ENGINE OPERATION 5.1 Adding/Checking Oil 5.2 Adding Fuel IMPORTANT Oil has been drained for shipping. Failure to fill engine with oil before starting engine will result in permanent damage and will void engine warranty. Add oil according to the instructions. WARNING • Always check the oil level before starting the engine, making sure the pressure washer is on a level surface.
Engine Operation 5. ENGINE OPERATION 5.1 Adding/Checking Oil IMPORTANT IMPORTANT Before each use: Clean air filter (12) element for every 50 hours of use • Check the oil and fuel level and fill if necessary. (every 10 hours under dusty conditions). Wash in • Make sure that spark plug, muffler, fuel cap, and air high flashpoint solvent, squeeze dry, dip in clean engine oil, and squeeze out excess oil. filter are in place and secured. • Do not crank engine with spark plug removed. 1.
Operation Instructions 6. OPERATION INSTRUCTIONS 6.1 Using Spray Nozzle This pressure washer comes with 5 different nozzles (1) that can be installed on the stainless steel wand (11). The spray pattern is adjusted by installing the appropriate spray nozzle (1).
Operating Instructions/Cleaning and Maintenance 6. OPERATION INSTRUCTIONS 6.4 Cleaning with Detergents IMPORTANT This pressure washer is intended for use with special pressure washer detergents only. Do not use powdered soaps, which would clog the injection system. Follow the detergent manufacturer’s directions or call the Simoniz toll-free number at 1-866-4SIMONIZ (1-866-474-6664) if you have any questions or concerns.
Cleaning and Maintenance 19 7. CLEANING AND MAINTENANCE WARNING DO NOT operate this pressure washer without the water inlet filter in place, as deposits could build up internally and affect the functioning of the unit. 7.2 Engine Maintenance Draining Engine Oil The engine oil should be replaced after the first 20 hours of operation, or after the first month of use. After that, it should be replaced every 100 hours or every 6 months. To drain the engine oil: 1. Loosen the oil tank dipstick (6). 2.
Cleaning and Maintenance 7. CLEANING AND MAINTENANCE 3. Check the gap with a wire gauge. If necessary, reset the gap to 0.7-0.8 mm. Install and tighten the spark plug to the recommended torque–180 lb-in (20 Nm). 4. Reinstall the spark plug wire and protection cage in reverse order. 7.4 Storing Store idle product out of the reach of children and do not allow persons unfamiliar with the product or these instructions to operate it. This product is dangerous in the hands of untrained users.
Cleaning and Maintenance/Technical Specifications 21 7. CLEANING AND MAINTENANCE IMPORTANT • Make sure the engine I/O switch (15) is set to O position. Slowly pull the starter cord handle (4) until you feel tension, which indicates the piston is on its compression stroke and leave it in this position. • Replace the spark plug. 7.5 Winterizing Procedures • Pressure washer might be damaged if subjected to freezing temperatures. This type of damage is not covered by the limited warranty.
Troubleshooting 9. TROUBLESHOOTING NOTE: If your unit still is not functioning properly once you have used this guide please call the SIMONIZ toll-free service number at 1-866-4SIMONIZ (1-866-474-6664). Please do NOT bring the unit back to the store until you have called this number.
Troubleshooting 23 PROBLEM POSSIBLE CAUSE SOLUTION Nozzle tip not attached Attach required nozzle tip Water supply faucet closed Turn on faucet. Ensure there are no kinks or blockage in hose Water supply pressure is low Ensure faucet is fully opened. Check to make sure water supply is a minimum 30 psi, 4 GPM Inlet water filter is clogged Clean the water filter.
pressure washer 9.
24 Troubleshooting/Limited Warranty 9. TROUBLESHOOTING POSSIBLE CAUSE PROBLEM The trigger can’t be squeezed Accessories & Connections SOLUTION Safety lock is not Open the safety lock. Refer to the inopen struction manual There is water leakage at joints/connections Damaged seal on gun, hose and/or ring pump Change with back-up O-ring or purchase accessory kit SKU#.
Explosion View 25 11.
26 Explosion View 11. EXPLOSION VIEW Ref. Description Qty. Ref. Description Qty.