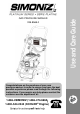
039-8569-0 Congratulations on the purchase of your new pressure washer. In order to ensure you have the best possible experience please read through the following instructions.
Table of Contents 1. Safety Advice..............................................................................................................3 1.1 Definitions..............................................................................................................3 1.2 Safety Warnings.....................................................................................................3 1.3 Intended Application.............................................................................................
Safety Advice 3 1. SAFETY ADVICE IMPORTANT: RETAIN FOR FUTURE REFERENCE AND READ CAREFULLY! Do not attempt to install or operate this product until you have read the safety instructions in this manual. Safety items throughout this manual are labeled Danger, Warning, or Caution depending on the risk type. Read and understand the operating manual and labels on the product. Familiarize yourself with the product application and limitations and the specific potential hazards.
Safety Advice 1.2 Safety Warnings DANGER – WORK AREA SAFETY AND EXHAUST FUMES • Keep work area clean and well lit. Cluttered and dark areas incite accidents. • Operate the product in a clean, dry and well-ventilated area. • Do not operate the product in explosive atmospheres, such as in the presence of flammable liquids, gases or dust. Power tools create sparks which may ignite the dust or fumes. • Never operate the product on a steep slope.
Safety Advice 5 1.2 Safety Warnings FLAMMABLE AND POISONOUS MATERIALS • Gasoline is highly flammable and its vapors can explode if ignited. Take precautions when using fuel to reduce the chance of serious personal injury. • When refilling or draining the fuel tank, use an approved fuel storage container while in a clean, well-ventilated outdoor area. • Do not smoke or allow sparks, open flames, or other sources of ignition near the area while adding fuel or operating the product.
Safety Advice 1.2 Safety Warnings CAUTION – SPECIFIC SAFETY ADVICE • Avoid dangerous conditions. Always operate this product on dry, solid and level ground. • Never operate this product on slippery, wet, muddy, or icy surfaces. The operating area should be free from any obstructions. There should be plenty of room for handling, and the operator should stay alert at all times. • Do not use this product in wet or damp areas or expose it to rain.
Safety Advice 7 1.2 Safety Warnings CAUTION – SERVICE •Before cleaning, repairing, inspecting, or adjusting, shut off the engine and make sure that all moving parts have stopped. •Have your product serviced by certified repair personnel using only identical replacement parts. This ensures the safety of the product is maintained. •Ensure proper maintenance. Check for misalignment or binding of moving parts, breakage of parts and any other condition that may affect the product’s operation.
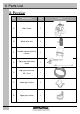
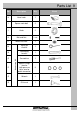
Parts List 2. PARTS LIST Ref. Description Qty.
Parts List 9 Description Qty. H Hose hook 1 I Square neck bolt 2 J Knob 2 K Bolt and Nut 1 set L Water inlet filter 1 M Spray tip cleaner 1 N Spark plug wrench 1 O Screwdriver 1 Spare O-rings (two for high-pressure hose, one for quick-connector) 3 Q Wrench 1 R Oil funnel 1 P Accessory Kit Ref.
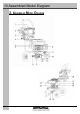
Assembled Model Diagram 3.
Assembled Model Diagram 11 3. ASSEMBLED MODEL DIAGRAM Ref. Description Ref. Description 1 Spray nozzles (x5) 11 Detergent tank caps 2 Trigger safety lock 12 Engine I/O switch 3 Spray gun with wand 13 Water outlet for pressure hose 4 Starter cord handle 14 Pump detergent inlet 5 Muffler 15 Air filter 6 Oil tank with dipstick 16 Fuel tank 7 Spark plug 17 Fuel tank cap 8 Pump fresh water inlet 3/4″ (2cm) 18 Pressure hose 25′(7.
Assembly Instructions 4. ASSEMBLY INSTRUCTIONS 2 1 Wheel Assembly NOTE: Make sure that there is enough air in wheel before assembly. Lift the frame (A) with one hand and attach one of the wheels (B) by pressing the wheel’s pin and inserting the wheel shaft into the main frame (A). Align the pin with the hole on the frame (A) until it snaps in. Repeat for the opposite side. 3 Gun Holster Assembly Slide the upper gun holster (G) all the way down into the handle assembly (C).
Assembly Instructions 13 4 6 Hose Hook Assembly Attach the hose hook (H) to the back of handle assembly (C) until it slides into place. Hose Connection Insert the water filter (L) into the pump inlet. Attach one end of garden hose to pump inlet, and fasten the plastic nut counter-clockwise. 5 7 Gun Holster Assembly Attach the lower gun holster (F) to the frame as illustrated. Fasten it with screw, washer and nut. Gun & Wand Assembly Assemble the spray gun with the metal wand.
Assembly Instructions 8 Gun/Hose Assembly Remove the air shield on pump outlet, then connect one end of pressure hose to pump outlet, and secure the plastic nut. Connect the other end to pressure gun, and fasten the plastic nut. Now your pressure washer is fully assembled. CAUTION Do not operate the product before you read and fully understand next chapter→ Operating Instructions.
Operating Instructions 15 5. OPERATING INSTRUCTIONS 5.1 Using Spray Nozzle This pressure washer comes with five different nozzles (1) that can be installed on the metal wand (3). The spray pattern is adjusted by installing the appropriate spray nozzle.
Operating Instructions 5.4 Cleaning with Detergents IMPORTANT This pressure washer is intended for use with special pressure washer detergents only. Do not use powdered soaps, which clog the injection system. Follow the detergent manufacturer’s directions or call the Simoniz toll-free number at 1-866-4SIMONIZ (1-866-474-6664) if you have any questions or concerns.
Engine Operation 17 6. ENGINEOPERATION 6.1 Adding/Checking Oil IMPORTANT Oil has been drained for shipping. Failure to fill engine with oil before starting engine will result in permanent damage and will void engine warranty. Add oil according to the instructions. WARNING • Always check the oil level before starting the engine, making sure the pressure washer is on a level surface. • Always use oil type SAE 10W-30, which can be found at your local Canadian Tire store (Product # 28-9301-6). 1.
Engine Operation/Cleaning and Maintenance 6.3 Starting Engine •Remove the water inlet filter (L) from the pump inlet pipe and clean. IMPORTANT If you have problems starting the pressure washer, Call the Simoniz toll-free number at 1-866-4SIMONIZ (1-866-474-6664) and one of our customer service representatives will be glad to assist you. IMPORTANT Before each use: • Check the oil and fuel level and fill if necessary.
Cleaning and Maintenance 19 IMPORTANT Used oil is a hazardous waste product and must be disposed of properly. Do not discard with household waste. Check with your local authorities, service centre, or Canadian Tire for safe disposal/recycling facilities. Checking Air Filter IMPORTANT Clean air filter (12) element after every 50 hours of use (every 10 hours under dusty conditions). Wash in high flashpoint solvent, squeeze dry, dip in clean engine oil, and squeeze out excess oil.
Cleaning and Maintenance 7.3 Cleaning the Carburetor 1. Screw down the bolt on the bottom of carburetor with wrench. 2. Push the float up four to five times, then clean sediment cup with gas. NOTE: Put the sediment cup back. Be careful not to miss the O ring. the fuel from the tank, carburetor, and hose. Screw the carburetor drain hex screw back once the fuel has been completely drained. 2. Add fuel stabilizer • If you do not wish to drain the fuel tank (16), add a fuel stabilizer into the fuel tank.
Cleaning and Maintenance/Technical Specifications 21 8. TECHNICAL SPECIFICATIONS 7.6 Winterizing Procedure • Pressure washer might be damaged if subjected to freezing temperatures. This type of damage is not covered by the limited warranty. To avoid possible damages, use a small amount of antifreeze. Maximum Pressure Rated Water Pressure • Place the pressure washer on its side, with the water inlet (8) facing upwards, and pour 1/4 cup (60 ml) of antifreeze into the water inlet (8).
Troubleshooting 9. TOUBLESHOOTING NOTE: If your unit still is not functioning properly once you have used this guide please call the SIMONIZ toll-free service number at 1-866-4SIMONIZ (1-866-474-6664). Please do NOT bring the unit back to the store until you have called this number.
Troubleshooting 23 PROBLEM No pressure, low pressure Pump Pressure too high POSSIBLE CAUSE Nozzle tip not attached Attach required nozzle tip Water supply faucet closed Turn on faucet. Ensure there are no kinks or blockage in hose Water supply pressure is low Ensure faucet is fully opened. Check to make sure water supply is a minimum 30 psi, 4 GPM Inlet water filter is clogged Clean the water filter.
Limited Warranty 10. LIMITED WARRANTY Always keep your receipt as proof of purchase. We’re here to help! If you have any questions or comments, call our toll-free hotline 1-866-4SIMONIZ (1-866-474-6664). Have your serial number ready. The serial number can be found on the back plate, located on the rear of the unit. This product has a Parts Replacement, Product Exchange and/or Repair Warranty only. NO REFUNDS will be provided. Please see stores for Product Exchange details.
Exploded Parts Diagram 25 11.
Exploded Parts Diagram Ref. Description Qty Ref.