Operator's Manual Do Not return this product to the retailer! Questions? 1-866-293-9274 Record All Information and attach sales receipt here for future reference: Purchase Date:____________________ Serial #: __________________________ Gas Powered Pressure Washer S2000 Table of Contents Safety Guidelines/Definitions . . . . . . .2 Important Safety Instructions . . . . .2–5 Carton Contents . . . . . . . . . . . . . . . . .6 Assembly Instructions . . . . . . . . . . . . .6 Operating Instructions . . . . . .
SAFETY GUIDELINES - DEFINITIONS This manual contains information that is important for you to know and understand. This information relates to YOUR SAFETY and PREVENTING EQUIPMENT PROBLEMS. Please read the manual and pay attention to these symbols below. Indicates an imminently hazardous situation which, if not avoided, will result in death or serious injury. Indicates a potentially hazardous situation which, if not avoided, may result in minor or moderate injury.
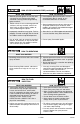
HAZARD RISK OF EXPLOSION OR FIRE (continued) HOW TO PREVENT IT WHAT CAN HAPPEN • Materials placed against or near the pressure washer can interfere with proper ventilation causing overheating and may ignite materials. • Never operate pressure washer in an area containing dry brush, weeds, or any flammable containers or materials. • Muffler exhaust heat can damage painted surfaces, melt any material sensitive to heat (such as siding, plastic, rubber, or vinyl), and damage live plants.
HAZARD RISK OF CHEMICAL BURN WHAT CAN HAPPEN HOW TO PREVENT IT • Use of acids, toxic or corrosive chemicals, poisons, insecticides, or any kind of flammable solvent with this product could result in serious injury or death. • Do not use acids, gasoline, kerosene, or any other flammable materials in this product. Use only household detergents, cleaners and degreasers recommended for use in pressure washers. • Wear protective clothing to protect eyes and skin from contact with sprayed materials.
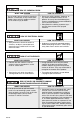
HAZARD RISK OF UNSAFE OPERATION WHAT CAN HAPPEN HOW TO PREVENT IT • Unsafe operation of your pressure washer could lead to serious injury or death to you or others. • Do not use chlorine bleach or any other corrosive compound. • Become familiar with the operation and controls of the pressure washer. • Keep operating area clear of all persons, pets, and obstacles. • Do not operate the product when fatigued or under the influence of alcohol or drugs. Stay alert at all times.
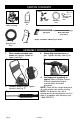
CARTON CONTENTS Knobs Saddle bolts Engine frame and wheel assembly Chemical hose Engine oil Hex key and cleaning tool Bagged parts Spray gun Multi-adjustable spray wand Engine and Owner's Manual (not shown) High pressure hose Handle ASSEMBLY INSTRUCTIONS 1. Place handle assembly onto frame and connect handle to frame. (see Fig.1) Fig. 1 3. Fig. 3 4. 2. Connect wand to gun. Tighten securely. (see Fig. 2) Fig. 2 A04196 Attach high pressure hose to gun. Tighten securely. (see Fig.
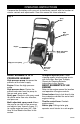
OPERATING INSTRUCTIONS Compare the illustrations with your unit to familiarize yourself with the location of various controls and adjustments. Save this manual for future reference. Fig. 4 Spray Gun High pressure hose Engine Multi-adjustable spray wand High pressure pump Detergent injection hose BASIC ELEMENTS OF A PRESSURE WASHER High pressure pump: Increases the pressure of the water supply. Engine: Drives the high pressure pump.
2. PRESSURE WASHER TERMINOLOGY PSI: Pounds per Square Inch. The unit of measure for water pressure. Also used for air pressure, hydraulic pressure, etc. GPM: Gallons Per Minute. The unit of measure for the flow rate of water. CU: Cleaning Units. GPM multiplied by PSI. GPM x PSI = CU Bypass Mode: Allows water to re-circulate within pump when the gun trigger is not pulled. Allowing the unit to run for more than two minutes without the gun trigger pulled could cause overheating and damage to the pump.
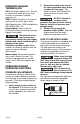
The nozzle at the end of the multi-adjustable spray wand can be rotated to change the high pressure spray pattern from a 0º pencil stream to a 40º fan spray (see Fig. 6a and 6b). Markings have been placed on the nozzle to help you select the spray pattern. Fig. 6a 40º fan spray Fig. 6b 0º pencil stream For low pressure operation, extend the nozzle of the multi-adjustable spray wand as shown in Fig 7. Fig.
STARTING HOW TO APPLY DETERGENT/CLEANING SOLVENTS Applying detergent or cleaning solvents is a low pressure operation. NOTE: Use only detergent/cleaning solvents designed for pressure washer use. Do not use bleach. To apply detergent/cleaning solvent: 1. Press detergent Fig. 8 hose onto barbed fitting located near high pressure hose Barbed connection of fitting pump as shown in Fig 8. 2. Place other end of detergent hose with filter on it into container holding detergent/cleaning solution.
8. Start engine. See Engine Owner's Manual for correct procedure. NOTE: When engine rope is pulled, pressure starts building in the gun. If the engine does not start after two pulls, pull the gun trigger to relieve this pressure. 9. Depress trigger on gun to start water flow. NOTE: Stand on a stable surface and grip gun/spray wand firmly with both hands. Expect the gun to kick when triggered. Risk of Burns.
of the wand with the 2 mm hex key provided (see Fig.11). 6. Clean the nozzle using the nozzle Fig. 11 7. cleaner provided or a straightened paper clip. Insert into the nozzle end and work back and forth until obstruction is removed (see Fig. 12). Direct water supply into nozzle Fig. 12 end to backflush loosened particles for 30 seconds (see Fig. 13). 8. Reconnect spark plug wire Fig. 13 A04196 9. Reassemble the nozzle to the wand. Tighten securely to prevent leaks. 10.
STORAGE Fig. 15 ENGINE Consult the Engine Owner's Manual for the manufacturer's recommendations for storage. PUMP The manufacturer recommends using a pump protector/winterizer when storing the unit for more than 30 days and/or when freezing temperatures are expected. If a pump protector/winterizer is not available, RV* antifreeze needs to be run through the pump as outlined in the steps below.
TROUBLESHOOTING GUIDE CAUSE PROBLEM Engine will not start (see Engine Manual for further engine troubleshooting) No or low pressure (initial use) Add Fuel. Pressure builds up after two pulls on the recoil starter or after initial use. Squeeze gun trigger to relieve pressure. Engine not primed Push primer button three times Spark plug wire not attached. Attach spark plug wire. Air filter clogged. Clean air filter and reassemble. Spray wand not in high pressure.
PROBLEM No or low pressure (after period of normal use) Water leaking at gun/spray wand connection Water leaking at pump Pump Pulsates CAUSE CORRECTION Worn seal or packing Call: 1-866-293-9274 Worn or obstructed valves. Call: 1-866-293-9274 Worn unloader piston. Call: 1-866-293-9274 Worn or broken o-ring. Check and replace. Loose hose connection. Tighten. Loose connections. Tighten. Piston packings worn. Call: 1-866-293-9274 Worn or broken o-rings.
WARRANTY Engine Warranty The first year of the engine warranty is the responsibility of Briggs & Stratton® Corporation. For complete details, please refer to the Briggs & Stratton® Operating & Maintenance Instructions. For the second year of engine warranty, please call 1-866-293-9274. Gas Powered Pressure Washer Warranty This Simoniz product carries a two (2) year repair warranty against defects in workmanship and materials.