
Unit installation


Digital Half Cylinder
Page 10
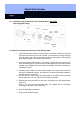
6.4.2 Installing the Knob and Flange of the Half Cylinder
1. Put on the locknut. The flat surface with the bore holes faces away from the
cylinder.
Note: If you cannot see any screw thread on the end of the pipe, this cylinder
has a new flange mounting (in this case, refer to Point 6.4).
2. Put the flange onto the end of the pipe; the side of the flange with the screw
thread faces away from the cylinder. The flange contains a crosspin that sticks
out of the interior diameter. This crosspin must catch in the longitudinal slot of
the pipe. Push the flange up against the stop on the pipe.
3. Holding it in this position, fix the three setscrews very tightly with the Allen key
(1.5 mm). Check whether the setscrews are really tightly screwed, because
this is important for correct functioning.
4. Fix the electronics module to the flange with the Allen screws that are parallel
to the battery (same Allen key as above). Guide the cable through the recess
next to the connector. Make sure that the cable is not pinched.
5. Connect the cable to the electronics socket and lay it so that it is flat on the
electronics covering and not in the way when screwing on the knob (danger of
pinching).
6. Use an authorised transponder to couple the half cylinder and tightly screw
the knob in until the stop
. Make sure that the knob is screwed on up to the
stop (important for the function). While doing this, you must firmly hold the
catch with your hand if the half cylinder is not installed. If the half cylinder is
installed, the catch is held by the stop within the lock.
7. Firmly hold the knob and use the special tool for half cylinders to firmly screw
the locknut onto the knob.