
Instructions / Assembly


4) Install the keeper to the astragal following the installation instructions included in the patio door handle box.
Note: DO NOT use the 4” screws to install the keeper. Use the 1.5” self tapping screws provided.
5) Install your patio door screen following the instructions on the frame of the screen.
On 4 Panel Doors:
1) Adjust the sash wheels to the fully recessed position before installing the sash into the frame.
2) Install the sash into the patio door frame. Warning: Patio door sashes are heavy and difficult to handle.
More than one person might be required to perform this operation.
3) Adjust sash wheels for proper operation ensuring that the sash is squared and leveled to the patio door
frame and/or fixed sashes. Note: Improper wheel adjustment will lead to handle, grids, and/or reveal
misalignment.
4) Install the patio door active handle to the operating sash.
5) Install the dummy handle to the keeper sash.
6) Install the pre-fabricated astragal to the keeper sash by applying a bead of caulking along both sides of the
U-shaped channel of the astragal. Secure it by applying the self tapping 1.5” screws provided every 12
inches. Ensure that the roller adjustment screws are visible.
7) Install the keeper to the astragal following the installation instructions included in the patio door handle box.
Note: DO NOT use the 4” screws to install the keeper. Use the 1.5” self tapping screws provided.
8) Install the secondary flush bolt into the top portion of the astragal.
9) Install flush bolt plate on the header of the door by following the next steps:
a. After closing the door, mark the flush bolt hole location.
b. Drill flush bolt hole using a 3/8” drill bit. Note: Hole should be NO deeper than 1/4”.
c. Install flush bolt plate using the screws provided.
10) Install active screen following the instructions on the frame of the screen.
11) Install dummy screen following the next steps:
a. Remove screen handle.
b. Remove screen lock from the handle.
c. Re-install dummy screen handle.
d. Install dummy screen following the instructions attached to the screen frame.
e. Adjust screen rollers in order to ensure dummy handle aligns with the active screen handle.
12) Once both screens are installed, install patio door screen astragal following the next steps:
a. Adjust wheel height to ensure proper operation and match handle height.
b. Install screen astragal to the dummy screen keeping the inside leg of the astragal flush to the
screen.
c. Attach screen keeper following the installation instructions attached to the screen.
d. Check for screen operation and ensure that it locks properly.
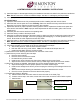
13) Install Screen Stops (L-Bracket)
a) Measure frame width and mark center of screen channel on the head (Top)
b) Position screen stop in the center, screw hole to be on the non active screen. Refer to photo.
c) Install screws
’
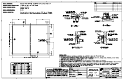
Fig. 2
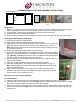
CONTEMPORARY PATIO DOOR ASSEMBLY INSTRUCTIONS
Screw to be positioned
towards the non active screen
“L” to be positioned
in the center
Screen Channel.
Screen Stop & Screw
For more information, please contact Simonton Service Solutions at 1-877-789-4617 or email THDSO@servicesolutions.simonton.com
2