
Instructions / Assembly

Preparation:
1) Remove the handle box(es), setting blocks, pre-cut door and screen astragal as
well as pre-cut glazing bead from the patio door frame. Ensure all parts are present
before removing existing door.
2) Tools required: Vinyl snips, 2lb. dead blow non scuffing hammer (see fig.2)
3) Install the frame into the designated opening.
4) Once the frame has been properly installed and leveled, proceed to glaze the patio
door fixed panels.
Glazing your French Rail Patio Door:
1) Apply a small (1/8”) bead of caulk along the entire length of the glazing bead
channel as shown in Fig. 1. Note: DO NOT allow the caulk to set up before
inserting the glazing bead.
2) Begin by inserting the glazing bead with the pre-applied glazing tape into the back
glazing bead channel (the channel toward the inside of the house) at the bottom of
the fixed panel. Next, insert the pre-taped glazing bead into the sides and finish by
inserting the pre-taped glazing bead into the top.
3) Peel off the backing of the glazing tape.
4) Apply sealant where glazing tape meets at each corner.
5) Apply setting blocks provided to the bottom of the fixed panel 3” to 4” away from
jamb ensuring that weep hole is not covered by the setting block. (see Fig 3)
Note: White setting blocks are for French Rail doors and grey setting blocks are for
Contemporary doors.
6) Identify the appropriate insulated glass unit to be glazed.
7) Ensure that the insulated glass unit is installed with surface 4 facing the inside of
the house. Follow the indications on the label on surface 4 of the insulated glass
unit. Warning: Insulated glass units are heavy and difficult to handle. More than
one person might be required to perform this operation.
8) Notch snapping leg at a 45 degree angle from the tip of the bead so it does not
interfere with the weld.
9) Install the top glazing bead first and then the bottom glazing bead.
10) Install the glazing bead on the sides of the fixed panel as shown in (Fig. 2)
Note: Applying glass cleaning solution between the glass and the bead could ease
the bead installation.
11) Apply caulk to fill any gaps at the corners after the glazing bead has been installed.
Wipe off any excess caulk. Note: If the gap is bigger than 1/16” the bead will have
to be re-ordered or re-cut.
Operating sash and screen installation:
On 3 Panel Doors:
1) Adjust the sash wheels to the fully recessed position before installing the sash into the frame.
2) Install the sash into the patio door frame. Warning: Patio door sashes are heavy and difficult to handle.
More than one person might be required to perform this operation.
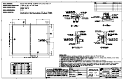
Glass
Unit (2)
Handle(s) (a)
Glazing
bead (b)
Setting
blocks (c)
Frame
(a)
(b)
(c)
Astragal
Astragal top (b) Flush bolt (c)
FRENCH RAIL PATIO DOOR ASSEMBLY INSTRUCTIONS
Parts Identification:
Fig. 1
Fig. 2
Fig. 3
Fig. 2
For more information, please contact Simonton Service Solutions at 1-877-789-4617 or email THDSO@servicesolutions.simonton.com
3