HInged PAtio Door Systems I n s ta l l at i o n I n s t r u c t i o n s
TOOLS NEEDED: IMPORTANT: Read the instructions and familiarize yourself with the door parts and pieces before beginning assembly and installation. PERFORMANCE TESTED This installation manual is designed to assist experienced door installers. This manual assumes installers will have industry knowledge and understanding of carpentry principles. This manual also assumes installers understand how to properly and safely use power tools.
2 Check and prepare rough opening Provide a flat, level, clean bearing surface so the sill may be caulked and sealed to the opening. Scrape, sand or fill as required. A correct rough opening must be plumb, level and square. Maximum tolerance is no greater than 1/8" with any of these checks across the full width and height of opening. Plumb should be checked for both: • Right/Left plumb • Inside/Outside plumb. Fix any problems now! Pro Tip: A laser level makes this job easy and ensures accuracy.
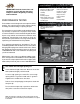
3 Install sill pan (Recommended) Sill Pan assembly Follow pictures to correctly install the pan system. *ASTM E2112 -07 recommends pan systems under all windows and doors. Use the sill pan available from Simonton. A F G ➡ Apply three (3) 1/2" beads of sealant across the width of the rough opening. ➡ ➡ D ➡ C ➡ B E After the pan is correctly assembled, wrap the frame stud 4" – 4 1/2" up with a high quality peel and stick water proof flashing. Set the left pan corner in place.
4 Prepare unit to place in opening Important! Apply sealant to sill pan as shown in step 3F. Nail Flange Corners Critical to Quality The nail flange corners need special attention. Two adhesive foam corners are supplied with the door. These need to be carefully applied with sealant to avoid leaking. ➡ Apply sealant here. Apply sealant bead in line with screw holes (interior side) of the nailing flange around the perimeter of door. A 1/2"- 5/8" bead of sealant is essential.
5 Shimming and securing perimeter of the door jamb Important! Shim the door before it has been opened. Margins should be consistent around the door. French Double Doors - Place shims between the doors in the center to prevent the shims at the jambs from over compressing the door in the center. ➡ Shim and screw locations: (See picture for recommended shim and screw locations). Examples are explained below.
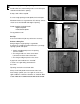
Adjust frame and complete fastening flange to wall A B ➡ Now that the door is installed and sealed properly, it is time for the top flashing to be applied. The top flashing should extend 1" wider than the edges of the side flashing. After the top flashing is applied, begin the trim application. Start by centering the top piece of trim and using a rubber mallet to snap the trim to the nailing flange. D C ➡ The inside of the miter cuts will line up with the frame corner joint.
9 Hinged Patio Door Corner Seal Pads Apply sealant at joint, where the threshold cap meets the door jamb. Remove self-stick paper from corner seal pads and apply to the door jamb, with bottom lined up evenly with top of sill cap. When correctly installed the tab is always on top and the narrow part is on the bottom. The bottom is the same width as the sill cap to help with alignment of installation. Repeat on the other side of the door.