
Operator`s manual


5-4
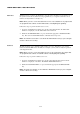
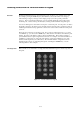
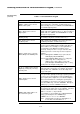
Table 5-1. Function/Numeric Keypad
Press this Key on Keypad
Data to Enter
ZONE – allows you to select a
Monitor Zone point.
<ZONE> followed by <ENTER>, where ZONE
represents a zone card and is a number from x to y.
After selecting a zone, use <NEXT> and <PREVIOUS>
to scroll through the points.
SIG – allows you to select a
Signal point.
<SIG>, followed by <ENTER>, where SIG represents a
signal card and is number from x to y. After selecting a
signal card, use <NEXT> and <PREVIOUS> to scroll
through the signal points.
AUX – allows you to select an
Auxiliary Relay
<AUX>, followed by <ENTER>, where AUX represents
an auxiliary relay and is a number from x to y.
FB – allows you to select a
feedback point.
<FB>, followed by <ENTER>, where FB represents a
feedback point and is a number from x to y.
IDNet – allows you to select an
IDNet, Mapnet or VESDA point.
<IDNET> followed m-dd, followed by <ENTER>, where
m represents the IDNet channel number and dd is the
device address. For example, to select point M1-13,
you would press the IDNet key and then enter 1
(channel). Next press the <-> key to enter the dash,
and then press the 1 and 3 keys to enter 13 (device
number).
Note 1: Although the <IDNET> key is pressed, the
LCD displays M (for MAPNET).
Note 2: New multipoint IDNet devices use sub-point
addressing. These sub-points are
addressed as c-dd-s, where s is the sub-
point. Example: A FRIAM device has a relay
at sub-point 1 & an input at sub-point 2.
P / A / L – allows you to select a
digital (P), analog (A), or List (L)
pseudo point.
Enter the number corresponding to the digital pseudo,
analog pseudo, or list point. For example, pressing the
<P> key then <2>, <ENTER> selects the Lamp Test
Key pseudo point.
NET – allows you to select a
network point.
Enter a network node number, followed by <ENTER>.
The system then prompts for the type of point you want
to select. Press the keypad key corresponding to the
type of point (Zone, Signal, etc.) Use the descriptions
above for information on selecting the specific point.
For example, to select zone 3 on node 2, you would
press the <NET> key, <2> then <ENTER>. Next press
<ZN> (key 1), <3> then <ENTER> for zone 3.
ADDR = Dip-switch address of
the card in the system.
Specify the address using the format c-p-s, where c is
the card, p is the point, and s is the subpoint. You must
insert the dash between the components of the
address. Use the <-> key to do this.
For example, to select address 0-7-3 (Brigade Alarm
Relay), you would press the <ADDR> key.
<ADDR> <0> <-> <7> <-> <3> <ENTER>
Note: System points are given a card address of
0. The first real card address is 1.
Selecting Points with the Function/Numeric Keypad, Continued
Selecting Points,
(continued)