
AmpliPHI 3.8kWh Battery Installation Manual


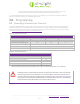


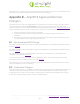
Table Of Contents
- 1.0 – Introduction
- 1.1 – Online Resources
- 2.0 –Safety
- 3.0 – Pre-Installation
- 4.0 – Installation
- 5.0 – Programming
- 6.0 – Troubleshooting
- Appendix A – AmpliPHI Battery Safety & Green Attributes, Certifications
- Appendix B – AmpliPHI Approved External Chargers

SimpliPhi Power, Inc. | 3100 Camino Del Sol | Oxnard, CA 93030, USA | (805) 640-6700 | info@simpliphipower.com | SimpliPhiPower.com
| 21 |
© SIMPLIPHI POWER
Figure 13.0 – AmpliPHI Battery’s Terminator Plug
The maximum number of AmpliPHI batteries that can be connected in a single system is 40, with a maximum total
connected distance of 40m (131 feet) from the first AmpliPHI battery module to the last AmpliPHI battery module.
While one 4’ CAT5 networking cable is provided per AmpliPHI battery, shor
ter networking cable for daisy-chaining
the batteries may be used.
Utilizing the last/closest battery to the inverter, create the closed loop communications bridge between the AmpliPHI
Battery and the Communication Input Port in compatible equipment utilizing CAT5 or greater cable. The cable length
from the last AmpliPHI Battery to the Inverter cannot exceed 40m (131 feet).
4.8 – Battery System Commissioning
CAUTION: AmpliPHI Batteries should be installed, wired and commissioned by a qualified
installer or professional electrician who is familiar with general electrical safety precautions
and specific regional code requirements.
If the AmpliPHI Battery’s voltage has dropped (during an extended period in storage) to a voltage below the inverter’s
minimum starting voltage requirement, then the battery will need to be charged using a plug-in / external charger.
SimpliPhi’s batteries have a very low self-discharge rate and typically do not require ancillary charging. If the AmpliPHI
Battery’s voltage has dropped due to over-discharge, try the steps outlined in Section 6.0 – Troubleshooting prior to
using ancillary charging equipment.
CAUTION: Only use a SimpliPhi approved LFP charger if ancillary charging is required
before installation, testing or troubleshooting. Failure to use a SimpliPhi approved LFP
charger will damage the AmpliPHI Batteries and Void the Warranty. See Appendix C for
more details on approved chargers.
1. Before installing the AmpliPHI Battery, inspect the battery for any signs of damage. Do not install or operate
the battery if it has been damaged during shipping.
2. Prepare the battery module for installation by removing its plastic terminal covers, 11/16” stainless steel hex
nuts and 3/8” lock washers from the battery terminals and set aside.
REV202203161200