
Installation Guide


7171
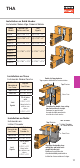
THA
Model
Modelo
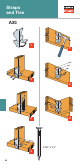
Top and Face
Encima and Cara
Joist
Vigueta
THA29 (16) 0.148" x 3" (4) 0.148" x 3"
THA213
(14) 0.148" x 3" (4) 0.148" x 3"
THA413
THA218 (18) 0.148" x 3" (4) 0.148" x 3"
THA218-2
(22) 0.162" x 3
½
" (6) 0.162" x 3
½
"
THA418
THA422
THA222-2
THA422-2
(30) 0.162" x 3
½
" (6) 0.162" x 3
½
"
THA426
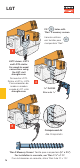
Installation on Solid Header
Instalación Sobre Viga Cabezal Sólida
Nail Location
Ubicación de
Los Clavos
Qty/Nail
Cant./Clavo
Top/Encima (4) 0.162" x 3
½
"
Face/Cara (4) 0.162" x 3
½
"
Joist
Vigueta
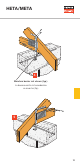
Fill all holes
with
0.162” x 3
½
”
Llene todos los
orificios con
clavos
0.162” x 3
½
”
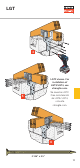
Installation on Truss
Instalación Sobre Cercha
Nail Location
Ubicación de
Los Clavos
4x Nailer /
Listón
Clavador 4x
Top/Encima (4) 0.162" x 3
½
"
Face/Cara (4) 0.162" x 3
½
"
Joist
Vigueta
Fill all holes
with
0.162” x 3
½
”
Llene todos
los orificios con
clavos
0.162” x 3
½
”
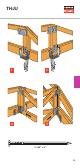
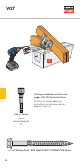
Installation on Nailer
Instalación en
Listón Clavador
Min. 4x nailer
Listón Clavador
4x Como Mínimo
Face / Cara
Top / Encima
Straighten the double-shear
nailing tabs and install nails
straight into the joist.
Enderece las pestañas de
clavado de doble penetración e
instale los clavos rectos en la viga.
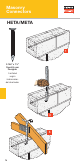
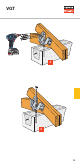
Top / Encima
Double 2x4 top chord min.
Viga superior doble de 2x4 como mínimo
Face / Cara
Straighten the double-shear nailing
tabs and install nails straight.
Enderece las pestañas de
clavado de doble penetración
e instale los clavos rectos.