
Project Ideas

(800) 999-5099
strongtie.com
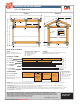
MATERIALS AND CUTTING DIAGRAM
© 2017 Simpson Strong-Tie Company Inc. • P.O. Box 10789, Pleasanton, CA 94588
DIY-CSDGHSE17 12/16 exp. 12/20
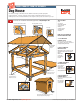
SIDE VIEW FRONT VIEW
36"
29"
7
3
⁄
8
"
28
3
⁄
8
"
7
1
⁄
8
"
46
1
⁄
2
"
23
1
⁄
4
"
24
3
⁄
4
"
55"
48"
45"
46
1
⁄
8
"
35
1
⁄
4
"
19
1
⁄
4
"
2
1
⁄
4
"
19
1
⁄
4
"
21
3
⁄
4
"
7
3
⁄
8
"
2
1
⁄
4
"
3 ft. x 4 ft. Dog House
(4) – 45" RAILS
(4) – 35
1
⁄
4
" CORNER POSTS
(3) – 29" END RAILS
(1) – 55" RIDGE BOARD &
29" END RAIL
(6) – 24
3
⁄
4
" RAFTERS &
(2) 7
3
⁄
8
" ROOF BLOCKS
(2)– 26" x 55" ROOF PANELS
(1) – 36" x 48" FLOOR
Attach with #6x1
1
⁄
4
" flat-head screws or
4d nails at 8" spacing
45" 45"
55" 29"
24
3
⁄
4
" 24
3
⁄
4
" 24
3
⁄
4
"
35
1
⁄
4
" 35
1
⁄
4
"
26" x 55"
Roof Panels (2)
46
1
⁄
8
" x 36"
End Panels (2)
Mark top-of-wall
and ridge-board
location to mark
roof lines
36" x 48" Floor
(Notch all corners)
36" x 48"
Side Panels (2)
SIMPSON STRONG-TIE
®
CONNECTORS*
(8) – Rigid Tie
®
RTC2Z connectors
(6) – RR Ridge connectors
(6) – H2.5A connectors
(4) – A21 angles
CORNER
POST
END RAIL
RAIL
RIDGE BOARD
RAFTER
ROOF
BLOCK
FASTENERS
(2) – BOXES Simpson Strong-Tie
®
#8x1
1
⁄
4
" Wafer-Head screws
(120) – #6x1
1
⁄
4
" flat-head screws or 4d nails
LUMBER
(7) – pieces of 2x4 8 ft. lumber
(4) – 4 ft. x 8 ft. sheets of
5
⁄
8
" plywood
FOR THIS PROJECT YOU WILL NEED:
CUT FROM PLYWOOD
CUT FROM 2x4 x 8' LUMBER
ROOF-BUILDING SEQUENCE:
1. Measure and attach the roof
blocks
2. Attach rafters to the ridge board
3. Lift assembly and rest ridge
board on roof blocks
4. Attach rafter to top of walls
SHEATHING TIP: When sheathing over the RTC connectors a slight bulge may appear in the plywood. If this is unacceptable, it is recommended that
1
⁄
4
" -
1
⁄
2
" furring strips be attached with
finish nails along the outside of surfaces to be sheathed prior to installing the plywood.
*CORROSION INFORMATION: We recommend using our ZMAX
®
galvanized product for best results on exterior projects and those using preservative-treated wood. These products have a “Z” at the
end of the model number (ex. RTC2Z). ZMAX
®
coated products provide additional corrosion resistance, which is advisable, but not required, for non-structural projects like the one shown above.
Visit strongtie.com/info for critical information.
WOOD/FINISH/ROOFING: Before making a wood-type or finish choice, make sure it is safe for your pet. Dimensions can be modified to fit your specific needs. Use roofing material of your
choice. Underlayment and asphalt shingles are recommended. Follow manufacturer’s instructions for installation.
1
7
⁄
16
"
Cut line
BEVEL RAFTER TIP
(2x)
(2x)
(1x)
(1x)
(2x)
7
3
⁄
8
"
TM
For more inspiration, visit diydoneright.com
The construction plan for this project is designed to be completed by people with basic carpentry skills in standard situations. If your situation is
unique, talk with someone with detailed carpentry or construction experience before starting your project. Particular attention was paid to the steps
and details in this plan, but they cannot be guaranteed to be error free. Simpson Strong-Tie
shall not be responsible for any possible loss, damage
or injury resulting directly or indirectly from the information contained here.