
Instructions / Assembly


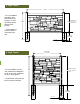
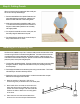

Step 8: Cutting Panels
Where a narrower panel is required to nish a wall, pan-
els can be cut to any desired length.
1. Remove steel stiffeners from panels. Determine the
exact width between post channels. Mark and cut
stiffeners to that width with a metal cutting blade.
2. Mark and cut the panel to the stiffener width, minus
½” to allow for thermal expansion and contraction of
the panel. Make certain panels are cut accurately
with edges parallel.
3. If a cut panel is used with an end or corner post, use
the factory edge for attachment to the post.
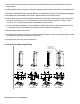
4. For steeper slopes, panels can be cut so the step or
drop in each section is 12” or less.
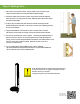
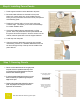
Installing on a Retaining Wall
SimTek can be installed on top of an 8” minimum width poured concrete wall or on at
concrete using SimTek’s Concrete Mounting Brackets. Concrete surface mounts are
manufactured with a heavy steel plate with vertical members. It attaches to the con-
crete with anchors and bolts to the post. Specic concrete shoes are available for end
posts, line posts, corner posts and gate posts
1. Cut the post to the desired height. Post may need to be cut longer to accommodate
changes in elevation. Always cut off the bottom of the post, retaining the factory
nished post top.
2. Panel support brackets are unnecessary when using concrete shoes. The Panels
will sit directly on the wall or driveway surface.
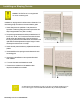
3. Start at the corner or an end post position. Locate the concrete shoe an equal
distance from the edges of the concrete.
4. Mark the position of the plate. Drill all four
holes through the pre-drilled holes in the steel plate.
5. Next install all the concrete anchor bolts in the
base plate bolt holes provided with a minimum
tension and shear strength of at least 4,000 lbs.
Position the bolts to fasten the mounting place
of the shoe.
6. Place the shoe over the bolt and attach the
shoes to the concrete with specied fasteners
Minimum bolt size
1/2” by 4.5”