
Instructions / Assembly


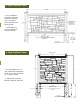


Step 5: Setting Posts
1. Set a post in the hole with concrete. Using a mallet or hammer, tap the post
into the concrete until the top of the post meets the desired height.
2. Fill the remainder of the hole with concrete. Using a level, check two adjacent
sides of the post. Two-way levels are useful. Adjust the post until it is both vertical
and at the correct height.
3. If using a dry mix method, rst place the post in the hole in the approximate
position at the bottom of the hole. Pour the dry mix in the hole, positioning the post
as soon as it is feasible.
4. Using the steel stiener out of the panel, which is exactly 70.25″ for the 6ft
wall and 95” for the 4ft wall, as a spacer, set the next post the same as the rst.
5. Do not move the post which is now in position. Leave the panel stiener spacer in
place for one hour minimum, as concrete begins to cure, to keep the posts from
moving. Set 3 to 4 posts with panel stieners as spacers, then advance them one at
a time, by moving the rst spacer placed. Allow the concrete to cure for a
minimum of 24 to 48 hours.
6. For a complete step-by-step installation video, visit our website at:
http://www.simtekfence.com/product-information or for personalized assistance
call our customer service line at 1-866-648-9336.
Make sure post is straight, plumb, and evenly spaced
Note: All SimTek posts are reinforced with galvanized steel. If
posts need to be cut, we suggest cutting them at the bottom tip.
DO NOT cut the top of the post.
Cutting the top of the post will VOID the warranty
For more info
Scan QR Code
and visit our site