FENCE INSTALLATION GUIDE 6’ HIGH FENCE 1.866.648.9336 www.simtekfence.
INSTALLATION GUIDE These instructions are designed to assist both professional installers and do-it-yourselfers of SimTek™ decorative rock-walls. These instructions are detailed to insure an excellent finished wall. A quality finished wall is a result of a quality installation. The layout must be consistent with ground contours; posts must be appropriately spaced and properly anchored.
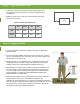
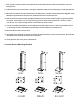
Step 1: Lay Out Fence Line 1. Locate your property line and stretch a string between stakes from the beginning to the end of the fence to ensure posts will be set on a straight line. 2. Beginning at the corner or end post, mark the location of the post. Dig a hole for each post. House Center to Center Post Dimensions Line Corner Line Corner End Gate 71 ½” 72 ½” 71 ½” 72 ½” 73 ½” 72 ½” 73 ½” Step 2: Digging Holes 1.
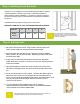
Step 3: Installing Fence Brackets If posts are to be installed in level ground attaching brackets in advance of post installation is easiest when using a measuring template for faster repetitive bracket installation. It is easier to change a bracket in the field if necessary than to install brackets once posts are installed in the ground. Installed brackets provide a leveling point on each post. DISTANCE FROM TOP OF POST TO SUPPORT BRACKET SURFACE Panel Size 3’ 4’ 6’ 8’ Bracket location 37.5” 49.
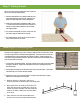
Step 5: Installing Fence Panels 1. Panel support brackets must be attached to all posts. 2. Be certain steel stiffeners are inserted in the top and bottom rail of each panel; they come installed from the factory, but may have been removed to use as post spacers. 3. Panels are universal, with no front or back, and no top or bottom edge. Randomly installing panels gives the most pleasing aesthetic effect. 4. Lift the panel bottom edge to approximately 4’ off the ground.
Step 7: Cutting Panels Where a narrower panel is required to finish a wall, panels can be cut to any desired length. 1. Remove steel stiffeners from panels. Determine the exact width between post channels. Mark and cut stiffeners to that width with a metal cutting blade. 2. Mark and cut the panel to the stiffener width, minus ½” to allow for thermal expansion and contraction of the panel. Make certain panels are cut accurately with edges parallel. 3.
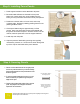
. If the concrete is not level, washers may be placed over anchor bolts and before shoes are bolted down to serve as leveling devices. 8. Position the skirt covers over the shoes, covering the metal plates. Skirts must be inserted prior to posts being attached. 9. Attach the shoe straps to the posts with fasteners in pre-drilled holes. Each side of the strap gets three staggered screws installed from opposite sides of the post for line posts and three each for ends and corners. 10.
Installing on Sloping Terrain Caution: SimTek Fence is not engineered for use as a retaining wall. Installation on sloping terrain is similar to that on flat terrain. Professionals typically use a laser to shoot and obtain a grade. 1. Set the first post on the uphill side. Post placement is important! Posts are typically placed at the point where the slope changes whether in a peak or a valley. 2.
SimTek Gate Installation Guide Gate Components and Tools Needed Gate Post SimTek™ Fence Gate End Post SimTek™ Hinges Latch Striker Rod (optional) 2 ½” Self-tapping Screws Button Head Screws Level and Power Drill Concrete Step #1: Set the Gate Post Gate posts have extra steel reinforcing for strength and are different than all other posts. Before setting the post in the ground, make sure that a gate post (not an end post is used) 1. Dig a hole 10” to 12” in diameter by 30” to 36” deep in the ground.
Step #2: Gate Openings All gates require about a 1 ½” gap between the gate and the gate post, and about a 1” gap between the gate and the end post or between the two gates when using double gates. For a single gates, use one gate post and one end post. For double gates, use two gate posts. Gate Post End Post Inside-to-Inside Post Spacing (see table below) Single Opening Double Drive w/3’ Gate Double Drive w/4’ Gate Double Drive w/5’ Gate Double Drive w/6’ Gate 3ft Wide Gate 38.5” 76.0” 88.
Step #3: Gate Hardware Installation A. Thread the ½” hinge rod into the upper and lower inserts in the gate metal frame leaving about 1 ½” from the edge of the gate to the bracket (this can be re-adjusted later) Illustration A Gate Panel B. Next hold the gate and its hinges against the gate post at the proper position and height. Drill the provided 2 ½” self-tapping screws into the gate post.
WARRANTY INFORMATION SimTek™ Fence warrants the product line to be free from manufacturing defects in materials and workmanship for 25-years from the date of purchase, or for as long as the original end-user purchaser of the product owns and occupies the real estate on which the product was first installed. The manufacturer’s warranty does not apply to installation. What We Cover.