
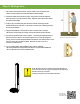
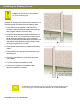
Installation Guide
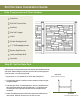


Step #2: Gate Openings
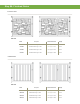
All gates require about a 1 ½” gap between the gate and the gate post, and about a 1” gap between the gate
and the end post or between the two gates when using double gates. For a single gate, use one gate post and
one end post. For double gates, use two gate posts.
Gate Post End Post
Inside-to-Inside Post Spacing
(see table below)
3ft Wide Gate
4ft Wide Gate
5ft Wide Gate
6ft Wide Gate
Gate Width
38.5”
50.5”
62.5”
73.5”
Single
Opening
76.0”
88.0”
100.0”
111.0”
Double Drive
w/3’ Gate
88.0”
100.0”
112.0”
123.0”
Double Drive
w/4’ Gate
100.0”
112.0”
124.0”
135.0”
Double Drive
w/5’ Gate
111.0”
123.0”
135.0”
146.0”
Double Drive
w/6’ Gate
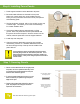
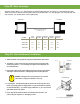
Step #3: Gate Hardware Installation
1. Attach the striker rod to the gate by using the provided button head screws.
2. Thread the ½” hinge rod into the upper and lower inserts in the gate metal
frame leaving about 1 ½” from the edge of the gate to the bracket (this can
be re-adjusted later)
3. Next hold the gate and its hinges against the gate post at the proper position
and height. Drill the provided 2 ½” self-tapping screws into the gate post.
DO NOT over tighten the screws because it can crush the
internal foam, making an indentation in the post.
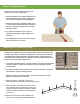
4. Level the gate. The standard height should be level with the top of the fence
panel. Six foot high gates are designed with a 2” gap at the bottom to facilitate
an unobstructed swing. If you desire a gap smaller than 2”, you may lower the
gate relative to the fence panels.
5. Finally, align the latch with the striker rod and attach the latch to the end
post by using the supplied 2 ½” self-tapping screws.
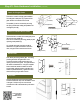
Internal
Metal Frame
Illustration A
Hinge
Gate Panel
2 ½” Zinc Plated Self Tapping Screw
SimTek Hinge
!