
Instructions / Assembly


7. If the concrete is not level, washers may be placed over anchor bolts and before shoes are bolted down to serve as
leveling devices.
8. Position the skirt covers over the shoes, covering the metal plates. Skirts must be inserted prior to posts being attached.
9. Attach the shoe straps to the posts with fasteners in pre-drilled holes. Each side of the strap gets three staggered screws
installed from opposite sides of the post for line posts and three each for ends and corners.
10. With the rst shoe anchored, and the post attached, determine and mark the next shoe position using a panel stiffener
as a spacer. It will measure 71.5” (for 3’ high and 6’ high) from the center of the next post and 1” shorter for a line to
a corner post. For 4’ high and 8’ high sections, it will measure 96” center to center.
11. Cut 7/8” of the bottom panel stiffer to accommodate the shoe strap and its screws. It is also recommended to remove
½” off the lower two feet on both sides of the panel edge to accommodate the shoe straps as well.
12. Mark and drill the holes for the next shoe.
13. Once all the shoes and posts are securely anchored to the wall and skirts are in place, insert the panels. Be certain that
steel stiffeners are in both top and bottom rails of each panel.
14. Finally, place the caps on the post for a nished look.
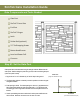
Concrete Surface Mounting Brackets
Need Help? call us at 1.866.648.9336
5
"
6.5
"
1.5"
24
"
End Shoe
10"
6"
End Shoe Skirt
Corner Shoe Skirt
Line Shoe Skirt
5
"
8
"
1
"
24
"
Line Shoe
10"
6"
9"
9"
7
"
7
"
1.25
"
24
"
Corner Shoe
5
"
8
"
2.5
"
24
"
Gate Shoe
10"
6"
Gate Shoe Skirt
5
"
6.5
"
1.5"
24
"
End Shoe
10"
6"
End Shoe Skirt
Corner Shoe Skirt
Line Shoe Skirt
5
"
8
"
1
"
24
"
Line Shoe
10"
6"
9"
9"
7
"
7
"
1.25
"
24
"
Corner Shoe
5
"
8
"
2.5
"
24
"
Gate Shoe
10"
6"
Gate Shoe Skirt