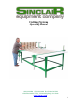
Cutting System Operating Manual (800) 624-2408 (530) 626-9386 Fax (530) 626-5144 6686 Merchandise Way Diamond Springs, Ca 95619 www.sineqco.
Assembly, Operating and Service Instructions A. Important for your safety! All activities on and with this machine must be carried out in a manner not endangering anyone. Above all, the following precautions must be observed: 1. The adjustable finger guard (512-120) may only be set as high as required for the thickness of the cloth. It may not be removed. 2. Effective safety measures must be taken before commencing any cleaning, repair work, or of changing of any parts.
D. Changing Blades 1. 2. 3. 4. Before changing blades, always turn off the main switch and unplug the machine. Remove the finger guard after loosening the knurled nut (512-122). Remove the grindstone assy by loosening the screw (512-91). Loosen tension nut (512-115), then withdraw the tension spring (512-114) and the blade holder (512-113) 5. Remove the upper blade (512-112) 6. The counter blade (512-110) may now be changed as well.
G. Assembly of guide parts with hand lifting device I. Cutting off equipment: 1. Clamp the near-side support including slide to the table top approx. 40-50cm from the left hand end. 2. Clamp the far-side support, including slide and lifting strap to the table top exactly opposite the near-side support. 3. Feed the lifting strap over the belt rollers (555-286) in the fastening angles (550-273) across the table to the front. 4.
H. Operation I. Adjustment of length According to the length of cloth required to be cut off, move the end stop and clamping device from the center of the guide rail to the inner side of the end rail until the distance corresponds to the required length of cloth. Lock the movable supports in position by means of the clamping lever (560-415). II.
Replacement Parts 6
NOTES 7