3DWOX 5X / 7X/ riZE 7XC USER MANUAL Printing 3
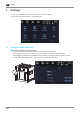
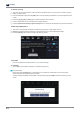
3 1. Printing Printing User can print printables via USB flash drive, USB cable, or over the network. The following on the printer means it is ready to start print. 1.1 Printing from USB Flash Drive 1 Connecting USB flash drive to the printer. In order to print using an USB flash drive, insert the flash drive into the USB port. When the USB flash drive is connected while in the home screen, a list of files in the USB appears.
Printing 3 2 Printing Files Select a file to print in the USB list. 3 Print Preview Once selected, a preview of the model appears on the screen. 4 Printing Once [Print] is pressed the nozzle starts to be heated. When the specified temperature is reached, the printing starts.
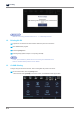
3 Printing 5 Pausing Print Pressing [Pause] during a print will pause the progress. Press [Resume] again and nozzle is heated again, and the printer will continue printing.
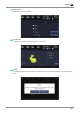
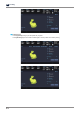
Printing 3 6 Additional Functions of Pausing When the [Pause] button is pressed during printing, buttons appear in the upper right corner to execute additional function actions. Additional functions include [Nozzle cleaning], [Bed Height Adjustment], [Extruder], [Cartridge] and so on. These additional functions are used for any mechanical problem or if the user needs them.
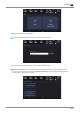
3 Printing ❖ Nozzle Cleaning ① This menu can be used to clean a nozzle manually if the filament does not come out of the nozzle for printing. ② Select a nozzle to clean. ③ Enter the temperature and press the [OK] button. Press the heating nozzle button to set the temperature of the nozzle. ④ Press the [1], [10], [50], or [100] button to select the desired moving amount. ⑤ Press an arrow button to move the filament to a desired direction.
Printing 3 8 Printing Completion After printing has completed, follow the instructions and remove the printed product. Press the [OK] to return to home screen. Caution - Do not touch the bed or the output until the bed has cooled down. - To remove the printed output before the bed is cold, press the [Cancel] button, wear protective gear, and then remove the output.
3 Printing Reference - Methods of removing printables refer to P. 4-2 “1. Printed Output Check”. 1.2 Printing Via PC 1 Prepare PC connected to the same network where the printer is connected to. 2 Run 3DWOX Slicer program. 3 Press the [Print] button. 4 Following Steps (Same as steps 3~9 of printing via USB) Note - Pause, print cancelation, please refer to P.3-2 Printing from USB Flash Drive. - Refer to “3DWOX Desktop Manual” for the details. 1.
Printing 3 *Additional cloud apps can be added later. 2 When using [CLOUD] for the first time, users must register their printer. * Alexa and Sindoh Cloud Slicer app share Printer registration information. 3 [Generate Code] allows you to connect the device with the account of the user registered in the App. If there is a user registered on the device, [Registered Users] appears, listing the registered users and deleting them by clicking the [ - ] button.
3 Printing 4 When the print job is sent to the printer registered in the app, a menu called [Print Queue] appears, and the names of the sender and the transmitted print job are displayed in the list when the menu is entered. The transferred print job can be deleted with the [ - ] button.
Printing 3 5 When you select the print job you want to print, the preview image of the print job will be displayed, and by clicking the [Print] button, the print job starts immediately after downloading the corresponding output. When the printing is started, the print job in [Print Queue] will be deleted from the list.
3 Printing 6 [Printer Detail] menu lets users check the printer information. 7 [Edit Printer] menu lets users change the [Display name].
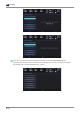
Printing 3 8 [Deregister Printer] menu lets users delete the registered printer in the server. * If users delete the printer information, the [Print queue] list and the registered user list will be initialized. * If users want to use the [CLOUD] function again after deletion, printer must be re-registered in the server. 1.4 Print Job Management You can manage print jobs in queue. 1 Press the [Job List] button on the upper right hand corner while printing. 2 The print jobs in queue are listed.
3 Printing 3 You may click the list to look at the information of the print job and delete it if necessary. 1.5 Printing with Two Types of Filaments 1 Two nozzles can cross print the same material. - PLA & PLA - ABS & ABS 2 Two nozzles can cross print the same material. - PLA and PVA(PVA+) 1.
3DWOX 5X / 7X/ riZE 7XC USER MANUAL Printed Output Check 4
4 Printed Output Check 1. Printed Output Check 1.1 Detaching Printed Output Note - If Side B of the FLEXIBLE bed is used, the Printed Output can be detached when the bed cooled down, without detaching the FLEXIBLE bed. - If Printed Output is large that doesn’t detached on its own, detach the flexible bed after the bed has cooled down, and detach the Printed Output by bending the bed up and down. (Scraper is not required). To safely detach the printed model, first let the bed cool down.
Printed Output Check 4 Detach the object from the Flexible Bed. The object can be easily detached by bending the Flexible Bed up and down. Using the scrapper provided with the printer will be useful. Be careful not to apply too much pressure while using the scrapper could damage the bed sheet and the bed. Depending on the filament material the printed output may easily break or damage, please be cautious.
4 Printed Output Check 1.2 PVA(PVA+) Filament Removal Guide 1 After printing a model with PVA supports, Detach the printed output from the bed, and then soak it in water. Once it’s soaked in water, the PVA support will get dissolved. - If the water is warm, the dissolution time can be shorten. Make sure to keep the water temperature doesnot exceed 35°C; otherwise, the shape of the PLA can be deformed due to hot temperature..
Printed Output Check 4 Nozzle Z-offset calibration sheet Z-offset calibration sheet Bed - When ABS materials are output - If outputs are not properly attached to Side B, use only Side A, or carry out printing by adding the raft setting at the slicer. - When one or more arranged small outputs (50 mm × 50 mm or smaller) that have a small area at which they attach to the bed are printed out, it is recommended to print by adding the raft setting to Side A.
4 2. Printed Output Check If problems persist 1 Please visit http://3dprinter.sindoh.com.