D330A Series Quick Start Guide About This Machine 4
4 1. About This Machine Optional components List of optional components No. 4-2 Name Descriptions 1 Main unit Scans the original in the scanner section, and prints a scanned image in the printer section. This unit is referred to as “this machine” or “the main unit” in the manual. 2 Original Cover OC513 Used to fix the loaded originals. 3 Reverse Automatic Document Feeder DF-633 Automatically feeds and scans originals by page. This unit also reverses and automatically scans 2-sided originals.
About This Machine No. Name 4 Descriptions 7 Authentication Unit AU-102 Performs user authentication by scanning vein patterns in the finger. The Working Table WT-515 is required to install the Authentication Unit AU-102. To install, the Local Interface Kit EK-608 or Local Interface Kit EK609 is required. 8 Authentication Unit AU-201S Performs user authentication by scanning information recorded on the IC card or NFC-compatible Android terminal.
About This Machine No. Name Descriptions 21 Punch Kit PK-519 Install this unit onto the Finisher FS-533. This unit supports the punching function. 22 Job Separator JS506 Install this unit onto the output tray of this machine. This unit sorts printed sheets. The Mount Kit MK-603 is required to install the Job Separator JS506. 23 Mount Kit MK-603 This unit is required to install the Finisher FS-539/FS-539 SD/FS533 or Job Separator JS-506 on this machine.
4 About This Machine No. Name Descriptions 14 i-Option LK-117 Allows you to add the IP fax (SIP) function. 15 Upgrade Kit UK-221 Allows you to use this machine in a wireless network environment. 16 Heater HT-509 Prevents paper in a paper tray from being affected by humidity. The Heater HT-509 can be mounted when you purchase the Paper Feed Cabinet PC-118, PC-218, or PC-418. 17 Power Supply BOX MK-734 Used to turn on or off the operation of Heater HT-509 for paper feed cabinet.
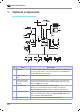
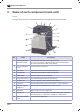
4 2. About This Machine Name of each component (main unit) Front This figure shows the main unit equipped with Reverse Automatic Document Feeder DF-633. No. 4-6 Name Descriptions 1 Reverse Automatic Document Feeder Automatically feeds and scans originals by page. This unit also reverses and automatically scans 2-sided originals. This unit is referred to as ADF in the manual. 2 Left Cover Release Lever Used to open the Left Cover. 3 Left Cover Open the Left Cover when clearing a paper jam.
4 About This Machine 13 Main Power Switch Press this switch to turn the machine on or off. 14 Tray 1, Tray 2 Allows you to load up to 500 sheets of plain paper. 15 Front Door Open this door to replace the Toner Cartridge , Waste Toner Box, or Drum Unit, and to clean the Print Head Glass. 16 Mobile Touch Area This area is used to associate this machine with an NFC-compatible Android terminal or an iOS terminal compatible with Bluetooth LE.
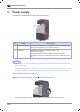
4 3. About This Machine Power supply This machine provides the Main Power Switch and Power key. No. Name Descriptions 1 Main Power Switch Turns the main power of this machine on or off. For details on how to turn the main power on or off, refer to page 17. 2 Power key Switches this machine to the Power Save mode. This function reduces power consumption and has a greater power saving effect. For details on how to use the Power key, refer to HTML User’s Guide.
About This Machine 2 When turning the main power off, press 4 of the Main Power Switch. Notice - When restarting this machine, turn the Main Power Switch off and on again after 10 or more se conds have passed. Not doing so may result in an operation failure.
D330A Series Quick Start Guide About Panels 5
5 1. About Panels Control Panel No. 5-2 Name Descriptions 1 Touch Panel Displays setting screens and messages. Directly press this panel to carry out operations. 2 Mobile Touch Area This area is used to associate this machine with an NFC-compatible Android terminal or an iOS terminal compatible with Bluetooth LE. 3 Start Press this key to start an operation such as printing. 4 Stop Press this key to temporarily stop an active print job. ● To restart, press the Start key.
5 About Panels 2. Touch Panel Home screen The layout of the home screen is as follows. No. Name Descriptions 1 User/Account Name Displayed when user authentication and account track are enabled. Opening the left area displays the name of the current login user or the account name. Tapping logs out. 2 [Job List] Displays active or standby jobs. If necessary, you can check job logs or print a communication report.
5 5-4 About Panels No. Name Descriptions 8 Left area open/close icon Opens or closes the left area. Opening the left area displays the names of the icons in the left area. 9 [Customize Home screen] Sets the function keys to display on the home screen. 10 [Language] Temporarily changes the language to be displayed on the panel. This option is displayed when [Temporarily Change Language] is set to ON. 11 [Utility] Configure settings of this machine or check the use status of this machine.
5 About Panels 3. Login methods When user authentication is enabled: When user authentication is enabled on this machine, the login screen is displayed. Enter the user name and the password, and perform user authentication. The contents of the login screen may vary depending on the authentication setting of this machine. If Public User Access (unregistered users) is enabled, you can tap [Used by public user] on the login screen to operate this machine without authentication.
5 About Panels 7 Tap [Yes] on the logout confirmation screen. When account track is enabled: When account track is enabled on this machine, the login screen is displayed. Enter the account name and the password to perform account track. The contents of the login screen may vary depending on the authentication setting of this machine. 1 Enter the account name and password. When performing account track using only the password, the keypad is displayed on the login screen.
D330A Series Quick Start Guide Loading the Original and Paper 6
6 1. Loading the Original and Paper Load the original The original loading methods are classified into two types: loading the original into the ADF (Automatic Document Feeder), and directly loading the original onto the Original Glass. Select the appropriate one for your requirements. 1.1 Loading the original into the ADF This function is useful when you want to scan an original containing multiple pages, or a sheet original of different sizes.
Loading the Original and Paper 2. 6 Loading paper No paper setting is required because frequently used paper is loaded during general use. This section describes how to use paper that is not usually loaded into a paper tray. The methods for loading envelopes, postcards, label sheets, and index paper are as follows. 2.1 Loading paper in Tray 1 to Tray 2 Up to 500 sheets of plain paper can be loaded into each tray.
6 Loading the Original and Paper 3 Load paper into the tray with the print side facing up. 4 When loading paper other than plain paper, specify the paper type. 2.2 For details on how to specify the paper type, refer to the HTML User’s Guide. Loading paper into the Bypass Tray When selecting a paper size other than for paper trays or printing on envelopes or transparencies, use the Bypass Tray. To use the Bypass Tray, specify the paper type and paper size.
Loading the Original and Paper 6 2 Load paper with the print side facing down, then align the Lateral Guide to the paper. Insert paper into the tray until their edges are pressed against the back. Notice - Do not load an excessive number of sheets such that the top of the stack is higher than the , ▼ mark. If paper is curled, flatten it before loading it. 3 Specify the paper type and paper size. 2.
6 Loading the Original and Paper ● Align the Lateral Guide with the envelope size. ● Select the desired envelope size from [Envelop/4 e6] ([Envelop/A6 Card]) of [Paper Size].\ When envelope printing has been completed, return the Fusing Adjustment Lever to the normal printing position (bottom). Caution - The inside of this product has areas subject to high temperature, which may cause burns.
Loading the Original and Paper 2.4 6 Loading postcards Precautions when using postcards ● When loading curled postcards, uncurl them. ● When using postcards other than 4 e 6 (A6 Card), confirm its size, and select [Paper Size] - [Custom Size] to specify the size. Up to 20 postcards can be loaded into the tray. ● Load postcards with the print side facing down. ● Align the Lateral Guide with the postcard size.
6 2.5 Loading the Original and Paper Loading label sheets A label sheet consists of the front-side paper (print side), sticking layer, and pasteboard (template). Peel off the pasteboard, then you can stick the label to other objects. Up to 20 label sheets can be loaded into the tray. ● With the print side facing down, load label sheets as shown in the figure. ● Align the Lateral Guide with the label sheet size. ● Select [Thick 1+] from [Paper Type].
Loading the Original and Paper 2.6 6 Loading index papers Up to 20 index papers can be loaded into the tray. ● With the print side facing down, align the tab side as shown below. ● Align the Lateral Guide with the index sheet size. ● Select [Index Paper] from [Paper Type].