D330A Series Quick Start Guide Registering a Destination 8
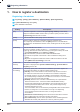
8 1. Registering a Destination How to register a destination Registering a fax address 1 Tap [Utility] - [Utility] - [Store Address] - [Address Book] - [New Registration]. 2 In [Select Destination], select [Fax]. 3 Enter destination information. Setting 8-2 Descriptions [No.] Destination registration number. Select [Use opening number] to automatically assign the smallest available number. When you want to specify a number, select [Input directly] and then enter a number.
Registering a Destination 8 4 Tap [OK]. Registering E-mail address 1 Tap [Utility] - [Utility] - [Store Address] - [Address Book] - [New Registration]. 2 In [Select Destination], select [E-mail Address]. 3 Enter destination information. Setting Descriptions [No.] Destination registration number. Select [Use opening number] to automatically assign the smallest available number. When you want to specify a number, select [Input directly] and then enter a number.
D330A Series Quick Start Guide Read this if You Have a Problem 9
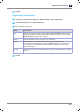
9 Read this if You Have a Problem 1. Main messages and remedies 1.1 Checking a notification message on the Touch Panel The notification icon is displayed on the home screen when there is a machine condition warning or notice notification. You can tap the icon to check the notification contents. 1 Tap the notification icon on the home screen. 1 Tap [ATTENTION List], and check the notification list.
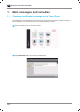
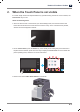
Read this if You Have a Problem 1.2 9 Screen that appears when a paper/staple jam has occurred If any paper or staple jam occurs on this machine, the paper jam clearing procedure and the paper or staple jam location are displayed on the screen of this machine. Confirm the clear procedure and jam location, and follow the guidance to clear the jam. If a paper jam is not cleared securely, the warning message is not reset.
9 Read this if You Have a Problem Return the original or paper, and tap [OK] or [Complete]; the system restarts scanning or printing of the original. Item 1.3 Descriptions [Start Guidance] Starts the guidance showing how to clear a paper/staple jam. [Display Switch] Changes the screen that shows the paper jam clearing procedure and the screen that shows where the paper jam occurred.
Read this if You Have a Problem 2. 9 When the Touch Panel is not visible If a certain length of time has elapsed without any operations being carried out on this machine, the Touch Panel may turn off. Check the following items: ● Touch the Touch Panel. In Power Save (Low Power/Sleep) mode, this machine returns from Power Save mode when the Touch Panel is touched or a key on the Control Panel is pressed, and the Touch Panel appears normally. ● On the Control Panel, press the Power key.
9 3. Read this if You Have a Problem When printing quality has deteriorated Cleaning the Original Glass and roller Wipe the surface using a soft, dry cloth. Caution - The inside of this product has areas subject to high temperature, which may cause burns. When checking the inside of the unit for malfunctions such as a paper misfeed, do not touch the locations (around the fusing unit, etc.) which are indicated by a “Caution HOT” caution label. A burn could result.
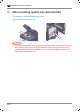
Read this if You Have a Problem 9 Cleaning the Slit Scan Glass Perform this procedure when the Reverse Automatic Document Feeder DF-633 is installed on the machine. 1 Open the ADF. 2 Wipe stains off the Slit Scan Glass using a dry, clean cloth. Notice - Do not touch the Slit Scan Glass.
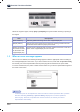
9 Read this if You Have a Problem Cleaning the Print Head Glass Printing quality deteriorates if the Print Head Glass is dirty. If this occurs, clean the Print Head Glass according to the following procedure. 1 Open the Front Door of the machine. 2 Remove the Waste Toner Box. 3 Remove the Printhead Cleaner from the Front Door of this machine.
9 Read this if You Have a Problem 4 Slowly insert the Printhead Cleaner all the way to the back end of the Print Head Glass, and then slowly pull it out. Repeat this operation approximately three times for all the Print Head Glass sections. 5 Mount the Printhead Cleaner onto the Front Door of this machine. 6 Mount the Waste Toner Box. 7 Close the Front Door of the machine.