Card Printer CHC-C320 Operation manual http://www.sinfo-t.
Handling of this Manual 1. All rights reserved. No part of this operation manual covered by the copyright herein maybe reproduced or copied in any form or by any means, including translation, without the written permission of SINFONIA TECHNOLOGY Co., Ltd. 2. The specifications in this operation manual are subject to change without prior notice. 3. In case of having any difficulties or finding the fault in this manual, your information to SINFONIA TECHNOLOGY will be highly appreciated.
CONTENTS PREFACE PREFACE Chapter 1. Important Safety Instruction ・・・・・・・・・・・・・・・・ 1-1 Environments ・・・・・・・・・・・・・・・・・・・・・・・・・・・ 1-1 Handling Instruction ・・・・・・・・・・・・・・・・・・・・・・・ 1-2 Handling Instruction for Consumable and Printed Output ・・・・・ 1-3 Chapter 2.
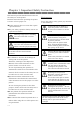
Chapter 1. Important Safety Instruction This manual provides detailed instructions for the safety use of the printer. Read this manual before operating the printer to ensure to have proper use. ◆In this manual, there are notes that require special attention. ◆ For your safety operation, Safety notices are separated as follows; Warning: Inappropriate handling can cause the death or serious wound. Caution: Inappropriate handling can cause the wound for the users and/or cause the physical damage.
Chapter 1. Important Safety Instruction Handling Instruction In handling the printer, please pay attention to the followings; Warning: Lift the printer from its box and put it onto a flat table or desk. Warning: At nearly 20Kg, the printer is too heavy to be lifted by one person. Also please take a good care of your hands and fingers when lifting the printer from the box. Warning: Be careful when you transport the printer on the slippery floor.
Chapter 1. Important Safety Instruction Handling Instruction for Consumable and Printed Output In handling the ink ribbon, card and printed output, please pay attention to the followings; Attention: Card Handling ・Use the card specified by SINFONIA TECHNOLOGY. ・Store the card flat. ・ Store the card in a dry and dark place to avoid the direct Sunlight. (Temperature less than 30°C, Humidity less than 60%). ・Do not touch the card surface before printing to avoid the fingerprints.
Chapter 2. Installing and Set Up This chapter explains the unpacking and set up of the printer. Before proceeding to this chapter, please make sure to read Chapter 1. Important Safety Instruction. Unpacking and Checking the Accessories 1. Open the box and remove the box containing the accessories and protection materials. Attention: Keep the packaging materials. The box and protection materials are necessary when moving or Accessories box Cushion 2. Take out the printer by holding bottom of the pri nter.
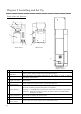
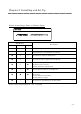
Chapter 2. Installing and Set Up Parts Name and Function ② ① ⑦ ③ ④ ( Front View) ⑤ ⑥ ( Rear View) ⑧ (Upper View) Name Function Printer Status ① Printer status display lamps are located on the panel. Indicator Open the upper unit when replacing an ink ribbon or card, or when ② Upper Unit performing maintenance. Open the card set unit when card setting, or when performing ③ Card set unit maintenance. Card set unit ④ When open the card set unit, push this button.
Chapter 2. Installing and Set Up Printer Status Lamps Name and Printer Status LED Display Description POWER MEDIA ERROR ○ ○ ○ The power of printer is off. * ○ ○ The printer is initializing after turn on the power Thermal head is cooled/heated on printing. ● ○ ○ The printer is ready to make prints. ● ○ * The card set unit or upper unit are opened. ● ○ ● Card jammed in printer. Mechanical part is faulty. Trouble of printer control board.
Chapter 2. Installing and Set Up Connecting Power Cable Insert the power cable attached to the printer into the power connector located on the rear of the printer. Warning: In case of not using the the power cable for safety. Warning: Avoid “piled up” connection. It can cause the fire and electric shock. Connecting USB Cable Connect the USB cable from the personal computer to the USB connector located on the left rear side of the printer. Be sure to insert the USB cable all the way.
Chapter 2. Installing and Set Up Attaching the cleaning roller. 1. Pull the upper unit open lever, and open the upper unit. Push the cleaning roller to the place shown in the following figure. (Push the cleaning roller until you hear an audible ‘click’.) R L When opening the upper unit, slowly move it upward with pulling the upper unit open lever. And until the upper unit is locked, hold and support the upper unit by hand.
Chapter 2. Installing and Set Up Setting Color Ink Ribbon 3. Place the ribbon cassette to the printer. 1. Pull the upper unit open lever, and open the upper unit. If there is any slack in the ink ribbon, remove it before setting. ( Taking out of the ribbon cassette ) Place the ink ribbon to the ribbon 2. cassette. White Blue Blue Blue 4. Insert the ribbon into the ribbon cassette until it clicks into position. Caution: Be careful not to get any dust, etc. on the ink ribbon.
Chapter 2. Installing and Set Up Setting Special Color Ink Ribbon Caution: Be careful not to get any 1. Pull the upper unit open lever, and open the upper unit. dust, etc. on the ink ribbon. 3. Place the ribbon cassette to the printer. 2. Place the ink ribbon to the ribbon cassette. If there is any slack in the ribbon, remove it before setting. White Blue Blue Blue ( Taking out of the ribbon cassette ) Insert the ribbon into the ribbon cassette until it clicks into position.
Chapter 2. Installing and Set Up Setting Card 4. While pulling the card guide (blue lever), 1. Push the card set unit open button, and draw out the card set unit. turn the printing surface on the front side and place it in the printer. And remove the upper side of the packing film. Convex portion is the lower left. 2. Place the dust box to the card set unit. Place the card in the printer. And remove the upper side of packing film. Put the card in the far side of the blue lever.
Chapter 2. Installing and Set Up Caution: Do not touch the printing surface (white side) by finger. Be careful not to get any dust,, etc. on the card. 5. Close the card set unit.
Chapter 2. Installing and Set Up Transporting the Printer The following cautions are necessary in transportation of the printer. Since an incorrect transportation method causes a printer fault, follow the correct method. 1. Remove the ink ribbon and card from the printer before transporting the printer. If the ink ribbon or card cannot be removed due to a fault, consult with the distributor. 2. Use a genuine box.
Chapter 3. Routine Maintenance Caution: Make sure that the power is turned off before starting cleaning. Thermal Head reaches high temperature just after printing. Do not touch directly by hand. Make sure that the thermal head has been sufficiently cooled down before starting cleaning. When fingerprint stick to the heat element, it can damage the Thermal Head. Do not touch directly by hand. Be careful not to be hurt by the projections of the printer.
Chapter 3. Routine Maintenance 4. Using gauze dipped with isopropyl alcohol or ethyl alcohol, clean the rubber section of the cleaning roller Attention: Printing should be performed after the alcohol dried up completely (approx.
Chapter 3. Routine Maintenance Cleaning of Outer Cover Wipe the printer outer cabinet with a soft cloth. If the stains are not removed, wet the cloth and apply weakened neutral Detergent to it. Warning: In case, the foreign substance get into the printer, turn off the power of printer, remove the power cable and contact the dealers or service center. Continuous use of the printer under such condition can cause the fire and electric shock.
Chapter 4. Error Handling Printer Status lamps are displayed in red When the error happens, the details of the error can be confirmed with the printer status lamps. Printer Status Lamps and Card Setting Lamp display ●:on、○:off、*:flashing / : Indicates that irrespective lit LED Display POWER MEDIA ERROR ● ○ * Status The card set unit or the Close the card set unit and upper unit are opened. the upper unit. Card jam occurred. ● ○ ● ● * ● ● ● ● * ○ Remove the card.
Chapter 4. Error Handling Failure Symptoms When detecting a failure symptom, check the printer using the following table. Symptom Action Power is not turned on. Check if the power cable is connected to the plug socket or the printer. The personal computer does not recognize the printer. Check if the USB cable is connected to the personal computer or printer. Check if the card set unit and the upper unit are closed. The printer does not become ready. Check if card is jammed in the printer.
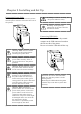
Chapter 4. Error Handling Card Jam (When there is a card around the center of the 1. Open the upper unit, and remove the printer and it is vertical as shown in the ribbon cassette. following figure.) 2. Confirm the card jamming position and ・Turn the knob(green) of the left side of the remove the card according to the following printer, move the card to the upper and pull procedure. it to upward and remove.
Chapter 4. Error Handling (When there is a card around the printer 2)If the card move to the position shown in center and it is horizontal as shown in the the following figure, pick up the top of the figure.) card and pull it up (as tilt it slightly forward), and remove it. 1)Turn the knob (green) of the left side of the printer, and move the card to the front side. Card (When there is the card at front part of the printer). 1)Move the card by finger to the position shown in the following figure.
Chapter 4. Error Handling 2)If the card move to the position as shown in the following figure, pick up the end of the 2)If the card comes out from the paper outlet, pull it up forward, and remove it. card and pull it up (as tilt it slightly backward), and remove it. (When the card do not be seen.) 1)Turn the knob (green) on the left side of (When there is the card at the paper outlet side.) 1)Turn the knob (green) on the left side of the printer, and move the card to the front side.
Chapter 4. Error Handling 2)If the card does not come out despite continue to turning knob for a while (about 5 (When there is the card at rear part of the printer). rotations), pull up the card set unit 1)Move the card by finger to the position 3)If tip of the card protrude little from Gate shown in the following figure. unit, move the card to the upper and pull it to upward and remove.
Chapter 4. Error Handling Power Supply Interrupted during Printing In case, power supply interrupted during the printing, Thermal Head will be kept pushing to Platen. Leaving this situation for a long time, shape of Platen can be warped. In order to avoid this situation, please follow the instruction below. 3. Turn the ribbon on the winding side and rewind the taped section completely. 1. Turn off the power of the printer. 2. Turn on the power for 3 or more seconds after turning off the power. 3.
Chapter 5. In order to more comfortably use For longer Printer usage Caution: Printing continuous pattern of high density image in limited part may cause uneven density print. Recommend not to print those images continuously. The consumable part of the printer (Periodic replacement recommended parts) is as follows. Check for details to after-sales service department. ・Thermal Head, ・Platen Roller ・DC MOTOR ASSY (9 type) ・Card Feeding claw For the Customers in the U.S.A.
After-sales Service Contact your dealers or service center for the details about after-sales service.