
Instruction Manual


2-2 Preparation and checking prior to sewing
At the time of shipment, this machine is set
for interlocking. However, please recheck
the machine again in the order given below.
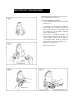
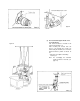
(1) Is the tip of the blade on the upper
knife facing in a downward direction?
(The knife should be in the position to
cut the cloth.) (Figure 14)
(2) Is the crank lever in the slot? (Figure 15)
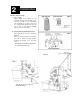
(3) If the crank lever is not in the slot,
rotate the machine pulley by hand
placing the needle in the lowest posi
tion, At this point, the crank lever may
be set into the slot by pushing down
ward, thus allowing the looper for
overedging to operate.
2-3 Sewing
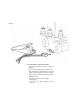
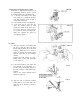
(1) After the completion of threading, hold
the ends of both the upper and lower
threads with the fingers of the left hand
creating a minor tension as shown in
Figure 16 and turn the machine pulley
with the right hand in the clockwise
direction.
Confirm that both threads are inter
twining. Then, set the cloth, and begin
to sew. (Figure 17)
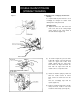
(2) If the tension balance of the upper and
lower threads is not satisfactory, it is
possible that puckering will appear on
the cloth or that the seams will become
irregular.
Refer to the section "Thread tension
adjustment". (Page 11)
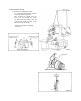
(3) After the seam is completed, continue
sewing about 3—5 cm at the end of the
cloth and cut the threads as shown in
Figure 18.
Figure 17
Figure 18