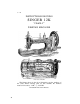
Form K2 INSTRUCTIONS FOR USING SINGER 12K “FAMILY” SEWING MACHINE Under View of Machine The figures shown in the above illustrations are the numbers of the i)arts. When ordering parts for this machine the numbers must be followed by “ 12K,” e.g., 48J/12K. THE SINGER MANUFACTURING CO.
BALANCE WHEEL STOP MOTION. This device allows the balance wheel to run free, so that bobbins may be wound and the correct method of treadling acquired, without operating the stitching mechanism. To loosen the wheel, hold it with the left hand, and with the right hand pull out the disc sufficiently to allow of its being turned either to the right or left, thus liberating the projection on the inner side of the disc from its recess.
at the same time allowing the feet to move freely and lightly with the motion of the treadle. Continue to do this until a regular and easy movement is acquired and you are able to work the treadle so that you can re-start the machine without the balance wheel turning in the wrong direction. When familiar with the working movement, lock the balance wheel, and place a piece of material under the presser foot (23).
TO THREAD THE SHUTTLE. Having removed the bobbin from the spool winder, take it between the thumb and finger of the right hand, being careful that the thread is over the bobbin towards the hand. At the same time take the shuttle in the fingers of the left with its point towards the hand, place one end of the bobbin in the spring centre in the end of shuttle cavity next to the point, and gently press the other end into its place.
TO REGULATE THE TENSIONS. Test the tension of the shuttle thread by drawing it towards the round end of the shuttle. If it draws as tightly as it will bear withoxit breaking, it is right for fabrics of firm texture. Thin, soft fabrics require less tension. To obtain more or less tension, pass the thread through more or less holes. (See page 4, “ To Thread the Shuttle.”) The tension of the needle thread is regulated by turning the tension screw (5).
The preceding Instructions are full and complete for the'perfect use of the Machine. A few special notes are added below in explanation of any adjustment that may be necessary. THE SLACK THREAD PIN 'L^) presses down the check-lever (15). It is adjusted properly for all classes of general sewing, and should never be altered unless the thread breaks in sewing very thick cloth ; then loosen the screw (14), and slightly lower the slack thread pin, after which retighten the screw.
ATTACHMENTS THE ADJUSTABLE BINDER. Adjust the binder to the desired width of binding and fix it firml5 ^ to the machine with the thumb screw. Place the end of the binding over the feed points, and its edges under the clips, then insert the fabric between the clips, and guide it against the binder. If the sewing is not on the edge of the binding, loosen tlie screw and move the binder a little to the right or left until it is in the correct position.
THE CORDER. é, Attach the corder foot to the presser bar, pass the cord into the eye of the guide, which is held in the left hand between the folds of the fabric with its end opposite the first groove in the foot. In placing each succeeding cord, guide the fabric with the last cord sewn in the second groove of the foot. In Cording, always turn a square corner while the needle rests in the fabric. THE EMBROIDERING ATTACHMENT.
Each embroidering thread should pass under the tension spring, so that it is lightly held between the spring and the lever to give a very light tension. Note.—When using the Embroidering attachment, the needle thread passes behind the driving rod into the slot of the I'eel bracket,, and then down to the tension discs, etc. THE HEMMER. THE FELLER. To make a Narrow Hem. Attach the hemmer to the presser bar.
THE quilting guide. Attach the guide by passing the horse-shoe shaped clamp over the presser bar from behind, bringing the holes in it in line with that in the presser bar immediately above the pressor foot. Through these holes pass the rod of the quilting guide from either side, and when guide is at proper distance for the pattern required, tighten the quilter in position by means of the thumb serew in the clamp. Make a straight line upon the fabric with chalk or by creasing, and stitch upon it.
THE TUCK-MARKER. Attach the marker to the machine by the thumb screw, passing the needle through the eye in the tongue upon the marker lever. Adjust the guide to the desired width for the tuck, and the marker to the required distance from the line of stitching for the centre of the next tuck. Fix both thumb screws firmly, then stitch the tuck, and the action of the marker will gauge and mark the next one ready for folding.
RELATIVE SIZES OF NEEDLES AND THREADS (Class and Variety of Needles used 1 2 x 1 ) Sizes of Needles CL.A.SS OF WORK TO SEW , J.inen or Silk Very thin Silk, Muslin, Cambric, Light-weight Delicate Fabrics, etc. 100 to 150 Cotton, 30 Silk. 11 Fine Calicoes, Goods, etc. Silk 80 to 100 Cotton, 24 to 30 Silk. 14 Shirtings, Sheetings, Bleached Calicoe.s, Silk and General Domestic Goods, Light Wool len Goods and all classes of general work. 60 to 80 Cotton, 20 Silk. 16 All kinds of Goods, etc.