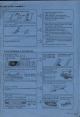
CHECK SHEET -For pr CONNECTING MACHINE WITH ELECTRICITY Connect the Curl Cord before supplying electricity to the mach in e. ~J *-~- Do not connect or disconnect the Curl Cord whilst knitting. Damage can be caused if the Curl Cord is incorrectly Inserted. Be sure to turn off the machine before disconnecting the Curl Cord. j_ .. 0 Set the .4 mark to correspond. Check Buzzer when connecting to electricity. =m=~=~w==u=;::=• The Buzzer will sound when the plug is correctly inerted into the machine.
er use of the machine To change a pattern card whilst knitting. 1. Press ON the Inspection Button. Insert a new card. Reset controls for new stitch pattern. Move Carriage across twice without knitting. Press 0 FF the Inspection Button. Commence to knit. ~/-/ 'rnj!;J:nU J,r;rc.=-- ! ,<" _;r ---1. . - /(..¥/ _.. /(~") 2. 3. 4. 5. 6. r /J ,/ .· / 1. Press ON the Inspection Button and reconnect Cut in Power Supply - Power cord or Curl Cord incorrectly inserted, or Power cut...
DODQOQDWD Getting to know how to knit garments ... With easy-to-follow · method, this manual helps you obtain comprehensive knowledge of garment knitting. This manual presents knitting procedure using the Pattern Papers on the Knit Contour, and a collection of necessary techniques which is convenient for your frequent reference. So keep this manual beside you while you are proceeding with garment knitting, and you will be able to expand your horizons of knitting by yourself with much fun.
···till a garment is completed. Select a pattern-----. 19 different pattern styles are available to you. Set up the machine---. Refer to the Operation Manual. Set the Knit Contour-----. The Guage Scale helps you take a correct tension gauge. Knit pieces---------. Row number, Pattern Paper, Stitch Scale. Block out and press - - -.... Knit a tension swatch Make up the garment--.....
CONTENTS page TAKING A TENSION GAUGE ............. . ........... .. ............. 1 PATTERN PAPER ............. .· .................................... 7 SETTING THE KNIT CONTOUR ........ ...... . .. ....... . ............. 9 TO UNDERSTAND PRINCIPLES OF THE KNIT CONTOUR .... . ......... 13 KNITTING ON THE KNIT CONTOUR ........ .. ...................... 15 IF A MISTAKE TAKES PLACE WHILE KNITTING ..................... . 21 KNITTING TECHNIQUES -on the Knitter- . . ........................ 22 Increase .........
TAKING A TENSION GAUGE Tension Gauge Your success in knitting greatly depends on taking a correct tension gauge, because knitted fabrics are affected by type of yarn and stitch. If this most important step is overlooked or ignored, you will never be able to knit your garment to the correct size. Tension swatch Tension swatch is a practical method to determine correct tension gauge for the yarn and stitch type you selected for knitting a garment.
(2) In the selected stitch type, knit 20 rows. [f) Push "ON" the Inspection Button. (3) With a contrast yarn, knit 2 rows in stockinet. I!] Push "OFF" the Inspection Button. (4) In the selected stitch type, knit 30 rows. (5) Push both 21st needles from centre(O) to 0 position. With a piece of contrast yarn, knit them back to B position by hand. (6) Knit another 30 rows. I!] Push "ON" the Inspection Button. (7) With a contrast yarn, knit 2 rows in stockinet. I!] Push "OFF" the Inspection Button.
(Tensio n Swatch of Lace Stitch Pattern) Take the following cares in knitting the tension swatch in lace stitch pattern . *Push up 35 needles on both sides of centre(O) to B position and cast on. **Knit about 30 rows in stockinet ending at the right side of the fabric . Hook the Comb Weight and hang the Claw Weights. ***Push "OFF" the Inspection Button and knit the same number of rows as specified, putting the yarn marks.
(2) With the main yarn, cast on and knit continuously checking tension on the fabric, till you obtain suitable Stitch Dial number. When you have obtained suitable Stitch Dial number, knit 10 rows. (3) With a contrast yarn, knit two rows. (4) With the main yarn, knit 15 rows. (5) Push 11th needles on both sides of the centre(O) in B position to D position. Lay a contrast yarn in the needle hook, and push them back into B position. (6) Knit another 15 rows continuously with the main yarn.
35 0 35 1111jjjjjjjjjjjjjjjjjjjjjjjjjjjjjjjjjjjjjjjjjjjjj111111111111111111111111111111' JJJJJ~~~~~~~~~~~~~~~~~~~~~~~~~~~~~~~~~~~~~~~~~~~~~~~~~~~~~~~~~~~~~~~~~~~~~~JJJJJ 0 35 35 (2) Cast on and knit 20 rows. (3) With a contrast yarn, knit 2 rows. 1 (4) With main yarn, knit 30 rows. (5) Put yarn marks on the 21st needles on both sides of centre(O) on either Knitter or Ribber. 0 rr r 0 0 0 0 0 r 0 0 0 0 0 ! 0 rr I 0 (6) Knit 30 rows continuously.
Gauge Scale This scale is so designed to measure the length of 60 rows and the width of 40 stitches of the tension swatch, and designate them as so many stitches and rows per 10cm. The scale is two sided. The side S is used for measuring stitches and the side R is for rows. The photographs below show how the Gauge Scale is used .
PATTERN PAPER Pattern Paper Set 19 sheets of Pattern Paper representing 19 different pattern styles come with the machine incorporating the Knit Contour unit. Each pattern style is drawn to 1/2 scale with 2-5 graded sizes which are lettered A, B, C, 0, & E from the smaller to larger sizes. Selecting a pattern style Of the 19 different pattern styles available to you, select the pattern of your choice. The table below shows the selection. Pattern Style Pattern Style No. Page No.
A Selecting a pattern size Measurement Table, shown opposite as an example, is given for each pattern style, and consists of two sections and each part has been graded into five sizes. One section (shaded line) shows body measurement and the other shows the pattern measurements (measurements of finished garments). To select one size from those five sizes given, take your body measurement at the position indicated by the black figure in the Table, and select one size nearest to your requirements.
SETTING THE KNIT CONTOUR The Knit Contour tells you where to cast on/cast off and the number of stitches to be increased/decreased while knitting a garment with the use of the Pattern Papers. @@@ I!J ® ® l l fu ~5( ~ [U1J1J u uu J ~~ ..... I~ '''' ,,,~1 ,..,. r"\ 111-J \ I CD Paper Lever Used to open or close the Paper Holder. @ Row Number Dial Adjust the row number by turning this dial. ® Clip Ho lds a Stitch Scale. (f) Feeding Dial Turn the Dial by hand to feed or return the Pattern Paper.
(3)* Set the Chan ge 0 .Ia I either to 3 When the gau 0-60 or 61-120 ge atrow numb er ·IS less than 60 · fthe Ch. ange 0 ial 30-60 unctron . • and the upper numerals • set * the WhenChan the gau_ge row number is als f unctron _ge .0 Ia I to 61-120 • andmore 60 ' set wer numerthe lothan When a th.tck yarn . . page set 4. the Auxil"tary Feedmg Cam as shown ~sn used, Set the Pattern Paper ( 1) Set the Paper Lever (The Paper Hold er .IStoopened the • )mark . When the paper Lever is ,.. · • .........
(4) Re-set the Paper Lever to the • mark. Hold both ends of the Pattern Paper, joining the Centre Line of the front and back so that they are in a straight line. (5) Afterwards, set the Paper Lever back to the T mark. Select a Stitch Scale and set it A set of 7 Stitch Scales and a set of 6 Centre Scales accompany the machine for the use on the Knit Contour.
(1) Select the Stitch Scale with the number equal to that of the stitches counted on the swatch. ~ ' loo~ I :I I I I I I• I 4~_@) 30 (For example, if the number of stitches read on the Gauge Scale was 33, the Stitch Scale having 33 at the corner should be selected.
TO UNDERSTAND PRINCIPLES OF THE KNIT CONTOUR The tension gauge determined over the tension swatch is the base for making a garment to its correct size. ,-..r--- ~ Example: Tension Gauge in 30 stitches by 40 rows. The tension Gauge, designated as so many stitches and rows per 1Ocm ., is represented by the Stitch Scale and row number. (30 stitches for Stitch Scale, and 40 rows for row number as an example.) They are considered to establish the same number of stitches and rows per 1Ocm .
As the pattern paper advances in the Knit Contour, the crossing point of the contour line with the Stitch Scale shifts and according to the selected Stitch Scale and the row number, this will indicate where and what number of stitches to increase or decrease to obtain the correct shaping for garment. Basic techniques as requried by the contour line are below as an example. 40 30 ~hown 20 10 10 ~0 20 30 Decrease (1) 46 stitches are now on the machine.
KNITTING ON THE KNIT CONTOUR Following the instructions below, practise garment knitting with the use of the Pattern Paper. The LADY'S PULLOVER (A-1) or MAN'S PULLOVER {B-1) is taken as an example, and the techniques necessary for it are applicable to other types of garment. The instructions given after the [f) mark should be followed when the Pattern Card is in use.
To workKl.Pl.rib ... - Set the Pattern Paper to starting line "1" for Kl.Pl.rib. - Read the number of stitches required for cast on and push up the same number of needles to B position on both the Knitter and Ribber. ~------------------~2 - Arrange the needles for knitting K 1. Pl. rib by using the Needle Pusher and cast on . - Knit up to "2" in K 1. Pl . rib . I I - Transfer the Ribber stitches onto the Knitter and drop the Ribber to its lowest position .
,.... . . . . (8) At the neck point, cut the main yarn, push the needles for the shoulder from holding position to knitting position and knit several rows of waste knitting over them (refer to page 31 ). Remove the section from the machine and push the empty needles back to A position. ~ ".... ----1-l. . . ,. . ,. .,.•,. l . . .,. :l,. .I.- :I- ""3 4- s... I I 6 [f) I I I (9) Return the Pattern Paper to the neckline "5" and read the number of stitches for the centre straight section.
---- (3) Read on the Sti tch Scal e, the number of needl es for the centre straight and sid e section nearest the Carriage and pu sh th ese needles to holding position . ..- ..- ..-\ \ I I I \ \ ' I Set the Change Dial to 0 and knit several rows of waste knitting over needles in B position. ' Remove th e section from the machine and push the empty needles bac k into A position. (Note needle numbers).
,.. Sleeves - pattern / Knit two pieces in the same pattern . I I ~ I (1) Set the Pattern Paper for the sleeve to the starting line "0" or "1" for knitting and read the number of stitches for the cast on. In the same manner as done for the welt (refer to page 15 or 16), knit up to "2". / I® \ \ \ \ I \ \ @) [f) I Insert the Pattern Card and set it at the starting position. Push "OFF" the Inspection Button.
Join the right shoulder With the right sides facing pick up the stitches of the last row knitted in the main yarn and place them onto the same needles. Knit 1 row with the Main Carriage, setting the Stitch Dial at 8-9, and cast off by using the Automatic Linker or a Tappet Tool.
IF A MISTAKE TAKES PLACE WHILE KNITTING Pattern knitting Stockinet knitting * If the vertical expansion is in use, unravel an even number of rows. Unravel the incorrectly knitted rows, and align the needles in 8 position (refer to page 101 of Operation Manual). * In lace fabric, if there are empty needles on the same row to be unravelled, fill those needles with the stitches from the adjacent needles before unravelling (refer to page 101 of Operation Manual).
KNITTING TECHNIQUES - on the Knitter - Increase Increasing 1 stitch You can increase 1 stitch at a time on the Carriage side. 1. Push 1 need le on the Carriage side from A to B position. 2. Knit 1 row. ..... . . . .... . . . . . . . . . . . .... I I I I I I I liJ_jl When the Lace Carriage is in use, increase the stitch at the edge opposite to the side of the Carriage, and move the Point Cam to the new position by one needle before knitting the next row.
Increasing multiple stitches Yo u can only increase on the Carriage side. This method can not be used when the Lace Carriage is in use. Carriage is on the rig ht side. 1. Pul l some yarn from the Yarn Feeder. 2. Push the required number of need les from A to D position. 3. Wind yarn loosely around the empty needles in the anti-c lockwise direction. 4. Push loops against sinker posts. 5. Eliminate slack yarn . 6. Continue knitting .
6. Push up the same set of needles from B to 0 position and lay the main yarn in the needle hooks. 7. Push the needles back one by one to form loops in the same manner as for the Ravel Cord. i i i i i i i L!J i t '{ ; i i i i i i i i i i i 8. Move the Point Cam on the side of the increase to the new position to mark off two working needles at the new edge before knitting the next row. ~--·--· [[[[[[[tttttttttttttttttttt ,,,,,,~ ~ .
2. Push the end empty needle back to A position . Continue to knit. When the Lace Carriage is in use, perform the decrease on the side without the Carriage, and move the Point Cam of the same side to the new position to mark off two working needles at the edge, before knitting the next row. Decreasing multiple stitches You can only decrease on the Carriage side. CD On the Carriage side, hold the fabric against the Knitter. Transfer the end stitch to the adjacent needle.
Partial knitting Pa~ PARTIAL KNITTING is a practical method for shaping a gentle slope, such as a shoulder, back of slacks and so on. decreasing stitches Partial knitting by decreasing stitches (Main Carriage only) Set the Russel Levers to the I position . ( 1) Push up the needles to be decreased, to D position, on the opposite side of the Carriage. 1,.., ~"1 I I I I I I I II 00 0 0 0 0 0 0 B•••••••••••IQIQ D••• ~ (2) Knit 1 row. (The needles in B position knit the yarn.
Partial knitting by decreasing stitches (Lace Carriage only) (1) On the side without yarn end, pu sh up the needles required for decrease to D position. (2) Lay the Ravel Cord into the open needle hooks, and knit the needles back one by one from D to A position by hand . iii.liii~iWiiiiiiiiiiiii "----.j (3) Move the Point Cam at the opposite side of the Carriage to the new position marking off two working needles from the separation of working and holding needles. (4) Knit two rows.
Partial knitting by increasing stitches (Main Carriage only) Set the Russel Levers to the I position . (1) On the side opposite the Carriage, push up the needles for the width to be shaped by partial knitting to 0 position. (2) Knit 1 row. (The needles 1n B pos1t1on knit the yarn . The needles in 0 pos1t1on remain inactive and the yarn passes over them .) (3) Pass the yarn under the first inside needle in 0 position and over the other needles.
Partial knitting by increasing stitc~es (Lace Carriage only) (1) On the side without yarn end, push up the needles required for shaping by partial knitting to 0 position. (2) Lay the Ravel Cord into the open needle hooks and knit the needles back one by one from 0 to A position by hand . ;i ; ;i ; ; ~ ·x· :i ; ; ~----~ b:J i ff ~~ (3) Move the Point Cam at the opposite side of the Carriage to the new position marking off two working needles from the separation of holding and working needles.
Holding stitches When knitting separately as for the neckline, apply these methods to hold the stitches for latter work. Holding stitches in D position (Main Carriage only) (1) Push up the needles for the section to be held, to D position. (2) Set the Russel Levers to the I position and continue to knit for the needles in B position. Holding stitches with Ravel Cord (1) Push up the needles for the section to be held, to D position, and lay the Ravel Cord across the hooks.
Holding stitches on waste knitting (Main Carriage only) Set the Cam Lever to STOCKINET (0) and the Russel Levers to the I position. ( 1) Leaving the needles in B position for the section to be held, push the remaining needles into D position. (2) Remove the section from the machine. Holding stitches on waste knitting (Lace Carriage only) ( 1) Except for the stitches to be held on waste knitting, push up the needles to D position.
Cast off Cast off with Tappet Tool This is used for closing the stitches when main knitting is completed. (1) Knit the cast off row with the Main Carriage, setting the Stitch Dial 3-4 numbers higher, then push the needles to 0 position. On the side opposite the Carriage, hook the first stitch with the Tappet Tool and push back the needle to A position. The stitch is transferred onto the Tappet Tool. (2) Place the stitch behind the latch of the Tool.
Cast off with Transfer Tool (1) Transfer the first stitch onto the -second needle. (2) Push the second needle to D position to have both stitches behind the latch, and lay the yarn inside the needle hook. (3) Push the needle back towards A position . (4) Repeat (1)-(3) Mock rib (1) Push up the required number of needles to B position and push every third needle back to A position. (2) Cast on and knit several rows of waste knitting "A", then knit one row with the Ravel Cord 8.,._ ,.....
Hemming (1) Cast on and knit several rows of waste knitting "A" then knit one row with the Ravel Cord "8". (2) With the main yarn, knit twice the depth of the hem. (3) Pick up the sinker loops from the first row of the main knitting and place them onto the corresponding needles. (4) With the Stitch Dial set 2 numbers higher, knit one row. (5) Set the Stitch Dial to the original number and continue to knit. * If the Ravel Cord is pulled out, the waste knitting comes off.
Trimming Applicable to neckband, border etc. ( 1) With the wrong side facing you, place the stitches of a side edge onto the needles omitting a stitch at appropriate intervals. (2) With the main yarn, knit 1 row in stockinet with the Stitch Dial 1 number lower than that used for stockinet. (3) Re-set the Stitch Dial to the original number and knit twice the depth of the hem . (4) Pick up the sinker loops on the first row and place them onto the needles.
Buttonhole ( 1) Transfer 2 stitches onto their adjacent needles respectively. (2) Knit 1 row and remove the hooked yarn from the right side needle. (3) Knit 1 row. Pick up the yarn crossing above and place it onto the needle. (4) Conti nue to knit up to the next buttonhole. When making buttonholes on a double border, adjust the number of rows or stitches in between the inside buttonholes and outside buttonholes so that they correspond when the border is folded.
Joining Joining on the machine This is used for joining shoulders, joining a waistband to the waist edge, or joining a neckband to the neck edge, etc. Pick up the stitches from the fabrics to be joined with the right side facing each other, and place them onto the same needles. Knit 1 row with the Main Carriage, and cast off using the Automatic Linker or a Tappet Tool (refer to page 32) . Blind stitch This is used for joining side seams.
K1. P1. rib With waste yarn, cast on, and knit several rows. With the Ravel Cord, knit 1 row. Using main yarn, knit the number of rows required for the ribbed welt. ( 1) Push every alternate needle up into D position. These stitches are to be reformed into purl stitches. Pull the first needle back from D to A position, push the empty needle back into B position . Drop the stitch down to the Ravel Cord .
Cable stitch ( 1) Using two treble transfer tools, take three stitches off the needles onto each tool. (2) Cross and transfer the three stitches at the right onto 3 empty needles at the left, transfer the remaining three stitches to the empty needles at the right. (3) Push these 6 needles up into 0 position, knit required number of rows. (4) Repeat the above procedure.
Cord knitting (1) Place the Carriage on the right side of the Needle Bed . Depending upon the thickness of the cord, bring 3-5 needles to 0 position . Cast on the stitches by the winding method as illustrated. (2) Set the machine as follows. A II II IIIII III II II I 01111 (3) Move the Carriage back and forth knitting one row, holding the knitting down by hand. (4) Continue knitting, pulling the cord down lightly by hand, until the desired length has been achieved.
KNITTING TECHNIQUES -with the Ribber- Increase Increase of single stitch In case of double rib: (1) Push an adjacent Knitter/Ribber needle at A position on Carriage side to B position. Pick loop of stitch below the end stitch and place it onto needle. (2) On Ribber/Knitter, push needle in A position up to B position . (3) Hang Edge Weight and continue to knit. In case of K1. P1. and K2. P2. rib: POSSIBLE ONLY ON CARRIAGE SIDE .
(2) Knit 1 row. Yarn lies alternately in a zigzag pattern in Knitter and Ribber needle hooks. (3) Hang Edge Weight and continue to knit. I ~ ~l ~ I I /', 1"--~ I I I I I I I I '----1 In case of K2. P2. rib: (1) On the side opposite Carriage, push up required number of needles for increase to B position on both Beds as shown . (2) Knit 1 row and hang Edge Weight "' ' ....... ...... 1'-----~ I l I l '' '' I (3) Knit 1 row. Rearrange needles by transferring stitches as arrowmarked.
Decrease Decrease of single stitch In case of double rib: (1) Transfer end stitches on both Knitter and Ribber onto their adjacent inside needles at the same time. (2) Push back empty needles to A position. Continue to knit. In case of K1. P1. rib: POSSIBLE ON BOTH SIDES. Using Double-eye Transfer Tool, transfer last stitch either from Ribber to Knitter or vice versa. Push empty needle back to A position and continue knitting. In case of K2. P2.
(2) After decreasing stitches in the same manner as for K1. P1. rib follow the instructions below, "In case of K1.P1. and K2.P2. rib", re-set Half-Pitch Lever to H. In case of K1. P1. and K2. P2. rib: POSSIBLE ONLY ON CARRIAGE SIDE . (1) Push up required number of empty Knitter needles to B position. (2) Transfer stitches from Ribber needles to their. corresponding empty Knitter needles. (3) Push empty Ribber needles back to A position.
Partial knitting Pa~ decreasing stitches PARTIAL KNITTING is a practical method for shaping a gentle slope such as a shoulder, back of slacks and so on. Partial knitting by i~ Note: In case of knitting pushing up end needle to 0 position like K3. P3. rib, variation swing, pile knitting and drive lace knitting, etc., push up needle to C position since needles in 0 position can not knit in partial knitting. Partial knitting without involving "swing" This method applies to double rib, K1. PT. rib, K2.
Pilrtial knitting by increasing stitches. Set Russel Levers on Knitter and Ribber Carriages to I and- positions respectively. (1) On the side opposite Carriage, push up needles for the width to be shaped by partial knitting to 0 position . (2) Knit one row, then yarn will be laid over needles in 0 position. (3) To prevent a hole from being formed in the fabric, bring yarn under the first inside needle in 0 position.
Partial knitting involving "swing" A ~ Knitter needles in D position cross the opposite Ribber needles in D position. When needles are in this position, you must not swing (by using Swing Handle) Needle Bed, or you will damage the crossed needles. So, a special technique of partial knitting as undermentioned is required for swung English rib, variation swing, herringbone swing and like stitches, all of which involve "swing".
Partial knitting in pile knitting and drive lace knitting. Set Russel Levers on Knitter and Ribber Carriages to I and -positions respectively. In pile knitting, start partial knitting after removing stitches on Knitter using P Carriage. Partial knitting by decreasing stitches ( 1) On the side opposite Carriage, push Knitter needles to be decreased back to A position, and push up Ribber needles to be decreased to 0 position.
Partial knitting while knitting double jacquard * Partial knitting at the right side is worked in the same manner as for double rib . * For partial knitting at the left side, set the Russel Levers as shown below : B 111111 Jill 111111 IIIII II D IJIIJIIIJJ Knitter Carriage .. .... . I (both) Ribber Carriage ........ - (both) And follow the instructions below. Partial knitting by decreasing stitches ( 1) Leave the Carriage at the right side.
Waste knitting 1. On Knitter, push up empty needles to B position. 2. Transfer stitches from Ribber to corresponding Knitter needles. Drop Ribber to its lowest position . 3. Exchange Ribber Arm for Knitter Arm and thread a contrast yarn through Yarn Feeder. Knit 9-10 rows with Stitch Dial 4-5 higher. 4. Remove yarn and Weights. Set Cam Lever to STOCKINET(/\., 0). Holding Cast-on Comb, move Carriage to remove fabric from machine.
Buttonhole Single stitch eyelet (1) At the point for eyelet, transfer 1 stitch from Ribber to Knitter. (2) Leave empty needle in B position. Continue to knit. Double stitch eyelet (1) Transfer 2 stitches on Knitter onto their adjacent stitches at the point for the buttonhole. Work the same on Ribber. (2) Push empty needles on Knitter to A position . Leave empty needles on Ribber in B position.
KNITTING GUIDE It is advisable to knit the Lady's or Man's Pullover as a first try (refer to Page 15) before knitting the other types of garment, as the pullover requires most of the basic techniques necessary for garment making and these techniques are applicable to other garments. ... c A 2 ) LADY'S CARDIGAN ( c 2 ) CHILD'S CARDIGAN Back - pattern -_., 6 Knit in the same manner as for the back of the LADY'S PULLOVER (refer to page 15). \ I I ' '-, I I I ,... ....
Neckband - pattern ('}) Join both shoulders before knitting the neckband. In the same manner as for neckband of the LADY 'S PULLOVER, knit the neckband and join it to the neck edge (refer to page 20). Making up - Join both borders to the front edges. (I llustration) - Join the side and sleeve seams. - Set in sleeves. c c A 3 ) LADY'S RAGLAN SLEEVE PULLOVER B 3 ) MAN'S RAGLAN SLEEVE PULLOVER Back - pattern r-+--, - At the starting line "0" or "1 ", cast on stitches on both sides of centre(O).
Sleeves - pattern 5 I "'b - At the starting line "0" or "1 ", cast on stitches on both sides of centre(O). - Work mock rib or K 1. Pl. rib up to "2". - Turn up for cuff in mock rib or transfer stitches onto knitter in Kl. Pl. rib. - Knit up to "3", increasing on both sides. a I I I r./ \ Knit up to "4", decreasing on both sides. @) \ - Decrease for section "b". For section "a", knit up to "5", decreasing on both sides. Knit the other sleeve on the same pattern but reversing the shape.
( A - 5 J LADY'S SLACKS I ( c - 4 ) CHILD'S SLACKS I 7 -6 r • Knit two pieces each for front and back legs, but reverse shaping. • Use the Centre Scale . Front legs - pattern I CD - 5 r - At the starting line "1 ", cast on stitches required respectively on each side of centre(O). - Knit up to "2" and turn up for waistband. - Knit up to "3", increasing for the side. - Put yarn mark at the side edge. Knit up to "4", increasing for the crutch .
( A - 6 ) LADY'S ONE-PIECE DRESS Back - pattern - At the starting Ii ne "1 ", cast on stitches on both sides of centre(O). - ~- j,;,~~ 7 c b """'- - ( I I - With the Stitch Dial one number lower than the main tension, knit in stockinet up to "2". I r CD - Put yarn mark through the row. - \ Knit up to "3", decreasing on both sides. Put yarn mark on both sides. \ .__ - Knit up to "4", decreasing on both sides . - Put yarn mark on both sides.
Sleeves - pattern - At the starting line "1 ",cast on stitches on both sides of centre(O). ,/ - Work mock rib or K 1. P1. rib up to "2". - Transfer stitches onto knitter in K 1. P1 . rib and turn up for cuff. I I I / @) \ - Knit up to "3", increasing on both sides. CJID - Knit up to "4", decreasing on both sides. \ - Cast off the remaining stitches. \ \ Neckband - pattern ® Join the right shoulder before knitting the neckband .
Sleeves - pattern @) Knit in the same manner as for sleeve of the MAN'S PULLOVER (refer to page 19). 4 Border - pattern 3 ® - Space out and mark buttonhole positions between "1" and "2". - At the starting Line "1" cast on twice the number of stitches read on the stitch scale. - Knit in K 1. Pl. rib up to "4" making buttonholes where marked and putting yarn marks at "2" and "3". - Return the Pattern Paper to "1". - Without yarn marks or buttonholes, knit up to "4".
Making up - Stitch down the pockets and bands. - Join both shoulders. ¥ t - Join the border to the front centre and neck edge. (Illustration) - Join the side and sleeve seams. - Set in the sleeves. - Make buttonholes and sew buttons on the border. ( c - 1 ) I Sizes C, D and E require the same manner as for the LADY'S PULLOVER (refer to page 15). A and B have a shoulder opening and require slightly different techniques for shaping the shoulder.
Neckband - pattern @ Before knitting the neckband, join the right shoulder, fold in the facing and underlap at the yarn mark and stitch down Oilto the shoulder. Knit in the same manner as for the neckband of the LADY'S PULLOVER (refer to page 20) . After knitting the neckband, join it to the neck edge. (Illustration) CHILD'S RAGLAN SLEEVE PULLOVER Knit in the same manner as for the LADY'S RAGLAN SLEEVE PULLOVER (refer to page 53) except for the · back of size A and B with a back opening.
( c - 5 ) CHILD'S SKIRT Knit two pieces of the same pattern . \ - At the starting line "1 ",cast on stitches on both sides of centre(O). - Knit up to "2". \ \ - Turn up for waistband. - Knit up to "3", increasing on both sides. r - - - ---+-------...,· \ \ - Put yarn mark through the row. \ - With the Stitch Dial one number lower than the main tension, knit in stockinet up to "4". \ - Cast off.
Neckband - pattern @) • Join both shoulders before knitting the neckband. r- - - -- ( ___,~,!__-t~~ • Set the Stitch Dial one number lower than the one originally used. ~-----! 1 01) - i_ - At the starting line "1", push the required number of needles to B position on both sides of centre(O) . I I - Pick up the stitches from the neck edge and place them onto the needles. (Illustration) - With the Stitch Dial one number lower than the main tension, knit up to "2". - Turn up for neckband.
) ( c - 7 ) CHILD'S COAT Back - pattern r- CD - At the starting line "1 ",cast on stitches on both sides of centre(O). 1 I - Knit up to "2", and turn up for hem. I - Knit up to "3", decreasing on both sides. r.l - Knit up to "4", decreasing on both sides. CD I I - Cast off. I I ,_ - - - - -+---+--...... 2 t- - - -1---...a....--~ - (O) I14 A I\ I I I Fronts - pattern Knit the right and left fronts in a symmetrical pattern .
Borders - pattern ® ~r-----------------------~4 Set the Stitch Dial to the same number as used for the neckband. /~ 1 - At the starting line 'T', push the required number of needles to B position on both sides of centre(O). I= t =:t; ® (0) +--------~------I /, - Pick up the stitches from the centre front edge and place them onto the needles. (Illustration) - Knit up to "4", making buttonholes at "2" and "3".
Legbands - pattern ~======~:~f- I __ \ @) • Graft the front and back at the crutch before knitting the legband . ...~.+----J.)~ • Knit two pieces with the same pattern . - At the starting line "1 ",cast on stitches on both sides of centre(O) . - Work mock rib or K 1. Pl. rib up to "2". - Turn up for band in mock rib or transfer stitches onto knitter in K 1. Pl . rib. I I I I I I - Pick up the stitches from the leg opening and place them onto the needles.
Making up - Join the centre back and front seams leaving an opening inside the waistband . - Join the inside leg seams continuously. (Illustration) - Insert elastic through the waistband. cc - ROMPERS 10 ) Front - pattern - At the starting line "1 ",cast on stitches on both sides of centre(O). Knit up to "2" and purl the stitches on the row. Knit up to "3" and turn up for waistband. ,....~ /f-b Knit up to "4", increasing on both sides. - Work partial knitting on both sides up to "5" .
r=-I I I I ' Bib - pattern 3 2 - At the starting line "1 ", push the needles to B position on both sides of centre(O). - Pick up the same number of purl stitches from the centre of front waistband and place them onto the needles. - Knit straight up to "2" . ®I L __ • (0) @) •1 - Make b'uttonholes. - Knit up to "3" and cast off. Legbands - pattern • Before knitting the legband, join the side seams. c------~ • Knit two pieces with the same pattern.
INDEX A ankleband ... ... ... . .. ...... .... ........ 65 armband ... .. . .. .. . .. .... . ......... ... .. 62 armhole ..... ........... ... .. ..... . ... 16, 20 Arrow mark . .. ....... .... . ... . . .... ...... 7 Automatic Linker ......................... 20 Auxiliary Feeding Cam ........ . ......... 4, 10,21 B back ....... . . . .. .............. 15, 53, 56, 64 Back legs ............................... 55 Ba.ck width ............................... 8 Bib ...................................
0 on-piece dress .... . ............. . ......... 56 p Page number ............... . .............. 7 Paper Holder ....................... . ...... 9 Paper Lever ........... . . . .. ... ............ 9 Paper Slit ..... . ......... . ............. . .. 9 partial knitting ................... . .. 14, 26, 45 Pattern Card ....... . ................. 1, 15, 21 pattern knitting ...................... 21, 26, 28 pattern paper........................ . ... 7, 10 Pattern piece number ...... . .... . .. . .........
Printed in Japan 1982.