
Instruction Manual


4
Pin
1
3
2
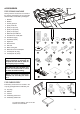
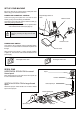
Set power/light switch at
“OFF”
Machine socket
Power line cord
Foot control
Power/light switch “OFF”
Power/light switch “ON”
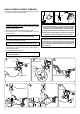
Spool
Spool pin
Felt disc
Vertical spool pin
Spool
Thread retaining slit
Spool pin cap
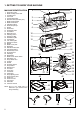
SET UP YOUR MACHINE
Be sure to wipe off any surplus oil from needle plate area
POWER LINE CORD/FOOT CONTROL
Connect the plug of the power line cord into the cord
socket (1) and your wall outlet (2) as illustrated.
Connect the foot control plug into the machine socket (3),
when using sewing machine only.
NOTE: In sewing mode, the machine can be operated either
with or without the foot control (see page 15).
POWER/LIGHT SWITCH
Your machine will not operate until the power/light switch
is turned on. The same switch controls both the power and
the light.
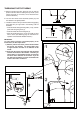
When servicing the machine, or when changing needles
or lights, etc., the machine must be disconnected from the
power supply.
Always disconnect the machine from power
supply by removing the plug from the wall
outlet.
SPOOL PINS
HORIZONTAL SPOOL PIN for normal
thread spool
Place thread spool on the pin and secure with a spool cap
VERTICAL SPOOL PIN for large thread
spool
Attach the spool pin. Place felt disc over it. Place a thread
spool on the spool pin.
4