WHITE SUPERLOCK OWNERS WORKBOOK 2000 ATS Copyright 1995 Education Department White Sewing Machine Company 11760 Berea Road Cieveland OH 44111
TABLE OF CONTENTS INTRODUCTION SECTION I - Know Your Machine - Model 2000 ATS Accessories Superlock Set Up and Maintenance Foot Control Power/Light Switch Opening Front Cover Closing Front Cover Opening Swing-Away Side Cover Handwheel Presser Foot Lift Changing Presser Foot Adjustment of the Presser Foot Pressure Disengaging Upper Cutter Exclusive Built-in Thread Cutter Adjustable Fabric Guide Waste Tray Oiling Cleaning Storage Hints for Successful Stitching Needle Replacement Needles, Thread & Fabric Chart
SECTION IV - Differential Feed 33 Positive Differential Feed Minimal Differential Feed Normal Differential Feed Serging Lightweight Fabrics Serging Stretch or Bulky Knits Gathering 34 34 34 35 36 37 SECTION V - 3-Thread Sewing Techniques 38 3-Thread Seam or Edge Finish Rolled Edge Picot Edge Spaghetti Straps Slit or Placket Rolled Edge - "Pokies" Narrow Edge Safelock Decorative Edges Decorative Braids Flatlock/Ladder Stitching & Seams Flatlock Technique - Lace Application Flatlock Technique - Lingerie
tNTRODUCTtON Welcome to the world of easy, speed sewing. The White Superlock was designed with the home sewer in mind. It is simple to thread, simple to change from regular sewing to specialty sewing, such as flatlock and rolled edge. The automatic thread tension release will help you in easy removal of your projects and creative sewing. This workbook is compiled in a method so you will thoroughly understand the machine and its potential.
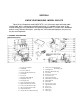
SECTION I KNOW YOUR MACHINE - MODEL 2000 ATS Top of the line Superlock model 20CXÌ ATS is a 2/3/4 thread serger with adjustable cutting width, built in rolled edge and differential feed. It is capable of two, three or four thread sewing plus many decorative and specialty applications. A section of this workbook outlines many different techniques, specialty feet, and simple quick projects for you to try on your new Superlock. 1. KNOWING YOUR MACHINE IDENTIFICATION CHART 1. Foot pressure regulator 2.
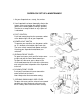
ACCESSORIES All parts listed may be obtained from your nearest dealer. (D (D P ^ * II 1. Two-thread convertor (Model 2000 only) 2. Needle set 3. Brush 4. Screwdriver (small) 5. Needle threader 6. Machine cover 7. Screwdriver (large) 8. Oiler 9. 10. 11. 12. 13. 14. 15. 16. Moving cutter Spanner Thread net Tweezers Thread extension plate Cone holder Cord guide Accessory bag *Only Model 2000 has storage of accessories at the back of front cover.
SUPERLOCK SET UP & MAINTENANCE 1. Set your Superlock on a sturdy, flat surface. 2. Your Superlock has been thoroughly oiled at the factory so be sure to wipe the needle and bed plate areas carefully before sewing a garment. Practice on a scrap of fabric so any surplus oil is absorbed. 3. FOOT CONTROL Push foot control plug into the connector socket at the bottom right side of your Superlock. Connector socket 4. POWER/LIGHT SWITCH To operate your machine, turn the power switch on.
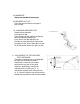
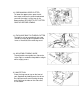
. HANDWHEEL Always turn handwheel toward you. 9. PRESSER FOOT LIFT Raise the presser foot lift to lift up the presser foot. 10. CHANGING PRESSER FOOT Switch off your Superlock. Raise presser foot. Raise needles to their highest position by turning handwheel toward you. Push lever A and foot will come off. Position the new foot with pin right under the groove of the ankle. Lower presser foot lift so that holder catches the presser foot. 11.
12. DISENGAGING UPPER CUTTER To lower the upper cutter, open the left front cover and turn the cutter knob toward you until the cutter is all the way in the down position. BE SURE TO PUT CUTTER BACK UP BEFORE SEWING. 13. EXCLUSIVE BUILT-IN THREAD CUTTER The built-in scissor conveniently cuts your thread tail simply by pressing down on the lever as illustrated, then releasing to cut. 14.
16. OILING Lubrication is not required often for this machine since the important parts are all made of a special oil impregnated sintered metal. You will want to occasionally put one or two drops of oil on moving metal parts will increase durability. 17. CLEANING First disconnect machine from power supply by removing plug from the electric outlet. Open front cover and side cover (see pg. 3). Using the brush provided, remove all the dust and lint that has accumulated.
) HINTS FOR SUCCESSFUL STITCHING An understanding of the following variables will make your Superlock run smoothly and your work will look professional. Before sewing, always test the compatibility of your fabric, thread, pressure, stitch length, and tension. Thread Selection When selecting the proper thread, choose one that is compatible with the fashion and the fabric. Polyester threads (or polyester based) are most commonly used for general sewing purposes.
■» NEEDLE REPLACEMENT Replace needles in the following way: 1. Bring needles to their highest position by turning handwheel towards you. 2. Lower presser foot. 3. Open front cover: the screwdriver and needles are located inside the handy storage area. 4. When replacing right needle, loosen right needle clamp screw, marked "R", and remove needle. Be sure to store extra loose needles in needle cushion. To replace left needle, loosen left needle clamp screw. 5.
NEEDLES, THREAD & FABRIC CHART Needles Proper needles are important when using your White Superlock. A standard sewing machine needle of good quality, Organ brand HA X 1SP, can be used on your Superlock. Change needles often for best results. Caution: Do not used banded needles (i.e., yellow band) on your White Superlock. These can cause skipped stitches and possibly bend or break needles or damage loopers. Threads Any good quality cotton, polyester, silk, synthetic threads, etc.
SECTION II - THREADING & TENSION Spool cap Preparation for Threading Domestic cotton reel Spool Holders For large cones of thread, use the black plastic cone holders. This will help hold the cone of thread in place. Cone type thread Spool Caps When using small spools, remove the plastic cone-spool holders (a drop of oil will make the holder slide off easily), and place the spool directly on the spool pin.
Your White Superlock is very easy to thread. With some practice you will be able to thread it in a few minutes without using any tools. Master the correct threading before starting your first project. To become familiar with your Superlock, practice on scrap fabric with different color threads to identify placement and function of each thread. Threading must be carried out in the following sequence for total ease of operation: upper looper - lower Looper - right needle - left needle.
THREADING UPPER LOOPER Open front covers. Bring the upper looper to its lowest position by turning the handwheel toward you Draw thread from spool and pass it through the thread stand (back to front), under thread clip guide (1) and then, in order, through guides 2-4 as illustrated below and inside the front cover of your Superlock. With the presser foot raised to release tension, lay thread between thread tension discs. (2) Be sure thread is all the way into the tension discs.
THREADING LOWER LOOPER Bring the thread from the spool through thread guide back to front of the thread stand under (1) and then, in order, through guides 2-4 as illustrated below and inside front cover of your Superlock. With the presser foot raised to release tension, lay thread between thread tension discs. Be sure thread is seeded all the way into the tension discs. Bring the lower looper to the far left position by turning the handwheel toward you.
) THREADING NEEDLES Raise the needles to their highest position. Bring the thread from the spool and pass it through the guides on thread stand (back to front), then under thread clip (1). Lay thread between thread tension discs (2). Be sure thread is seeded all the way into the tension discs. Pass thread through guides A and B for each needle. Thread each needle(s) eye (4) using your needle threader found in the storage area of the right front cover.
NEEDLE THREADER (For right needle) 17
HELPFUL HINTS - CHANGING THREAD The following steps may be helpful when changing your threads. •Cut off threads that are on your Superlock near the spools and replace the spools with new ones. Tie new thread on to old threads with overhand or square knot. •Raise presser foot and cut the needle thread(s) right above the needle eye. •Lower needle bar to its lowest position by turning the handwheel.
TESTING STITCH After threading is completed, test your Superlock stitch in the following order: 1. Be sure both front cover and side cover are closed. 2. Without fabric under the presser foot, lower presser foot. Pull the ends of the threads gently with your left hand toward the rear of the machine, turning the handwheel toward you a few times to make sure the stitch forms on the stitch finger (figure 1). . Sew on scrap fabric.
THREAD TENSIONS Thread tensions will vary according to the type and thickness of your thread and fabric. In most cases these tensions will only vary slightly. Turning the tension dial to a lower number gives you less tension. Threading your Superlock with four different colors of thread will help you identify the placement and function of each thread. Upper Looper Thread should be flat on the top side of fabric and lock with the lower looper thread on the edge.
ADJUSTING THREAD TENSION Just Right Upper Looper Thread Pulled to the Underside Lower Looper Thread Pulled to the Top Side Under side , ^ Lower J ' tooper j ' thread i Top side' Increase upper looper thread tension and/or decrease lower looper tension. # Left Needle Thread Loose and visible on undereide of fabric. Increase lower looper thread tension and/or decrease upper looper tension. Right Needle Thread Loose and visible on underside of fabric.
SECTION III BASIC SEWING TECHNIQUES Sew samples for the next section of this workbook, and record your tension settings on each page for future reference.
SUPERLOCK SEAMS & SEAM FINISH Seam and overcast all in one step. Your Superlock produces fast, professionallyfinished garments. Machine Setting Stitch Length: 2-3 Stitch width: 6 Fabric Medium weight woven Tension Setting Set your tension to normal setting and note. Left needle (LN) - 4 Right needle (RN)-4Upper looper (UL)-4Lower looper (LL)-4- To Seam & Overcast •Fold fabric in half. •Place under presser foot with folded edge to be trimmed to the right. •Use your 5/8* seam allowance as a guide.
ADJUSTING STITCH LENGTH Turn the stitch length dial (located on the right side of your Superlock) until the required length is at the guideline. The higher the number, the longer the stitch. With the dial you can adjust the stitch length from R for rolled edge to 5mm. Stitch Length Sample Machine Settings Stitch length: 1 - 5 (see illustration) Stitch width: 6 Fabric Medium Tension Settings Normal weight LN RN UL LL woven -4-4-4- 4- Serge •Fold fabric in half. •Set stitch length to 5mm.
ADJUSTING CUTTING WIDTH & BALANCE OF STITCH The cutting width can be adjusted from 4mm to 7mm by simply turning the cutting width dial according to the type of fabric you are working with. This fine tune adjustment allows you to achieve the best stitch possible on all fabric types. The normal setting for the cutting width is 6mm. Adjust the cutting width by turning the dial on the left side of the Superlock.
ADJUSTING CUTTING WIDTH The cutting width can be changed for different techniques and types of fabric. Loosely woven or heavy knit fabrics require a wider width and lighter weight fabrics require a narrower seam width. Machine Settings Stitch length: 2.5 - 3.0 Stitch width: 6 Fabric Medium weight woven Tension Settings Normal Serge Serge along one edge with the stitch width on 4mm. Serge along the other edge with the stitch width at 7mm.
SECURING BEGINNING & END OF SEAM As most ends of seams and finished edges are later stitched over during garment construction, it is often not necessary to lock ends. When needed, use one of the following methods. Machine Settings Stitch Length 2 . 5 - 3 Stitch width 6 Fabric Medium weight woven Tension Settings Normal (LN) - 4 (RN) -4(UL) -4(LL) -4Securing Beginning of Seam •Fold fabric in half •Stitch 2-3 stitches into fabric, then stop sewing. •Raise presser foot.
OUTSIDE CORNERS You can stitch neat outside corners with little practice on your Superlock. Machine Settings Stitch Length: 2.5 • 3.0 Stitch Width: 6 Fabric Medium weight woven Tension Settings Normal (LN) -4(RN) -4(UL) -4(LL) -4Serge (Sew along edge of fabric; do not trim.) •Sew along one side of fabric to the end. •Raise the needles and presser foot. •Gently slide the threads off the stitch finger of the needle plate by pulling fabric toward back of Superlock.
INSIDE CORNERS Practice the inside corner technique for perfect inside corners or curves such as for Christmas stockings, oven mitts or kick pleats on skirts. Machine Settings Stitch Length: 2.5 - 3 Stitch Width: 6 Fabric Medium weight woven (Cut a square out of one corner.) Tension Settings Normal (LN) -4(RN) -4(UL) -4(LL) -4- Serge •Align the edge with the inside edge of cutter, with bulk of fabric to the left. •Serge up to 1/2" from the inside corner.
CORDED OVERLOOK The Specialty Technique Guide consists of the snap on cord guide (1) found in your accessory pouch, the guide above the needles (2) and either hole in the presser foot (3). The Specialty Technique Guide guides cord through the foot and then is covered by the upper looper thread or is caught by the right needle, depending on the size of cord you choose. Ribbon or Cording can be used to stabilize where stress occurs: joining shoulder seams, sleeves, side seams, etc.
RIBBING Your Superlock will finish, trim and allow the material to stretch while retaining its original shape. Machine Setting Stitch Length: 2 . 5 - 3 Stitch Width: 6 Fabric Sweatshirt fleece and ribbing Tension Settings Normal (LN) -4(RN) -4(UL) -4(LL) -4Serge •Cut a curved neckline in fabric. •Fold ribbing in half lengthwise. •Place ribbing on neckline with raw edges even. •Serge, stretching ribbing to meet neck edge.
CASING OR HEM FOLD Try this easy technique for T-shirt hems, elastic and drawstring waistbands or curtain rod casings. Serge •Measure and fold the desired depth for the casing. •Hold the folded fabric with wrong side facing you. •Turn the casing underneath so that the fabric now has an *S" shape. •Serge along the fold with the wrong side up catching both needles into fold of fabric.