
Instruction Manual
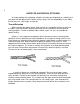
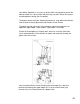

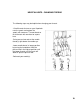
Table Of Contents
- TABLE OF CONTENTS
- tNTRODUCTtON
- SECTION I
- KNOW YOUR MACHINE - MODEL 2000 ATS
- SUPERLOCK SET UP & MAINTENANCE
- HINTS FOR SUCCESSFUL STITCHING
- Thread Selection
- NEEDLE REPLACEMENT
- NEEDLES, THREAD & FABRIC CHART
- SECTION II - THREADING & TENSION
- )
- NEEDLE THREADER
- HELPFUL HINTS - CHANGING THREAD
- TESTING STITCH
- THREAD TENSIONS
- ADJUSTING THREAD TENSION
- SUPERLOCK SEAMS & SEAM FINISH
- ADJUSTING STITCH LENGTH
- ADJUSTING CUTTING WIDTH & BALANCE OF STITCH
- ADJUSTING CUTTING WIDTH
- SECURING BEGINNING & END OF SEAM
- OUTSIDE CORNERS
- INSIDE CORNERS
- CORDED OVERLOOK
- RIBBING
- CASING OR HEM FOLD
■»
NEEDLE REPLACEMENT
Replace needles in the following way:
1. Bring needles to their highest position by turning handwheel towards you.
2. Lower presser foot.
3. Open front cover: the screwdriver and needles are located inside the handy storage
area.
4. When replacing right needle, loosen right needle clamp screw, marked "R", and remove
needle. Be sure to store extra loose needles in needle cushion.
To replace left needle, loosen left needle clamp screw.
5. With the flat side away from you, insert the new needle into groove of needle bar as far
as it will go. Use an Organ brand HA x 1SP. These are standard needles used for home
sewing.
Change needles after each garment for best results.
10