
Instruction Manual
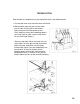

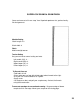
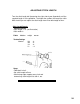
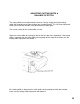
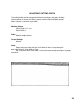

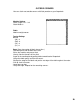
Table Of Contents
- TABLE OF CONTENTS
- tNTRODUCTtON
- SECTION I
- KNOW YOUR MACHINE - MODEL 2000 ATS
- SUPERLOCK SET UP & MAINTENANCE
- HINTS FOR SUCCESSFUL STITCHING
- Thread Selection
- NEEDLE REPLACEMENT
- NEEDLES, THREAD & FABRIC CHART
- SECTION II - THREADING & TENSION
- )
- NEEDLE THREADER
- HELPFUL HINTS - CHANGING THREAD
- TESTING STITCH
- THREAD TENSIONS
- ADJUSTING THREAD TENSION
- SUPERLOCK SEAMS & SEAM FINISH
- ADJUSTING STITCH LENGTH
- ADJUSTING CUTTING WIDTH & BALANCE OF STITCH
- ADJUSTING CUTTING WIDTH
- SECURING BEGINNING & END OF SEAM
- OUTSIDE CORNERS
- INSIDE CORNERS
- CORDED OVERLOOK
- RIBBING
- CASING OR HEM FOLD

THREAD TENSIONS
Thread tensions will vary according to the type and thickness of your thread and fabric.
In most cases these tensions will only vary slightly. Turning the tension dial to a lower
number gives you less tension. Threading your Superlock with four different colors of
thread will help you identify the placement and function of each thread.
Upper Looper Thread should be flat on the top side of fabric and lock with the
lower looper thread on the edge.
Lower Looper Thread should be flat on the underside of fabric and lock with the
upper looper thread on the edge.
The needle threads should lay mainly on the top side like rows of normal straight
sewing. The left needle will form a line of sewing along the left edge connecting the
two looper threads and the right needle acts as a "safety stitch"-forming a line of
stitching through the upper looper thread.
Set your Superlock according to the tensions recommended below. Try test sewing on
a piece of medium weight fabric. If you need to change the tensions mark them down
for future reference.
Left Needle (LN)
____
4__
Right Needle (RN)
___
4
__
Upper Looper (UL)
__
4
__
Lower Looper (LL)
___
4__
We will refer to these tensions as normal.
These tension recommendations are for average strength thread tension. It may be
necessary to adjust the thread tension(s) slightly as different weights of fabric and
thread can make a difference. Your tensions should remain in the outlined area on the
tension dial.
20