
Quick Start Guide


QUICK START GUIDE (V1.2)
pg. 1
Copyright © 2017 - www.SingleTact.com
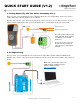
1. Analog Output (Try this first before attempting 2 or 3)
Before you start, you need: SingleTact Sensor, SingleTact Electronics, Four Jumper Wires, Power source (Power
supply, USB power or Battery), Oscilloscope or Voltmeter.
Open the FFC connector on the green Interface Board, insert the sensor, then close the FFC connector. Access the
signals using the supplied quick snap connector and jumper wires, or solder wires directly to the pins below.
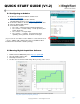
2. PC Digital Setup
Before you start, you need: SingleTact Sensor, Electronics & Jumper Wires, Arduino UNO and a Windows PC.
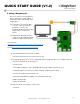
Open the FFC connector on the green interface board then insert the sensor. Connect the Arduino using 4 wires, as
shown:
• The analog output swings from 0
to 2V, with valid outputs ranging
from 0.5V (no force) to 1.5V
(FSR force)
• As pressure increases beyond
the full-scale range (FSR), the
output increases to 2V and then
saturates.
SingleTact Sensor
SingleTact Interface Board
Note: USB communication may need
additional driver installation from the
Arduino software package
https://goo.gl/4QDLty