
Installation Guide

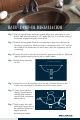


Step 1. Flip sink upside down and mark the countertop by tracing the inside
edge of the basin by placing your arm through the drain hole.
Note: We recommend a ¼” reveal on 3 sides when using the
under-mount style. For ush or built-up mount, cut countertop along
the outside line of basin prole. Apron fronts are designed to be
installed ¾” extended out beyond the front of the countertop.
Step 2. Cut the countertop based on the installation type.
Step 3. Place the basin and apply silicone as a gasket between the sink and
the cabinet.
Step 4. Install countertop.
Step 5. Apply silicone around the top edge of the basin. Place the countertop
around the basin. Ensure it is centered and remove any excess silicone.
Step 6. Install the drain mount.
Step 7. Treat copper sinks with Sinkology Copper Armor for maximum
protection (apply based on directions on bottle).
KITCHEN – APRON FRONT INSTALLATION