
Installation Guide

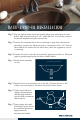

Step 1. Flip sink upside down and trace outside edge onto craft paper or
cardboard. Outline faucet to ensure necessary clearance. Cut out
template and place on the countertop.
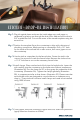
Step 2. Find and mark the
center of the sink
based on the
template. Remove
template from
countertop. Drill
a 2 3/4” diameter
hole in the center
of your countertop.
1/8” chamfered
edge is recommended,
but not necessary.
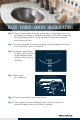
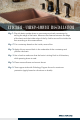
Step 3. Apply silicone to
chamfer and
mount sink to
countertop using
waste tting and
supplied Washer.
Step 4. Clean excess silicone and mount faucet.
Step 5. Treat copper sinks with Sinkology Copper Armor for maximum
protection (apply based on directions on bottle).
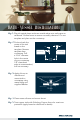
Counter TopCounter Top
2-3/4”
Diameter
Hole
1/8”
1/8”
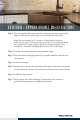
BATH – VESSEL INSTALLATION
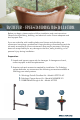
Counter Top
Plumbers putty (or Silicone)
Steel Washer
Brass Locknut