TM SERIES CAMERAS USER MANUAL
SI ONYX, LLC Cummings Center Beverly, MA 01915 U.S.A. (978) 922-0684 support@SIONYX.com F OLLOW US Share your SIONYX content and be sure to tag us! NEED HELP? O NL I N E CHAT www.sionyx.com SUBMIT A TICK ET www.sionyx.com/contact 24 /7 SU PPORT www.support.sionyx.com CAL L SIONYX, LLC NIGHTWAVE Made in Taiwan SIONYX.com/patents (866) 827-8237 Register your device and stay up to date by visiting the URL or scanning the QR code below.
TA B L E O F C ON T E N TS TA B L E O F C O N T E N T S WE LC OM E TO N I G H TWAV E 02 G E T T I N G STA RT E D 03 I N STA LLATI ON 05 G E T T I N G C ON N EC TE D 14 CA M ER A S E T UP 17 SA FE T Y 18 M AI N TE N AN C E 27 A D D I TI ON AL R E S OUR C ES 28 01
W E LCOM E TO NIGHTWAV E THIS IS SIONYX. We believe that human endeavor should not be limited by daylight. In the darkness of night, greatness is possible. Adventure enabled. And a full sense of all sight achievable, no matter the light.
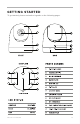
G E TT I NG STARTED To get started, please review the legends on the following pages.
04 S I O N Y X N I G H T WAV E U S E R M A N UA L
I N STAL LATION C A M E R A M O U N T I N G : LO C AT I O N When planning the installation location, consider the following points: • The camera is waterproof, and appropriate for above decks mounting. • When mounting the camera in a ball-down position, ensure that the camera is installed with adequate drainage so that standing water does not collect in the base.
I N STALLATION I N S TA L L AT I O N C H E C K L I S T Installation includes the following activities: Plan your system. Obtain all required equipment and tools. Site all equipment. Route all cables. Drill cable and mounting holes. Make all connections into equipment. Secure all equipment in place. Power on and test the system.
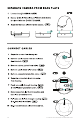
MOUNTING THE CAMERA Use these instructions to mount the camera unit in position. Using the template supplied, mark and drill the holes for mounting the camera.
P L AC E H O L D E R : TO P D O W N Mounting the Camera: Top Down 08 S I O N Y X N I G H T WAV E U S E R M A N UA L
P L AC E H O L D E R : TRIPOD I N S TA L L AT I O N 09
C A M E R A O R I E N TAT I O N The camera can be mounted in 2 orientations known as “Ball up” and “Ball down.” BALL-UP: The camera is mounted on top of the mounting surface. BALL-DOWN: The camera is suspended upside down, below the mounting surface. The default video image orientation is for the ball-up configuration; if the camera is to be mounted in the ball-down configuration then the video image must be rotated.
G E N E R A L C A B L I N G G U I DA N C E Cable Types and Length • It is important to use cables of the appropriate type and length. • Unless otherwise stated, only use cables supplied by SIONYX. • Ensure that any non-SIONYX cables are of the correct quality and gauge. For example, longer power cable runs may require larger wire gauges to minimize voltage drop along the run. Routing Cables Cables must be routed correctly, to maximize performance and prolong cable life.
Strain Relief Ensure adequate strain relief is provided. Protect connectors from strain and ensure they will not pull out under extreme sea conditions. Circuit Isolation Appropriate circuit isolation is required for installations using both AC and DC current: • Always use isolating transformers or a separate power-inverter to run PC’s, processors,displays and other sensitive electronic instruments or devices. • Always use an isolating transformer with Weather FAX audio cables.
V E R S AT I L E M O U N T I N G I N S TA L L AT I O N LO C AT I O N R E Q U I R E M E N T S When planning the installation location, consider the following points: • The camera is water-resistant, and appropriate for above decks mounting. • When mounting the camera in a ball-down position, ensure that the camera is installed with adequate drainage so that standing water does not collect in the base.
G E TT I NG CONNECTED Must apply power output with < 100W DC power equipment.
I IV II III FIG.
Prior to installing Nightwave, please consider the following: • Select an installation location as high as practical with minimum obstructions. • Select an installation location that is greater than 1m from any magnetic compass. • Select an installation location that is greater than 1m from any source of EMI (electromagnetic interference; radio, generators, motors, radar). • The mounting surface must be horizontal and level.
CA MER A SETUP FIG.
SA FETY IMPORTANT PRODUCT AND SAFETY INSTRUCTIONS By using this product, you acknowledge that you have read and agree with this ‘Product and Safety Instructions’ document and Privacy Policy (www.sionyx.com/ privacy-policy.html). For more detailed information about camera features and settings, download the user manual online at www.sionyx.com. Read this guide for important safety and health information for the product that you purchased.
WA R N I N G Failure to take the following precautions can result in serious injury or death from electric shock, fire, or damage to your SIONYX camera or powered accessories: • Do not drop, disassemble, open, crush, bend, deform, puncture, shred, microwave, incinerate or paint the camera or powered accessories. • Do not insert foreign objects into any opening on the camera. • Do not use the camera if it has been damaged—for example, if cracked, punctured or harmed by water.
• Using a wall charger other than a SIONYX-approved wall charger can damage the Aurora camera battery and could result in fire or leakage. Use this product only with an agency approved power supply which meets local regulatory requirements (e.g., UL, CSA, VDE, CCC). • The temperature icon and a message appear on the camera status screen when the camera becomes too hot and needs to cool down. Simply let it sit and cool before attempting to use it again.
FCC STATEMENT This device complies with Part 15 of the FCC Rules. Operation is subject to the following two conditions: (1) This device may not cause harmful interference; and (2) This device must accept any interference received, including interference that may cause undesired operation. WARNING: Changes or modifications to this unit not expressly approved by the party responsible for compliance could void the user’s authority to operate the equipment.
DISPOSAL Electronics donation and recycling is a great way to help conserve resources and natural materials. It is important to make sure you are donating and/or recycling electronics safely and correctly. The Waste Electrical and Electronic Equipment (WEEE) Directive requires the recycling of waste electrical and electronic equipment which contains materials, components and substances that may be hazardous and present a risk to human health and the environment when WEEE is not handled correctly.
IMPORTANT PRODUCT & SAFETY INSTRUCTIONS The use of this product is an acknowledgment and agreement to all the product instruction, safety warnings, private policy and other pertaining documentation outlined or reference in this document. THIS DOCUMENT CONTAINS IMPORTANT SAFETY AND HEALTH INFORMATION THAT MUST BE READ BEFORE USE.
IC REGULATIONS This device complies with Industry Canada license-exempt RSS standards. Operation is subject to the following two conditions: (1) This device may not cause interference and; (2) This device must accept any interference–including interference that may cause undesired operation of the device. This Class B digital apparatus complies with Canadian ICES-003.
WARNING Failure to take the following precautions can result in serious injury or death from electric shock, fire, or damage to your SIONYX camera or powered accessories: • Do not drop, disassemble, open, crush, bend, deform, puncture, shred, microwave, incinerate or paint the camera or powered accessories. • Do not insert foreign objects into any opening on the camera. • Do not use the camera if it has been damaged in any way.
• Reorient or relocate the receiving antenna. • Increase the separation between the equipment and the receiver. • Connect the equipment into a branch circuit different from that to which the receiver is connected. • Consult an experienced marine radio/electronics technician for help. The provided power and data cables must be used with this unit to ensure compliance with the class B FCC limits.
MAIN TEN A N C E The camera housing and lens will require occasional cleaning. You should clean the lens when image quality degradation is noticed or excessive contaminant build up is seen. Clean the interface between the yoke and base often to prevent accumulation of debris or salt deposits. • Do NOT wipe the lens window with a dry cloth, or with abrasive materials such as paper or scrub brushes, as this could scratch the coating. • Do NOT use acid or ammonia based products. • Do NOT pressure wash.
A DDITIONA L R ES OU R CE S I N S TA L L AT I O N T E M P L AT E Click here to download the Nightwave installaton Template or visit www.sionyx.com/nightwave-installation-template. WA R R A N T Y Click here for full product warranty or visit www.sionyx.com/nightwavewarranty. D E C L A R AT I O N O F C O N F O R M I T Y Click here for full declaration of conformity or visit www.sionyx.com/nightwave-declaration.
Cummings Center Beverly, MA 01915