
Install Instructions

SD
S
DDS
S
D
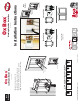
Determine Confi guration of Boxes
Determine Placement of Boxes
Straddle Stud
(strongest installation)
Side Stud Separate Studs Floating
Slide bar into top channel. Secure bar
to studs. Add bar to bottom as desired.
Screw boxes to bracket
(screw through bracket fi rst).
Nail to studs using the top nailway
and front two nailway tabs.
Between Studs Between Studs Separate Stud Bays
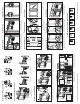
Plumb the supply lines in the typical
manner. Open valves before soldering.
Plumb the drain line in the
typical manner. Wait for glue
to cure before testing.
54
DO NOT
glue box.
Apply glue to
pipe only.
DO NOT allow
fl a m e t o c o m e
into contact
with the box.
OX BOX INSTALLATION INSTRUCTIONS - WASHING MACHINE OUTLET BOX SIOUX CHIEF MANUFACTURING COMPANY, INC.
Twist off small tip. Connect ⅝" O.D.
compression fi tting for air or water test.
Remove the test cap by clamping
and twisting off the test nipple.
Install the frame after the
wall has been fi nished.
Test the System Remove Test Cap Install Frame
Straddle stud installations allow
for the drain and vent pipe to easily
be installed in same stud bay.
Clip boxes together in desired
confi guration. Clip slides into tracks.
Gently bend boxes together. This will
allow the boxes to hold onto the stud.
Secure with nails/screws in the middle
of the box clip and the top nailways.
231
Straddle Stud Installation
Tabs fold into metal stud
for added rigidity.
To separate boxes, slide a thin,
hard material (pocket knife)
between the box and clip.
If boxes are separate (see above), cut
the frame to create individual frames.
To Separate Boxes To Cut Frame
Metal Stud Support
½" Nominal Shank Connections Available
MIP/FSWT Male CPVC PEX Crimp PEX F2080 ProPEX
®
Kitec PEX