
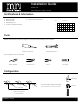
Installation Guide
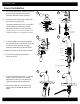

Pop-Up Drain Installation
A. Remove pop-up drain stopper (6), and ange (7) with
top rubber washer (8) from the pop-up assembly.
B. Insert drain body (9) from underneath of sink drain hole.
Replace ange (7) and top rubber washer (8) back to
drain body (9). Tighten ange securely.
C. Slide the bottom rubber washer (10) back on the drain
pipe, up to and against the bottom of the sink. Tighten the
washer (11) and the lock nut (12) rmly against the base
to form a tight seal.
D. Replace pop-up drain stopper (6) into the drain body (9)
with o-ring (10) in place, and align the hole in the stopper
with the guide rod opening.
E. Remove the rod guide nut (11) and rod ball rubber
gasket (12).
F. Insert rod ball assembly (13) into the drain body (9)
and through the hole in the drain stopper (14).
G. Replace the rod guide nut (11) and the rod ball
rubber gasket (12) and tighten securely.
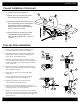
H. Insert pop-up stem (15) through the hole in the faucet
body (16). Connect rod ball assembly (13) to the lift rod (18)
using the spring clip (17) to hold and adjust.
I. Attach the lift rod (18) to the pop-up stem (15) by inserting
the stem through the hole in the lift rod (20). Then, adjust the
pop-up stem (15) to the correct height and hand-tighten the
lift rod screw (19).
7
8
11
12
10
6
10
9
15
16
19
18
20
17
13
11
12
14
13
7
9
3
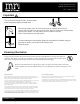
Installation Guide
G
G. (1) Tighten pop-up stem guide nut.
(2) Attach the hot and cold supply lines to
the Tee tting at the faucet base.
(3) Attach the opposite end of each hose to
the corresponding quick connect ttings
by tightening the 3/8" compression
ttings onto the lines. Secure all ttings
with a 1/4 turn of a wrench.
(4) Secure water line connections to each
corresponding faucet handle shank
base. Secure all ttings with a 1/4 turn of
a wrench.
Faucet Installation Continued
3
2
4
1