
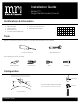
Installation Guide
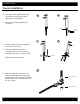

Remove the aerator from the end of the faucet by carefully unscrewing it.
Let hot and cold water run through both water lines for at least one minute before
replacing the aerator. This will help to clear any debris in the line,
which could otherwise clog the system.
Important
To prevent damage to the tube body, tighten the connections by carefully using two
wrenches as shown. Use caution to not bend the stem.
Check for leaks.
Turn on the water supply SLOWLY, to test for leaks
before completely opening the water lines.
3
Installation Guide
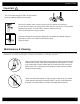
Maintenance & Cleaning
The faucet can be cleaned by rinsing with clear water or washing with mild detergents. Dry the faucet with a clean, soft cotton cloth.
CAUTION: do not use any cleaning agents containing acids, abrasives, or other harsh chemicals.
Simply rinse and dry faucets with a soft towel every week to prevent mineral
deposits from forming. Clean spills and splatters as they happen. Do not let
soap, toothpaste or other contaminates dry on the faucet, this can stain or
pit the nish. Use a mild soap and soft sponge or towel to remove residue.
Rinse and dry thoroughly.
Never use an abrasive cleaner or rough sponge to clean or dry your faucet.
Harsh cleaners could dull or scratch the nish. Use only a soft disinfectant
that does not contain bleach or chlorine and apply with a soft towel.