I N S TA L L AT I O N INSTRUCTIONS CARE AND USE MANUAL FOR: CONTEMPORARY WALL RANGE HOODS Models covered by these instructions: SU202 & SU 207 ***BEFORE INSTALLATION*** ENSURE THERE IS NO VISIBLE OR HIDDEN DAMAGE SUSTAINED DURING SHIPPING ***SHIPPING DAMAGE*** MUST BE REPORTED WITHIN 5 DAYS OF RECEIPT Telephone (Toll Free): 866.528.4987 Fax (Toll Free): 866.365.9204 www.siriushoods.com info@siriushoods.
WARNINGS Thank you for purchasing a Sirius Range Hood. Please read all the instructions in this manual before installing the appliance. Save these instructions for future reference. The appliance is not intended for use by young children or infirm persons without supervision. Young children should be supervised to ensure they do not play with the appliance. If the range hood is vented, the air so vented must be ducted into a dedicated duct that is not showed with any other equipment whatsoever.
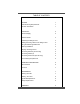
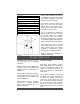
TABLE OF CONTENTS BEFORE YOU BEGIN 1 DUCTING 1 External Venting Requirements 1 Duct Run Calculation 1 ELECTRICAL 2 Electrical Supply 2 INSTALLATION 3 Positioning the Range Hood 3 Marking the Fixing Holes for the Range Hood 3 Fixing the Main Support Bracket 3 Chimney Installation 4 Hanging the Range Hood 4 Connecting Electricity and Ducting 5 Connecting Chimneys 5 Connecting the Screen (SU 202 only) 5 Re-Circulating Requirements 6 OPERATING PROCEDURES 6 General Advice 6 Fu
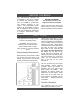
BEFORE YOU BEGIN The manufacturer declines all responsibility in the event of failure to observe the instructions given here for installation, maintenance and suitable operation of the product. The manufacturer further declines all responsibility for injury due to negligence and the warranty of the unit automatically expires due to improper maintenance and/or installation. BEFORE YOU BEGIN: It is advisable to test run the range hood before installation.
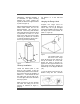
Maximum Run 6” or 3 1/4 x 10” duct 100 FT Deduct Each 90 elbow used 15FT Each 45 elbow used 9FT Each 6” or 3 1/4 x 10” duct Transition used 1FT Each 3’1/4 x 10” to 6” Transition used 5FT Side Wall with damper 30FT Roof Cap 30FT hood is 100’. Calculate your duct run by measuring linear feet and adding the elbows, transitions and caps based on the table alongside.
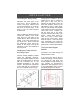
I N S TA L L AT I O N Positioning the Range Hood Determine the center point of the range hood. This is generally the center of the range. Make a mark on the wall a minimum of 25” above the top of an electric range. If the range is gas, the ideal minimum should be 30”. Using a spirit level, draw a perfectly vertical line, starting at the center mark, right up to the ceiling or the highest point to where the hood will extend. This is the central axis for the range hood.
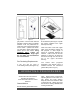
applications. Wherever possible, it is advisable to place blocking between the studs, behind the drywall, to attach the support bracket to (refer to Figure 4). Drill the appropriate size holes at the marks made earlier and fix the Support Bracket (“S”) securely to the wall. Ensure any wall anchors have been fitted into the lower holes in preparation for items “C” as the range hood will cover these holes once hung on bracket “S”. Fit items “C” before hanging the range hood refer to Figure 5 for positioning.
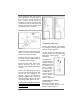
These screws are also used to make minor adjustments to the levelling of the range hood. Ensure the hood is level. Locate the two holes “C” inside the housing of the range hood and secure the range hood to the wall once the range hood is perfectly level and vertical. (refer to Figure 3) Connecting Electricity and Ducting Figure 9 Figure 10 Connecting Chimneys Figure 8 Please refer to the Electrical Supply section on page 2 for the required location of the electrical supply.
Figure 12 Figure 13 grit present – if there is this will most definitely crack the glass. The plastic washers must be positioned between the screw head and the glass. Fit the screen – please have someone hold this in place whilst another person puts in the screws. Using FINGERS ONLY, tighten the screws evenly until finger tight. Do not under any circumstances use a screw driver.
NEVER dispose cigarette ashes, ignitable substances or any foreign objects into blowers. Cooking that generates flame is not recommended as this hood is equipped with a thermal overload that will shut down the motor if it senses excessive heat. When frying, oil in the pan can easily overheat and ignite.
Allow filters to dry before replacing them, otherwise water will be drawn into the blower. If a carbon filter has been fitted, this must be replaced every 6 months as a minimum, depending on usage and type of cooking that is performed. It is suggested that a spare set of carbon filters is kept on hand. These can be ordered from the supplier of your range hood.
Three Year Limited Warranty WARRANTY SERVICE To qualify for warranty service, you must notify Sirius Range Hoods at the address stated below or call toll free USA or Canada 1-866-528-4987 and provide the model number, description of the fault or defect and original date of purchase. Sirius reserves the right to request proof of original purchase.