Satellite Music for Your Business Business Equipment Package Owner's Manual and Installation Instructions Applied Media Technologies Corporation ) 4091 AMTC Center Drive Clearwater, Florida 33764.6976 727.531.3965 sales@amtc.com www.amtc.com & 727.531.
Limited Warranty Applied Media Technologies Corporation ("AMTC") warrants this product against defective material and workmanship for a period of one year from the date of purchase. Except as specified below, this warranty covers parts and labor. The following are not covered by this warranty: 1. Damage, deterioration, malfunction or failure to meet performance specifications resulting from: a) Accident, acts of nature, misuse, abuse, neglect or unauthorized product modification.
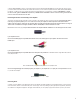
Check Package Contents: Receiver (Model EQ-SIRRCV) - Box includes: Receiver Mounting Bracket (2 pieces) 120VAC to 12VDC 1.2A wall adapter 6-ft.stereo audio cable with 3.5mm stereo plug and dual RCA plugs 25cm dual RCA female to single RCA male (stereo to mono) adapter cable RCA female to 1/4" male mono adapter Earbuds Commercial antenna (Model EQ-SIRANT) 100 ft.
. Plug the NON-THREADED connector on the antenna cable into the receptacle labeled ANTENNA on the upper right end of the receiver. If you must increase the distance between the antenna and the receiver, we stock 50-foot amplified extension cables (AMTC P/N EQ-SIR50X) for $39.95 (+ $5.00 S/H). Up to two of these may be daisy-chained together for a total extension of 100 feet. IMPORTANT!: To unplug the antenna cable, grab the CONNECTOR and pull firmly.
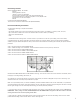
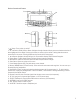
Receiver Controls and Features 1. Button: Turns receiver on and off. 2. Channel Switch (CHAN) & Select Button: Navigates through channels & display screens and makes selections of items highlighted on the display. Pressing up increases or moves up in the menus. Pressing down decreases or moves down in the menus. Pressing in duplicates the function of the Select button. 3. < > Buttons: Navigates through Category List Screen which displays SIRIUS Channel Categories. 4.
Activating your SIRIUS Satellite Music for Your Business Subscription Turn the receiver on by pressing the button. If the receiver is installed incorrectly, it may read “ANTENNA ERROR”. If this happens, unplug power from the receiver and double check the antenna cable connections. If the error message continues after verifying good cable connections, this may indicate poor antenna placement. Please revisit “Placement and Mounting of Your Antenna” on Page 3.
Search Modes (Category, Channel, Artist, Song Title) The receiver has several ways to search for and select music: by channel, by category, by artist and by song title. Searching Channels If you want to find a different channel to listen to, press and hold the DISPLAY button to enter Channel List mode: 1. Use the CATEGORY buttons to scroll through music and entertainment categories. 2. Use the Channel Switch to scroll through the available channels in each category. 3.
Searching for a Channel Preset (P.TUNE Mode) It is possible to quickly search through all of your presets using the Channel Switch. 1. Press and hold the BAND button to enter the Preset Tune Mode (P.TUNE). 2. “Preset Tuning Mode” will be displayed and the top corners of the display will invert to indicate Preset Tune Mode. 3. Use the Channel Switch to move up or down through your presets. Only channels stored in your presets will be displayed, regardless of which bank they are stored in.
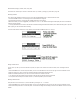
Storing Song Titles 1. While the Receiver is in the Default display mode, momentarily pressing and releasing the MEMO button stores the current program data information within the Receiver’s memory. A memory “Stored” pop-up screen, followed by “X Used/Y Empty” will each appear for 1 second (below). 2. If the MEMO button is pressed and all of the memory spaces are full, S-Seek Full will flash on the display for 1 second, followed by a popup screen presenting the Replace-Cancel options.
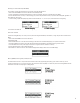
Activating the Song (S-Seek) Alert 1. Press and hold the MEMO button for 3 seconds to enter the S-Seek Mode. 2. Press and release SELECT. A pop-up screen displaying two selectable options - “Delete” and “S-Seek” will appear (below left). 3. Use the Channel Switch to highlight the “S-Seek” option. 4. Press and release SELECT and an S-Seek confirmation screen will appear. Select the “Yes” option using the Channel Switch and press SELECT to confirm (below right).
FM Transmitter Options If you would like to use the built-in FM Transmitter, you must turn ON the function and select an FM frequency: 1. Use the Channel Switch to highlight “FM Transmitter”. Press SELECT. 2. Use the Channel Switch to select “FM On/Off”. Press SELECT. 3. Use the Channel Switch to select “On”. Press SELECT. 4. Use the Channel Switch to highlight the “Frequency”. Press SELECT. 5. Use the Channel Switch and Category Buttons to adjust the FM frequency. The Channel Switch adjusts in 0.
Channel Block The receiver has the ability to lockout the use of any channels you do not want others to access without your permission. Like the Skip feature, the locked channel will not appear when the user changes channels with the Channel Switch. When the user tries to access a locked channel using the Direct Tuning function, the “Enter Code” screen will be displayed and the channel will not be accessed until the proper code is entered.
b. Auto Shutdown: You can program the unit to automatically shut off after a 1-hour period without any user intervention. After 59 minutes of inactivity, a beep tone sounds and a display prompt appears on the screen, “Cancel Auto Shutdown”. To activate the Auto Shutdown feature, use the Channel Switch to select it from the Time Based Features Menu and press SELECT to enter the menu. Once in the Auto Shutdown Menu, use the Channel Switch to either “Enable” or “Disable” the feature.
Troubleshooting If there is no power to the unit: Make sure wall outlet is receiving power (plug in another device). Check power cable connection. If you get the “ANTENNA NOT DETECTED” message: Check connections to antenna. If you've connected your receiver to your amplifier but there is no sound: Make sure the amplifier input selector is set to the input to which you’ve connected the receiver. Connect the provided earphones to the AUDIO jack to confirm that the receiver has output.