SIR-ALP10T ALPINE COMPATIBLE SIRIUS SATELLITE RADIO PLUS TRAFFIC TUNER Installation Guide
Congratulations on your purchase of the SIR-ALP10T, the Alpine Compatible SIRIUS Satellite Radio Plus Traffic Tuner! Your new SIRIUS Radio Plus Traffic Tuner is designed to work with compatible Alpine satellite radio ready headunits and traffic ready navigation systems. Contact Alpine or SIRIUS for model compatibility. What is SIRIUS Satellite Radio? What is SIRIUS Traffic? Over 120 channels of the best entertainment and completely commercial-free music for your car, home or office.
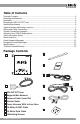
Table of Contents Package Contents ............................................................................................................... 3 Warnings and Cautions ........................................................................................................ 4 Installation ............................................................................................................................ 6 Mounting the SIR-ALP10T Tuner ................................................................
WARNING This symbol means important instructions. Failure to heed them can result in serious injury or death. DO NOT OPERATE ANY FUNCTION THAT TAKES YOUR ATTENTION AWAY FROM SAFELY DRIVING YOUR VEHICLE. Any function that requires your prolonged attention should only be performed after coming to a complete stop. Always stop the vehicle in a safe location before performing these functions. Failure to do so may result in an accident. DO NOT OPEN, DISASSEMBLE OR ALTER THE UNIT IN ANY WAY.
CAUTION This symbol means important instructions. Failure to heed them can result in injury or material property damage. of the hole. HALT USE IMMEDIATELY IF A PROBLEM APPEARS. Failure to do so may cause personal injury or damage to the product. Return the unit to your authorized retailer or nearest service center for repairing. USE THE SPECIFIED ACCESSORY PARTS AND INSTALL THE PRODUCT SECURELY. Be sure to use only the specified accessory parts.
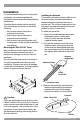
Installation It is recommended that prior to starting the installation, you read completely this installation manual and follow the guidelines listed below: Consider the mounting location carefully. You should make sure that you avoid the following: • Any location where the tuner is exposed to moisture. • Any location where the tuner is exposed to extreme heat. • Any location that would interfere with moving parts on the vehicle or interfere with driving.
Optimum Antenna Mounting Locations The optimum location to mount the antenna is on the roof of the vehicle. It is important to avoid any obstruction that will block the satellite signal, such as a roof rack. For convertible vehicles, install the antenna on the trunk lid as shown. • Place the antenna on a metal surface of your vehicle at least 12" x 12", and at least 6" from a window. (Use the antenna cover/tail as a guide for the proper distance from the rear window.
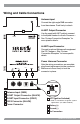
Wiring and Cable Connections Antenna Input Connect the right-angle SMB connector from the antenna. Push firmly to attach. A Ai-NET Output Connector Use the supplied Ai-NET cable to connect to the Alpine Headunit or Audio Processor – See “System Connection Examples” for more specific details. Ai-NET Input Connector Connect to optional Alpine audio equipment like CD Changers - See “System Connection Examples” for more specific details.
Right-angle Antenna (21’ cable) SMB Connector Mount on Roof of Vehicle Note: Connect the RED (ACC/IGN) wire ONLY when using the SIR-ALP10T without an Alpine headunit. DATA Red (Pin 1) – ACC, Connect to Ignition Switched Circuit Ignition Switch Yellow (Pin 2) – Connect to Battery Positive (+) Black (Pin 3) – Connect to Chassis Ground (–) 3.5-meter Data Cable (Connect to Alpine NVE-N872A) 2.
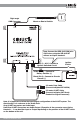
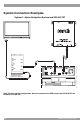
System Connection Examples System 1: Alpine Navigation System and SIR-ALP10T DATA EX-2 DISPLAY Alpine Monitor System (TME-M770 or TME-M710) Alpine Navigation System (NVE-N872A) (REAR VIEW) (FRONT VIEW) Note: For this system configuration, be sure to connect the RED wire on the SIR-ALP10T to a fused ACC or IGN line.
System 2: Alpine Headunit, Alpine Navigation System, and SIR-ALP10T Alpine SAT Ready Headunit (Ai-NET CD Player or Mobile Multimedia Station) Special Note Ai-NET BOTTOM COVER NORM EQ DIV DATA Ai-NET Switch Set to NORM~ Default Setting. (FRONT VIEW) Alpine Navigation System (NVE-N872A) DISPLAY EX-2 (REAR VIEW) Alpine Monitor Headunit Alpine Monitor System (TME-M770 or TME-M710) Note: For this system configuration, DO NOT connect the RED (ACC/IGN) line on the SIR-ALP10T.
System Connection Examples (Continued) System 3: Alpine Headunit, Alpine Navigation System, CD Changer or IPOD Interface, and SIR-ALP10T Alpine SAT Ready Headunit (Ai-NET CD Player or Mobile Multimedia Station) Special Note Ai-NET BOTTOM COVER NORM EQ DIV DATA Ai-NET Switch Set to NORM~ Default Setting.
System 4: Alpine Multimedia Headunit, Alpine Navigation System, CD-Changer or IPOD Interface, and SIR-ALP10T DATA Alpine Multimedia Station Headunit (IVA-D300, IVA-D310, IVA-D901) Hideway Headunit Tuner Module Alpine CD Changer (CHA-S634)/Alpine iPOD interface (KCA-420i) Special Note Ai-NET Bottom of Tuner Module Alpine Navigation System (NVE-N872A) (FRONT VIEW) NORM EQ DIV DISPLAY EX-2 Ai-NET Switch Set to NORM ~ Defaut Setting (REAR VIEW) Note: For this system configuration, DO NOT connect t
System Connection Examples (Continued) System 5: Alpine Multimedia Headunit, Alpine Navigation System, CD-Changer or IPOD Interface, Audio Processor, and SIR-ALP10T DATA Alpine Multimedia Station Headunit (IVA-D300, IVA-D310, IVA-D901) Special Note Bottom of Tuner Module Headunit Input Ai-NET Hideway Headunit Tuner Module Changer Input NORM EQ DIV Ai-NET Switch Set to EQ/DIV Alpine Audio Processor (PXA-H710, PXA-H700) (FRONT VIEW) Alpine Navigation System (NVE-N872A) DISPLAY EX-2 (REAR VIEW) A
Activating Your SIRIUS Subscriptions You must activate the SIR-ALP10T before you can start to receive the SIRIUS Satellite Radio service and the SIRIUS Traffic service. Each is a separate service, and each needs to be activated individually. In order to activate your radio and traffic subscriptions, you will need the two SIRIUS IDs (SIDs) – one for the SIRIUS Satellite Radio service and one for the SIRIUS Traffic service – which uniquely identify your SIRALP10T tuner.
6. The next Setup screen will display the Data SID near the bottom of the screen where it says Sirius ID. Copy the Data SID to the space provided on page 22 of this manual. 4. When the Nav Menu screen is displayed, touch the Setup button, or select it by tilting the joystick to highlight it and press the ENTER button. Activating the SIRIUS Audio and/or Data Services 5.
Traffic Information Setup The traffic information setup controls the way the traffic and navigation information is displayed. To review and/or change these parameters: 1. Turn on the Alpine navigation system and monitor/display. 2. The navigation system will display a disclaimer notice. Select I ACCEPT to proceed. 3. When the map screen is displayed, touch the menu icon in the upper right corner of the display screen. 4.
it by tilting the joystick to highlight it and press the ENTER button. Selecting the Default button will choose to display all traffic incident icons. Traffic Speed Flow To change the Traffic Icon setting, touch Traffic Icons, or select it by tilting the joystick to highlight your selection and press the ENTER button. When the system receives information about traffic flow (congestion), you can choose whether to display the traffic flow information on the map screen.
To change the Detour Based On setting, touch Detour Based On, or select it by tilting the joystick to highlight your selection and press the ENTER button. Traffic: The system will provide a detour by considering traffic congestion reported along the route within 30 miles ahead of the vehicle. This option should be chosen if you plan to use the detour feature to avoid traffic congestion. Distance: the system will provide a detour by considering the distance selected by the user.
4. The Traffic Incident List screen is displayed and provides a list of traffic incident information in the vicinity of the vehicle. There are several options available to you from this screen, which are described in the following sections: Traffic Incident Touching a specific traffic incident from the list (or selecting it by tilting the joystick to highlight it and pressing the ENTER button) will display details about the traffic incident.
Viewing Traffic Speed and Flow Icon Information Icon When you have set the system to display traffic speed and flow icons on the map display (discussed previously), the icons are displayed in several shapes and colors to indicate traffic speed. Red Square Speed 0-10 mph 0-20 km/h Yellow Diamond 10-45 mph 20-90 km/h Green Dot 45+ mph 90+ km/h Traffic incident icons and detailed information is available for all reported incidents. Audio Headunit Messages These messages vary by headunit model.
Specifications Operational Frequencies Satellite ............................................................................. 2322.293/2330.207 MHz Terrestrial .......................................................................................... 2326.250MHz Power Requirements ......................................................................... 8-16 Volts DC Fuse Type ..........................................................................................
12 MONTH LIMITED WARRANTY Sirius Satellite Radio warrants to the original retail purchaser of this product that should this product or any part thereof, under normal use and conditions, be proven defective in material or workmanship within 12 months from the date of original purchase, such defect(s) will be repaired or replaced with new or reconditioned product (at the Company’s option) without charge for parts and repair labor.
SIRIUS Satellite Radio 1221 Avenue of the Americas New York, NY 10020 (888) 539-7474 www.sirius.com © 2005 SIRIUS Satellite Radio Inc. ® SIR-ALP10T Manual (101805a) “SIRIUS” and the SIRIUS dog logo are registered trademarks of Sirius Satellite Radio Inc.