
User Manual


Install your XM Radio in your vehicle as described in your XM Radio User
Manual but do not connect the XM antenna plug to the dock at this time.
1.
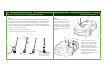
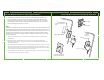
Locate your vehicles FM antenna and determine the best routing method to
get the FM Coupler output cable to the FM antenna. (For external antennas
(figure a), the Coupling Clip needs to be routed outside the vehicle. For
internal on glass antennas (figure b), all routing is inside the passenger
compartment and the Contact Bracket is used.
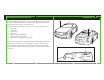
4.
Connect the FM Coupler input cable to the XM radio or vehicle dock
antenna input.
2.
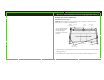
The following steps will guide you through the installation of your FM Coupler
3.
Connect the XM Antenna to the FM Coupler antenna input, located on the
coupler module about 2 feet from the end of the input cable. Tuck any excess
input cable and the coupler module behind dash or in another hidden
location for a professional looking installation.
5.
To route the output cable with Coupling Clip to your vehicle FM antenna,
follow the instructions on the next pages . There are separate instructions for
external antenna vs the internal on glass antenna. Follow the instructions
that apply to your vehicle’s antenna type. (This guide assumes you have
already installed your XM antenna per the instructions in your XM radio user
guide. The positions of the XM antenna in the illustrations below is for
example only. There is no need to change your XM antenna installation.)
no boot necessary
glass
contact
bracket
inside your
vehicle
outside
car dock
XM car
antenna
coupling
clip
coupling
module
input
cable
output
cable
External AntennaConnecting the Components Internal on-glass antenna
boot
power
XM antenna
Installation Setup Installation Setup
6 7
or
Figure 1 Figure a Figure b