
User Manual


3.
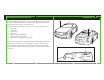
The FM antenna will have a single contact point and the Defogger will have two,
which are typically on opposite sides of the window. (The contact points may be
hidden behind interior liners or exterior glass tinting but the key is to locate where
the elements go off the window edge. The FM antenna will have only one location
where the defogger can have two or more.)
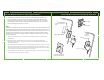
contact bracket with
arrows for alignment
contact strip
adhesive pads
antenna element in
glass
no boot
required
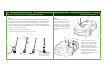
c.
The Contact Bracket has alignment arrows on the side opposite the adhesive pads. These arrows
indicate the contact strip location on the base of the bracket. Align the arrows with the on glass
antenna element to ensure you make direct contact between the strip and the antenna element.
Press and hold the Contact Bracket in place for 10 to 15 seconds.
b.
Remove the red liner from the adhesive pad and press the Contact Bracket firmly at the
identified mounting location on the glass. You can also view the alignment through the glass
from outside the vehicle.
d.
Once the Bracket is in place, attach the Coupling Clip to the flange on the Bracket and route any
excess cable behind liners for a professional look.
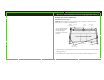
Install the Contact Bracket on the interior window surface over the antenna element using
the adhesive pad provided and the following steps. It may be mounted either vertical or
horizontal depending on the portion of the antenna element most easily accessed. Select
a bracket position that allows room to attach the Coupling Clip and cleanly run cables.
Install the on glass antenna coupling clip before routing the cable to avoid excess cable
outside your vehicle
Clean the mounting location on the glass for the Contact Bracket with the included surface
preparation kit.
a.
12 13
Internal On Glass Antenna Coupling Clip Installation Internal On Glass Antenna Coupling Clip Installation
(a)
(b)
(c)
(d)
Step 1: