
Owner's Manual


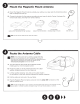


Find a Location for the Vehicle
Dock and Mount it
Select
eithe
r
the
Dash Mount
or
the
Vent
Mount
method
for
mounting
the
Vehicle
Dock. You
w i
ll
need a
phillips
screwdriver
to
complete
the
installation.
rD
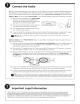
NOTE:
Your Radio may be
a different
mode
l
than the Radio shown here.
e1111
TIP!
You
can take advantage
of
the wire gui
de
channel across the back
of
the Vehicle Dock to organize the wires which
conntct
to the dock.
Dash Mount Method:
•
IMPORTANT:
The
air
temperature
needs
to
be
at
least
60°F
to
instal l
the
Dash Mount.
If
needed
, turn on the
heater
in
your veh
ic
le.
A.
Se
l
ect
a
flat surface
for
the
Dash
Mount
with
ample
room
for
the
Vehicle Dock and Radio. Avoid
mounting
on
leather surfaces. Choose a
location
that
doesn't
interfere
with
the
driver's vision
or
access
to
driving
contro
l
s,
one
that
won't
interfere
with
the
deployment
of
airbags
or
other
safety
equipment, and makes
your
Radio
easily accessible
for
operation.
(Airbag
l
ocat
ions
are
typically
marked wi
th
"SRS" logos.)
B.
Orient
the
adhesive
foot
so
that
your
Radio
is
easily accessible.
Loosen
the
knob
and
ad
j
ust
the
adhesive
foot
to
posi
t
ion
1,
2,
or
3,
and
then
t
ighten
it.
C.
At
t
ach
the
Dash
Mount
to
the
PowerConnect
Vehi
cle
Dock
using
the
4
provided
screws.
If
you
plan
to
use
the
wire
guide
channel
across
the
back
of
the
Vehicle
Dock
to
organize
the
wires,
do
not
fully
tighten
the
screws.
If
not,
tighten
the
screws.
D.
Clean
the
mounting
surface
in
the
vehicle
w
ith
the
alcoho
l
pr
eparation
pad
and
l
et
it
dry
thoroughly.
E.
Once
the
surface is dry, r
emove
th
e
adhesive
lin
er.
Press
and
hold
the
Dash
Mount
in
place
for
30
seconds.
A ll
ow
the
adhesive
to
cure
for
at
least
2-4
hours.
F.
You can
tilt
the
clock
mounting
plate
in
your
preferred
direction.
(Note
that
for
clarity
the
illustr
ation
does
not
show
the
Vehicle
Dock
attached
to
the
Dash
Mount.)
Vent
Mount
Method:
A.
Select
a
vent
with
ample
room
for
the
Vehicle
Dock
and Radio,
one
th
at
won't
interfere
with
the
deployment
of
airbags
or
other
safety equipment, and makes
your
Radio
easily accessible
for operation.
(Airbag
locations
are
typica
lly
marked with
"SRS" logos.)
B.
Some
vents
have recessed
louvers. If
you
rs are recessed,
remove
the
regu
l
ar
ve
nt
clamps
and
install
the
extended
vent
c
lamp
s.
Vent
Mount
Rear
View
Slide
Left
Clamp
to
Pull Clamp
Out
Hole
in
Center
Towards
You
-
.
i'-~
li
'
Insert
Round End
of
the
Extended
Clamp
in
the
Center Hole
;
l--...-__..
j
Slide Clamp
to
Left
to
Complete
Installation
Round
End
+
~
+-Or
i
entation
C.
Attach
the
Vent
Mount
to
the
PowerConnect
Vehicle
Dock
using
the
4
provided
screws.
If
you
plan
to
use
the
wire
gu
i
de
channe
l
ac
ross
the
back
of
the
Vehicle
Dock
to
organize
the
wires,
do
not
fully
tighten
the
screws.
If
not,
tighten
the
screws
.
D.
Install
the
Vent
Mount
onto
the
vehicle
vent.
(Note
that
for
clarity
the
illustrations
below
do
not
show
the
Vehicle
Dock
attached
to
the
Vent
Mount.)
i.
In
sert
the
vent
mount
into
the
vent
openi
ng.
II.
Pu
sh
until
hooked
on
the rear
of
the
ven
t
lou
ver
. Rest
the
foot
against
the
bottom
of
the
vent.
Repeat
to
Replace
Right
Clamp
iii.
If
necessary
,
adjust
the
ti
lt
of
the
Vent
Mount
by
repositioning
the
foot
to
a
different
t
ilt
adjustment
hole.
II
r
~
""'-.~
/
HOOKED
Vent
Ill
r.
'